


Difference between revisions of "Battery Backup Setup for xPAP"
JohnBFisher (talk | contribs) |
JohnBFisher (talk | contribs) |
||
| Line 160: | Line 160: | ||
I also specifically chose a flat top to allow me to modify the top to make it that much more modular than with the rounded top. | I also specifically chose a flat top to allow me to modify the top to make it that much more modular than with the rounded top. | ||
| + | |||
| + | |||
| + | |||
| + | |||
| + | == Shared Use Connector == | ||
| + | |||
| + | The secret to this design is the shared use connector. That is, at the same time you charge the battery, the battery can also be connected to an inverter. To do this, you have one of two options. I decided to modify the Battery Box and provide a connector that was securely anchored to the battery. I did not want a loose wire to result in a clamp being pulled loose from the battery. However, it is also reasonable to just use a Y connector. | ||
| + | |||
| + | These SAE connectors are available at [url=http://www.powerlet.com/]Powerlet.com[/url]. The model I chose was the "Luggage Electrix Connector and Cigarette Socket". The model number is PTB-003. Though this is more expensive, as the image shows, it is firmly connected to the battery box. | ||
| + | |||
| + | [img]http://i754.photobucket.com/albums/xx183/JohnBFisher/shared-use-connector-01of02.jpg[/img] | ||
| + | |||
| + | However, the Y connector only is also available: | ||
| + | |||
| + | [img]http://i754.photobucket.com/albums/xx183/JohnBFisher/shared-use-connector-02of02.jpg[/img] | ||
| + | |||
| + | As you can see from the completed battery box, the connector between the battery minder and Y cable is very sturdy and unobtrusive. Wires hanging all over the place is not a good choice for me (due to incoordination). Many others might prefer this, especially if children or animals might tug on the wiring. | ||
| + | |||
| + | I used a drill and a bit to drill the holes for the bolts. I also used a drill with a bit to drill holes to drill the center opening in the battery box. This seemed to be the easiest approach to create the openings in the side of the Battery Box. | ||
| + | |||
| + | First is the modified box with the connector installed. | ||
| + | |||
| + | [img]http://i754.photobucket.com/albums/xx183/JohnBFisher/battery-box-01of03.jpg[/img] | ||
| + | |||
| + | Next is a close up picture of the connector. It can be closed for easy and safe transportation, such as to take the battery car camping (if power if not readily available at the camp site). | ||
| + | |||
| + | [img]http://i754.photobucket.com/albums/xx183/JohnBFisher/battery-box-02of03.jpg[/img] | ||
| + | |||
| + | Finally, the connector can be opened and the Y Cable (the shared use connection cable) can be inserted into the connector. | ||
| + | |||
| + | [img]http://i754.photobucket.com/albums/xx183/JohnBFisher/battery-box-03of03.jpg[/img] | ||
| + | |||
| + | On the inside, the connector is firmly bolted to the battery box cover. The highlighted area shows that it presents the same connector as the end of the cable that leads from the battery tender. Thus, it can connect to either the battery clamp or the battery ring terminal harness. Either of those can then connect to the battery. | ||
| + | |||
| + | [img]http://i754.photobucket.com/albums/xx183/JohnBFisher/inside-box-01of04.jpg[/img] | ||
Revision as of 21:03, 10 February 2010
The following battery backup design is under edit. I will continue to edit it here until it is complete. At that time, I will move it into the Wiki. However, I thought you might enjoy seeing it come together. It might help those of you who want to put together a battery backup setup. And of course, I welcome input, though remember - I am sharing what I've done over the years - not a generic approach. But I am trying to make it generic enough for everyone else to pick up and use.
Introduction
Objectives
First, with this setup, if you know there is a possibility power may be interrupted, you can plug into this setup and use the battery. If power goes out, the setup is such that your xPAP unit can continue uninterrupted. When power is restored, the battery tender will gradually recharge the battery to full capacity.
Second, the design is fairly modular to allow you to customize this. You can keep it simple, or go a bit more complicated and make it sturdier.
Third, this is designed to stay in the bedroom. No need to drag the battery in and out of the house. But it is also designed to allow you to make it so little fingers won't be hurt with this setup.
Special Features
This setup allows you to use a modular approach to the power setup. You can choose your battery size. You can choose amount the battery tender options. You choose the shared use option. Make it as simple or as sturdy as you need. You can choose the DC to xPAP hookup. Choose the options to suit your needs. This approach means you can configure this to meet your needs. Additionally with this type of setup, it will help the battery last longer than if it is stored without the "float" charge, which keeps the battery charged and ready to use.
Note about Web sites
I have no affiliation with any of the web sites. I selected and used these products to make this setup for myself. Feel free to tinker and adapt it as you see fit.
Note about the application
I researched this as best as possible. I've used deep cycle batteries and an inverter for the past 10 years. However, this is the first setup I designed to stay indoors to provide continuous power. Though it should work and others will help improve the design, please understand if you use this design, you will do so at your own risk. (But it should work for you, if you follow the directions).
Note about the construction
By making this a modular design, you can either do some minor customization, or use a simpler approach to connect the components. I took an approach that does a good job of anchoring all the pieces. The advantage of this is that no parts will accidentally short. Nor will it allow little fingers to accidentally be hurt.
Note about humidifier use
Humidifiers consume a lot of power. ResMed humidifiers require pure sine wave inverters, which are both more expensive and use much more power. Thus, this design is primarily intended to be used without a humidifier. The humdifier can be attached, but turned off. It will then function as a "passover" humidifier.
Shopping List
1. Battery 2. Battery Tender 3. Battery Box 4. Shared Use Connector 5. Marine Terminal Coversion & Covers 6. DC to xPAP Hookup[/list]
Battery
Deep Cycle Battery
Of course at the core of the unit is the deep cycle battery. There are many options of battery that can be used. I recommend the following links to provide an excellent FAQs for batteries:
Battery FAQ - [1] Battery Tutorial - [2]
ResMed also provides a battery guide at the link below for their flow generators. It also includes some basic information about batteries. It is well written and easy to understand.
ResMed Battery Guide - [3]
Why use a Deep Cycle battery?
To quote from the WindSun website (above):
"Deep cycle batteries are designed to be discharged down as much as 80% time after time, and have much thicker plates. The major difference between a true deep cycle battery and others is that the plates are SOLID Lead plates - not sponge. This gives less surface area, thus less 'instant' power like starting batteries need. Although these an be cycled down to 20% charge, the best lifespan vs cost method is to keep the average cycle at about 50% discharge."
So, the deep cycle battery can last 4 to 8 years and be reused over and over and over.
Other choices include AGM deep cycle batteries and Gelled deep cycle batteries. From my research I found that a standard deep cycle battery provided the best price performance. As I noted, I've used one for about the past 10 to 15 years without problem, so I am sticking to that for this design. That is, during the past 10 to 15 years I used two different deep cycle batteries. I just purchased my third. So, the design works well and lasts a long time.
Note: It is best to purchase a sealed, maintenace free deep cycle battery.
What about UPS units?
Well, they can be an option. Some xPAP units require more power than most UPS units provide. Larger UPS units (though more expensive) can be used to power more current xPAP units.
What about portable batteries?
These certainly can also be used. However, the cost of those batteries are prohibitive for the power requirements of my ASV unit. Thus, I selected a deep cycle battery to keep my unit going for a couple nights.
What about car batteries?
Standard car batteries should NOT be used. They typically are designed to provide a quick boost of energy to start an engine (cold cranking amps), instead of being designed for deep cycle operations. A deep cycle will often ruin such batteries after one or two times they are used.
How much power do I need?
ResMed provides a handy Battery Guide to help understand how to hook up and use battery backup for your ResMed unit.
ResMed Battery Guide - [4]
For instance, I use a ResMed VPAP Adapt SV Enhanced unit. To use this unit without a humidifier, I need to use a modified sine wave Inverter. That inverter must provide at least 150W sustained output. If I use a humidifer with my ASV unit, I need to use a pure sine wave inverter with at least 300W sustained output and upto 500W peak output. See page 7 of the battery guide for more information.
Then based on the pressure setting of my unit, I can determine the size of the battery that I need. On page 13 there is a table titled "AutoSet CS2/VPAP Adapt powered with inverter". My unit uses an ending exhalation pressure (EEP) of 7. To be conservative, I will choose 8 from the table. So, to last 8 hours WITHOUT a humidifier, my unit needs upto 26 amp-hours. To last 8 hours WITH a humidifier, my unit needs upto 58 amp-hours:
File:Http://i754.photobucket.com/albums/xx183/JohnBFisher/battery-guide-01of01.jpg
How long will power be out?
In my area the power rarely is out more than 2 days. In fact, most of the time power is out only for a few hours. However, 2 days provides enough leeway to handle most emergencies.
So, with 2 nights of service but without a humidifier, I will need over 52 amp-hours (AH) from a deep cycle battery. Thus, I purchased a deep cycle battery rated at 55 amp-hours.
What if I had a ResMed S8 AutoSet Spirit II?
In that case, I probably would want to use a DC Converter. If my average treatement pressure was 16, then per the ResMed Battery Guide on page 15, it indicates I would need only 15 amp-hours to run the unit for 8 hours.
File:Http://i754.photobucket.com/albums/xx183/JohnBFisher/battery-guide2-01of01.jpg
So, to last two nights, I would need a deep cycle battery rated for 30 amp-hours.
What about other units?
Other units by other manufacturers require a little more calculation. ...*** To Be Completed ***...
Where to purchase a deep cycle battery?
I found my deep cycle battery at [url=http://www.batteriesplus.com/]Batteries Plus[/url]. You can also find them at many automotive stores as well as Sears and other stores with automotive departments. Be careful that you purchase a battery that is a deep cycle battery. Rembmer that in this case, cheaper is probably going to be just that - cheaper. It is worth paying more for a battery that will last longer and not die in the middle of a power outage.
Battery Tender
With standard lead acid batteries and especially deep cycle batteries that are only periodically used, it is important to keep them charged to maintain their chemistry and charge. If left uncharged for a prolonged period of time it irrevocably damanges the battery.
To maintain this charge, you can periodically maintain the charge. For example, once a month charge the battery. However, if time elapses and the battery is not charged, damage can be done.
It is possible to maintain a trickle charger. However, unless it is designed to stop charging the battery, if left on too long a trickle charger can over charge a battery and thus permanently damage a battery.
Instead, the easiest and best way to maintain the charge on a battery is to use a Float Charger. This maintains the charge on the battery, but stops charging once it senses the battery is fully charged. For more information on trickle and float chargers, see the wikipedia article - [5]
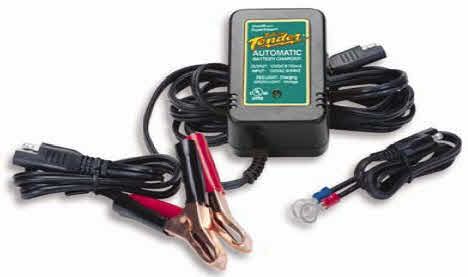
Though others are available, I chose the Battery Tender Jr. charger:
[img]http://i754.photobucket.com/albums/xx183/JohnBFisher/battery-tender-jr-01of01.jpg[/img]
It is available at:
Since I only rarely see power outages, the Battery Tender Jr delivers an adequate charge rate to maintain my battery. If you anticipate you will use the battery more frequently, or want to always remain plugged into the battery backup unit, then a more powerful Battery Tender unit will be needed.
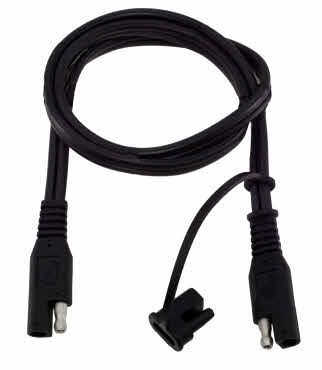
Additionally, one of the advantages of the Battery Tender models is that they use the SAE automotive connectors. So, you can easily add an extension cord to the unit, such as those found at [url=http://www.powerlet.com/]Powerlet.com[/url]:
[img]http://i754.photobucket.com/albums/xx183/JohnBFisher/sae-extension-01of01.jpg[/img]
Battery Box
There are several key disadvantages to batteries in the bedroom.
First, one of the disadvantages of lead acid batteries is that they do contain acid! Even sealed batteries can leak. That's certainly not somethng that I want uncontained within my bedroom.
Second, it is possible pets and/or little fingers might want to explore the battery. These batteries contain a good deal of power and might hurt those naive, inquisitive fingers and noses. So, sealed and protected makes the most sense for a battery in the bedroom.
Finally, though it probably won't occur, left uncovered and unsealed, it is possible clamps may be knocked off of the battery. Again, this can damage the battery and possibly cause other problems.
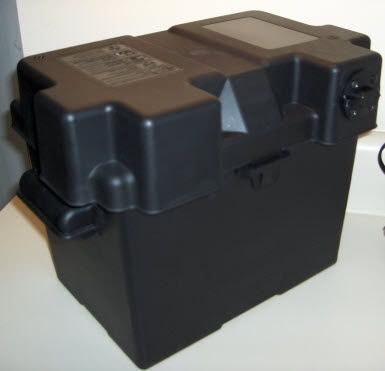
For for all three reasons an ounce of prevention is worth a pound of cure! And to do this, I chose a plastic battery box, such as the following image:
[img]http://www.batteriesplus.com/images/Product/Large/39218.jpg[/img]
It was available at the [url=http://www.batteriesplus.com/]Batteries Plus[/url] store, where I purchased the battery and the Battery Tender Jr.
I also specifically chose a flat top to allow me to modify the top to make it that much more modular than with the rounded top.
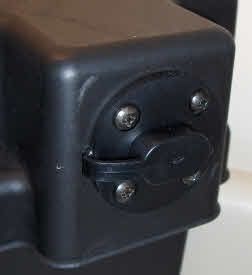
The secret to this design is the shared use connector. That is, at the same time you charge the battery, the battery can also be connected to an inverter. To do this, you have one of two options. I decided to modify the Battery Box and provide a connector that was securely anchored to the battery. I did not want a loose wire to result in a clamp being pulled loose from the battery. However, it is also reasonable to just use a Y connector.
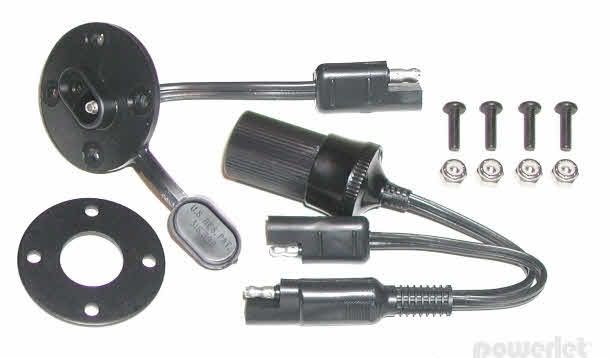
These SAE connectors are available at [url=http://www.powerlet.com/]Powerlet.com[/url]. The model I chose was the "Luggage Electrix Connector and Cigarette Socket". The model number is PTB-003. Though this is more expensive, as the image shows, it is firmly connected to the battery box.
[img]http://i754.photobucket.com/albums/xx183/JohnBFisher/shared-use-connector-01of02.jpg[/img]
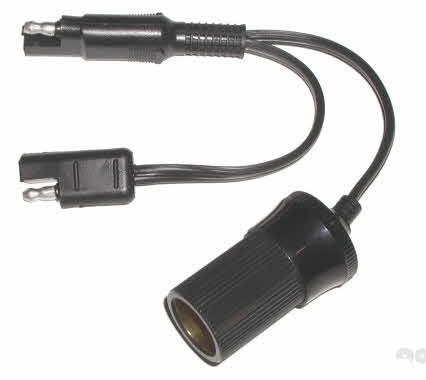
However, the Y connector only is also available:
[img]http://i754.photobucket.com/albums/xx183/JohnBFisher/shared-use-connector-02of02.jpg[/img]
As you can see from the completed battery box, the connector between the battery minder and Y cable is very sturdy and unobtrusive. Wires hanging all over the place is not a good choice for me (due to incoordination). Many others might prefer this, especially if children or animals might tug on the wiring.
I used a drill and a bit to drill the holes for the bolts. I also used a drill with a bit to drill holes to drill the center opening in the battery box. This seemed to be the easiest approach to create the openings in the side of the Battery Box.
First is the modified box with the connector installed.
[img]http://i754.photobucket.com/albums/xx183/JohnBFisher/battery-box-01of03.jpg[/img]
Next is a close up picture of the connector. It can be closed for easy and safe transportation, such as to take the battery car camping (if power if not readily available at the camp site).
[img]http://i754.photobucket.com/albums/xx183/JohnBFisher/battery-box-02of03.jpg[/img]
Finally, the connector can be opened and the Y Cable (the shared use connection cable) can be inserted into the connector.
[img]http://i754.photobucket.com/albums/xx183/JohnBFisher/battery-box-03of03.jpg[/img]
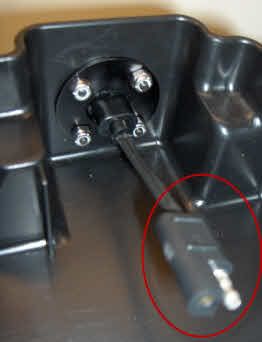
On the inside, the connector is firmly bolted to the battery box cover. The highlighted area shows that it presents the same connector as the end of the cable that leads from the battery tender. Thus, it can connect to either the battery clamp or the battery ring terminal harness. Either of those can then connect to the battery.
[img]http://i754.photobucket.com/albums/xx183/JohnBFisher/inside-box-01of04.jpg[/img]
To Be Continued ...