How to build your own manometer at home

General Discussion on any topic relating to CPAP and/or Sleep Apnea.
User avatar
feeling_better
Posts: 802
Joined: Sun Jun 01, 2008 7:08 pm

How to build your own manometer at home

Post by feeling_better » Tue Sep 23, 2008 6:19 pm

It is fairly easy to build at home an accurate manometer for measuring the pressure ranges used in cpap. It looks so simple, but I dare say it would be more accurate than most dial types sold to consumers, unless you are willing to fork off a good sum of money

There was at least one other post in this forum on building a manometer. This was one has a couple of features to make it easier to read, and measure the pressure while you use the system, rather than just check the static pressure of your machine when there is no flow of air.

All you need is piece of clear flexible tube, similar to the one used in home aquariums, a centimeter graduated ruler, and plastic water pipe 1/2 tee, two small pieces of 1/2 pipe a cork or plastic equivalent from a very good quality wine bottle that will fit snugly into the tee. If the ruler has hole at one end, it is easier to hand this vertically on the wall, but you can probably tape it with masking tape to the wall. The two photos below shows the completed manometer, and the connection/insertion into the cpap tube. BTW, the slightly colored area is a little bit of water colored with food coloring so it is clearly visible.

Below, I am using a thinner tube than the aquarium type, since I happen to have that. If you use such thinner tube, it is a good idea to add a very small drop of liquid soap as well to the colored water, so that surface tension induced errors are minimized.

The tube is attached to the ruler with rubber bands or other things, such that it is not constricted at the point of support. A hole just small enough to snugly fit the tube is made (this hole should go clear thru the cork), the tube inserted into the cork, and the cork is inserted into the tee. You add the colored water into the tube. Now see the important Notes below, follow them carefully, if you wish to make your meter accurate.

Image
Image

Note 1. Pour just enough of the colored water, so that when held vertically, the two vertical portions of the tube will be filled exactly to the 10 cm mark on the scale. This simple trick makes the pressure reading much easier. When there is positive pressure in the cpap tube, water in the left open side of the tube will go up, and the one in the right side will go down. Suppose the left side level under some pressure you want to measure stands at 14.5 cm. Then the pressure you are reading is (14.5-10) * 2 = 9cm.

Note 2. Make sure the left arm of the tube is above the 20cm mark on the ruler, so that at the highest cpap pressure of 20cm, the water will not be pushed out of the meter. Adjust this level longer if your machine goes above 20cm.

Note 3. Use clean, distilled water, and the measurement will be more accurate, and the water can stay in the tube for a long time without something growing in it

Note 4. The ruler can be at any level, higher or lower than the cpap end, and you can use as long a clear tubing as you want without affecting accuracy.

Note 5. I have added a snugly fitting self threading screw to the top of the left open end (sorry not very clear). This is not essential, but this would minimize accidental spilling of the water, if the tube with the water is somewhat tilted. If you use this, make sure the left hole is not closed off completely; that is why I use the self threading screw which has cut notch at the beginning; only just enough inserted to leave a hole. You can check if there is sufficient opening here by tilting the ruler left or right from the vertical. The level in the two sides should change and when you bring back to the vertical it should get back to the original equal height fairly quickly.

----------
Edited 2008.9.24
Note 6. When you inserted the cork into the tee, inserted it enough so that a small portion of the end of the cork can be seen when viewed through the other two holes of the tee. This is important for accuracy. The aim is to make the cross section of the tube where the cork (with the vinyl tube just jutting out) is the same as the cross section of your cpap tube. If it is blocked off too much or opened out too much by the cork not going up to there, venturi effects may cause some small pressure error to be introduced. Do not be too concerned about this, if you do not quite follow this.
-----------

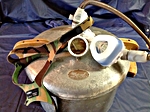
Now, how to measure how much drop is there when using the cpap at a certain pressure and flow, without wearing the mask: See the photo below.

Image
I am using the Swift LT nasal pillow. The green ear plugs will simulate 0 unintended, but normal flow through the out port at that pressure. If you use another type of mask, you need to figure out to seal the normal interface area of the mask, while keep the out port clear.

To measure the drop in a 2' length of cpap tube at a pressure of say 10cm, you set the machine for 10cm. Insert the manometer tee to one end of the 2' tube. Run the machine, read the pressure. It would be very close to 10cm. Now stop, move the tee to the other end and measure again. The difference between the above reading is the pressure drop in the 2' tube under the flow the outport at that pressure.

Suppose including your unwanted leak the flow is twice that at that pressure. Then the drop in the tube under the leak condition will be twice that of you measured. You would find this pressure drop very very small for a 2' tube length.

To measure the drop through a bacteria filter, you do a similar measurement with the tee inserted close to the filter on the machine end, and then again close to the filter at the mask end. Find the difference.
Last edited by feeling_better on Tue Oct 28, 2008 3:08 pm, edited 2 times in total.
Resmed S9 Elite cpap mode, H5i Humidifier, Swift FX Bella L nasal pillows

User avatar
dsm
Posts: 6996
Joined: Mon Jun 20, 2005 6:53 am
Location: Near the coast.

Re: How to build your own manometer at home

Post by dsm » Tue Sep 23, 2008 8:06 pm

Feeling Better,

That is an excellent effort. very neat.

Cheers DSM
xPAP and Quattro std mask (plus a pad-a-cheek anti-leak strap)

Sleepy55
Posts: 28
Joined: Tue Aug 26, 2008 3:02 pm

Re: How to build your own manometer at home

Post by Sleepy55 » Tue Sep 23, 2008 8:14 pm

Feeling_Better,

Thanks for taking the time to share the details of your wonderful invention. I shall try this soon and report back on my results.

_________________
Mask: FlexiFit HC431 Full Face CPAP Mask with Headgear
Additional Comments: 22 IPAP/ 20 EPAP / Bi-Flex Mode (No Backup Rate) / Mindray PM-60 Pulse Oximeter

User avatar
freepostg
Posts: 205
Joined: Tue Mar 18, 2008 3:32 pm
Location: Northwestern Ontario, Canada

Re: How to build your own manometer at home

Post by freepostg » Tue Sep 23, 2008 8:22 pm

You're hired! What a mind..thanks!

_________________
Mask: AirFit™ P10 Nasal Pillow CPAP Mask with Headgear
Humidifier: S9™ Series H5i™ Heated Humidifier with Climate Control
Additional Comments: Also S8 Elite w/humidifier

User avatar
JeffH
Posts: 2153
Joined: Mon Dec 04, 2006 3:44 pm

Re: How to build your own manometer at home

Post by JeffH » Tue Sep 23, 2008 9:06 pm

They are simpler than that. This is all you need to do...just double the numbers because you are pushing down and then up. This one took about 5 minutes to build.

Image

_________________
Mask
Additional Comments: Equipment isn't correct, S9 ASV w/H5i

User avatar
Babette
Posts: 4231
Joined: Mon Apr 30, 2007 5:25 pm

Re: How to build your own manometer at home

Post by Babette » Wed Sep 24, 2008 2:13 pm

Dang it! I'm just not that handy.... I'll send you $20 to make me one! Of course, I'll expect you to throw in a free koala bear....

LOL,
Babs

_________________
Machine: PR System One REMStar 60 Series Auto CPAP Machine
Additional Comments: Started XPAP 04/20/07. APAP currently wide open 10-20. Consistent AHI 2.1. No flex. HH 3. Deluxe Chinstrap.
I currently have a stash of Nasal Aire II cannulas in Small or Extra Small. Please PM me if you would like them. I'm interested in bartering for something strange and wonderful that I don't currently own. Or a Large size NAII cannula. :)

User avatar
tomjax
Posts: 1093
Joined: Mon Feb 14, 2005 1:20 am
Contact:

Re: How to build your own manometer at home

Post by tomjax » Wed Sep 24, 2008 3:17 pm

All these Rube Goldberg thingies look good and will probably work fine.

I posted my VERy SIMPLE remedy and nobody even mentions trying it.

The exact same principle is involved as these other ones, just direct.

Simply hold or tape or rubber band a ruler to the bottom of the hose.
Bottom of ruler to bottom of hose with long end up the length of the hose.

Lower this about 6 inches into a container of water. turn on machine and very gradually raise ruler tieh hose up until bubbles start escaping.
Look at length of ruler from otip of hose to top of water.
This is your pressure.

May have co convert if 12 inch ruler is used instead of metric.

This measures the pressurein cm of air needed to suopport a column of water. SIMPLE.

fuzzy96
Posts: 448
Joined: Sun Sep 02, 2007 5:34 pm
Contact:

Re: How to build your own manometer at home

Post by fuzzy96 » Wed Sep 24, 2008 3:32 pm

pretty cool guys , i want to see the tim allen version..///// anyone got one yet????? mmmmmmmmmm more power!

User avatar
feeling_better
Posts: 802
Joined: Sun Jun 01, 2008 7:08 pm

Re: How to build your own manometer at home

Post by feeling_better » Wed Sep 24, 2008 3:43 pm

I have edited my original post and added Note 6. This is for making your meter more accurate.
Resmed S9 Elite cpap mode, H5i Humidifier, Swift FX Bella L nasal pillows

danw61
Posts: 124
Joined: Wed Aug 29, 2007 5:17 pm
Location: Southern California
Contact:

Re: How to build your own manometer at home

Post by danw61 » Wed Sep 24, 2008 4:47 pm

tomjax,
I like your method... sounds easier.
Thanks,
-Dan

User avatar
Snoredog
Posts: 6399
Joined: Sun Mar 19, 2006 5:09 pm

Re: How to build your own manometer at home

Post by Snoredog » Thu Sep 25, 2008 11:37 am

That will do it, I have made several but currently use a F&P manometer. But I have a U-tube manometer from Dwyer along with a Magnehelic gauge but they are in Inches of H2O not centimeters.

Note: If you use a wooden stick like a lath stick and round one end and simply wrap that clear tubing around the edge you can tape the tubing to the stick with clear shipping tape. Since the end is round it rolls around it nicely.

The stick will need to be more than 20 cm's long with the Zero line in the center, when it measures 4 cm above the zero line you double the reading for the total cm value (i.e. 4cm above + 4 cm below = 8 cm pressure).

If you want a baseline "intentional" leak for accurate measurement you incorporate a cap on the end of the hose with a 4 mm hole, this allows for intentional leak which should be included in any recalibration.

It doesn't take much to get accurate readings. I found my 420e off by 1 cm, luckily it has an adjustment for that to bring its LCD reading into calibration.
someday science will catch up to what I'm saying...

User avatar
StuUnderPressure
Posts: 1378
Joined: Mon Jun 18, 2012 10:34 am
Location: USA

Re: How to build your own manometer at home

Post by StuUnderPressure » Fri Dec 14, 2012 10:02 am

Old thread also revived.

_________________
Machine: AirCurve™ 10 VAuto BiLevel Machine with HumidAir™ Heated Humidifier
Additional Comments: Cleanable Water Tub & Respironics Premium Chinstrap
In Windows 10 Professional 64 bit Version 22H2 - ResScan Version 7.0.1.67 - ResScan Clinician's Manual dtd 2021-02

SD Card Formatter 5.0.2 https://www.sdcard.org/downloads/format ... index.html

johnthomasmacdonald
Posts: 977
Joined: Sun Sep 02, 2012 1:48 pm
Location: northwest new jersey and Boston Mass

Re: How to build your own manometer at home

Post by johnthomasmacdonald » Fri Dec 14, 2012 10:58 am

very cool

_________________
Mask: Mirage Quattro™ Full Face CPAP Mask with Headgear
Additional Comments: Resmed ASV adapt enhanced - epap=8; minPS=3; maxPS=17 ave. pressure =10

critterdoc
Posts: 5
Joined: Wed Apr 09, 2014 2:55 pm
Location: Looziana

Re: How to build your own manometer at home

Post by critterdoc » Wed Apr 09, 2014 3:12 pm

Snoredog wrote:That will do it, I have made several but currently use a F&P manometer.
Being new to CPAP use, and assuming that a water manometer is still the affordable gold standard for measuring pressure, I recently took delivery of an F&P HD-200 water manometer.

Image

I am however not clear on why the adapter which supports the vertical calibrated tube contains what appears to be in effect a vertical vent that runs parallel to the calibrated tube. It's been some time since I visited manometers but why would one want the HC325 chamber to vent air that the pump introduced into it?

Thanks,

Doc
Last edited by critterdoc on Thu Apr 10, 2014 6:11 am, edited 2 times in total.

JDS74
Posts: 3397
Joined: Sun Jan 23, 2011 2:57 pm
Location: South Carolina

Re: How to build your own manometer at home

Post by JDS74 » Wed Apr 09, 2014 7:11 pm

Perhaps that is there to simulate the effect of the "normal" mask leak rate. It shouldn't make a difference on the pressure inside the F&P humidifier chamber being used as part of this device. Without the device in hand to test what happens if that 'vent' is temporarily closed its just a mystery.

_________________
Mask: Oracle HC452 Oral CPAP Mask
Humidifier: DreamStation Heated Humidifier
Additional Comments: EverFlo Q 3.0 Liters O2 PR DSX900 ASV
Oracle 452 Lessons Learned Updated
DSX900 AutoSV with HC150 extra humidifier and Hibernite heated hose
Settings: EPAP Min-10.0, EPAP Max-17, PS Min-3, PS Max-10, Max Pressure-20, Rate-Auto, Biflex-1.
Sleepyhead and Encore Pro 2.21.