During the first 36 hours after making this post, I had several PM requests from folks offering to pay me to perform this Breeze modification for them. Unfortunately, I have a very busy holiday season approaching and I just don’t have the time. In fact, I have to start temporarily weaning myself off of this forum soon. I do very much appreciate all of the knowledge and help I have received from the great people here and I do intend to give back as much as I can to the forum when I have more time next year.
While the modification appears to be a major project, it is actually quite simple. If you can use a small saw to cut a small piece of wood, you can do this modification yourself (it would take less than 5 minutes to make the cut). I think a small inexpensive hack saw (generally used to cut metal) will do the trick even though if you cut where I have stated in the instructions below, you will only be cutting through hard plastic and no metal at all. If you are still unsure of yourself, ask a family member or friend in your local area that has some basic woodworking or mechanical skills to cut the cradle/assembly off the outrigger for you.
Assembling the interface is also quite easy (another 5 or 10 minutes). You can order the universal chin strap (link to cpap.com below) and the forehead support (link to cpap.com below) for about $32 plus shipping. You can get the Velcro ties and Velstretch bands at many of the larger stores near you for less than $10. Search around the internet for other materials and use your own ideas for making any substitutions to make it all work for you if you need.
I encourage you to do this modification yourself. It would not only be less expensive for you to do it, it will also provide you with a sense of pride and make your PAP treatment just that much more desirable. Below is an e-mail you can use to contact me in case you run into problems. I must also mention that I am extremely flattered by all of the compliments I have received … Thanks.
Best of luck and happy breez'in !
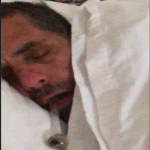
I forgot to add -- a couple of people asked about the green alien head in the pics. That is my Anti-Alien Abduction Insignia (AAAI). It is intended to prevent aliens from abucting me in the middle of my REM sleep ... cuz I really enjoy my dreams.
I was also given friendly advice to add a disclaimer to this post in case someone cut their finger off or poked an eye out … so here it goes …
WARNING: Anyone using the information provided in this electronic post does so at their own risk. Furthermore, the cpap.com ownership and author of this electronic post shall not in any way be held liable for damages to person or property by anyone attempting to perform the modification described herein.
I would also like to add that I was not sponsored by anyone for this post. I have no financial interest in cpap.com or Puritan Bennett. Furthermore, I was not in anyway encouraged (financially or otherwise) by anyone to author this post. I purchased all materials used in the modifiaction at my own expense.

Summary:
I have modified the Puritan Bennett Breeze® SleepGear® interface system and find it to be my favorite so far. I basically replaced the metal cradle/spine assembly with a soft stretch Velcro headgear system. Compared to the original stock interface, the modified interface is lighter in weight, more stable on the head, and allows for me to sleep on either side, back, stomach, and any position in between (basically I now have 360 degree rotation lying in bed). The nasal pillow seal is maintained throughout my sleep sessions. I have used it for almost two weeks now and feel that I can present it to the forum in the hope that it may help improve someone’s PAP treatment and/or compliance.
Background:
I’m relatively new to the PAP lifestyle (2 months) and was provided with a Breeze interface for my first night use at home. I had perhaps my best night’s sleep ever that first night but woke up with very raw nares. Consequently, I assumed the Breeze interface would never work for me and rushed back to my DME that same day to trade the Breeze out for the Swift I had used during my sleep study (which had not given me sore nares). Fast-forward about a week when I discovered this forum and began to learn that I had not given the Breeze a fair trial. I learned that I had not properly adjusted it since I simply inserted the pillows, put it on, and went to sleep nor did I even rinse the pillows prior to using them (which may have contributed to the raw nares). In addition, the triangular metal cradle bruised the back of my head and together with the connected metal spine, it had added undue pressure by hooking my nose while lying on my back (kind of like how Moe does to his fellow stooges).
Purpose:
The purpose of this modification is to eliminate the triangular metal cradle/spine assembly (parts 10 & 11 in manual) in order to relieve undue pressure on the nostrils while enhancing the overall stability of the interface.
Modification:
I would first like to acknowledge that most of the credit for this modification design should go to the following cpaptalk forum members from whom I got the idea(s) -
Rested Gal
Puffing Billy
BigNortherner
The modification is based primarily on Rested Gal’s suggestion to add a lower anchoring point to the forehead in order to improve stability shown below.
Page 6 of Breeze Manual - parts diagram

Here is what you will need to do -
1) Cut the spine (part # 10 in manual) from the outrigger (part # 8 in manual) using a hack saw (I actually used a serrated Miracle Blade knife). First make sure you have removed the hose guide (part # 7 in manual) from the outrigger. Make the cut on the outrigger itself about ¼ inch from the rear edge. There is a raised portion on the underside of the outrigger that I used as a guide (see lower-left pic). I discovered that the metal part of the spine is connected to the outrigger with two small molded rivets at just a little less than ¼ inch from the edge.
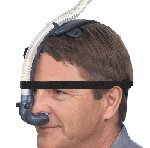
2) Attach the forehead support to the hose guide (see lower-left and middle-right pics) using a small ½ inch-wide strip of Velcro (or anything you have that would work) by threading it between the forehead support and the silicone pad and also between the the forward clip (part # 5 in manual) and the hose guide. I used the Respironics Comfort Series forehead support and pad. The forehead support adds lateral stability to the interface.
3) Attach an elastic headband to the forehead support (see all pics). I used the Universal chinstrap. The hole in this chinstrap also helps to fix the forward clip (part # 5 in manual) in place (see lower-right pic). I got the idea of using this specific chinstrap from forum member Oldgearhead.
4) Attach a 1 inch-wide strap (Velstretch bands available at Lowes) by threading through the slot in the outrigger from rear to front and holding it in place by sliding the hose guide back into the outrigger and over the strap. The other end of the strap can then be attached to the chinstrap-converted head band (see middle-left pic). This over-top-of-head strap helps stabilize the the interface by preventing the shell (part # 2 in manual) from rotating out of position and basically replaces the function of the cradle/spine assembly.
5) Use the stock Breeze halo straps to attach to the outrigger and Velcro to the chinstrap-converted head band (see middle-left and upper-right pic) ... it adds additional stability and helps prevent the outrigger from rotating across the top of the head.

6) Make adjustments as necessary and prepare yourself for some dreams.
Conclusion:
I have been getting great AHI numbers (under 3.0) with this set-up and find it extremly comfortable to sleep with. However, I have yet another idea for a second improved and hopefully easier modification for the Breeze which I will try and post by year's end if it does indeed work.
UPDATED Oct 2, 2006 in response to Billy's comment later in this thread -
Puffing Billy made an important observation about this modified design regarding the head band riding up on the back of the head. You see, it is not evident from my avatar picture, but I actually have long hair that I always wear it in a pony tail. I also wear the pony tail to bed at night and I usually just place the back strap of the head band over it and I never had any problems with it riding up. I had gotten into the habit by previously doing the same thing with my Swift headgear.
When I got home this afternoon, I tried on my modified Breeze without my pony tail and it does appear to ride up. I think Billy has pointed out a significant flaw in the design and after he brought the question up, I then remembered he had discussed this issue in one of his previous posts.
I suppose that those with short hair could use the same fix that is used by some for the Swift … which is to add a piece of the “hook-side” of a strip of Velcro on the inside rear of the head band. It sticks to your hair and keeps the head band in place (not advised for those with long hair though since it gets all tangled up). Another fix might be to add some stretch type Velcro (like the halo bands) to wrap underneath the chin and around to the rear side of the head band. I actually removed the halo straps on mine to try that and it did seem to work.
Anyway, that was a good catch … thanks to Billy. It is something to consider before attempting this modification.
In addition, I think you could still add the forehead pad and head band to the Breeze without actually cutting the spine/cradle assembly if the assembly does not bother you and you wish to add enhanced lateral stability to the interface. Just a thought.
- roberto
_________________
CPAPopedia Keywords Contained In This Post (Click For Definition): breeze, hose, nasal pillow, cpap.com, Puritan Bennett, swift, DME, AHI, seal