


I had the opportunity to build a second version of this battery backup design. I added lots of pictures (to provide a step by step installation section). I also fleshed out sections that had been left undone. I also added extensive information about different types of DC power options for various xPAP devices. As I edit this over the coming days, I will be certain to incorporate answers to concerns as well as suggestions provided by others in the 10 pages in the original Battery Backup System post.
Does it work? Absolutely. This is a refinement of the original Battery Backup System that I posted three years ago. It makes ordering the parts quite a bit easier. However, if you are wondering about the overall safety, I've used a battery backup system for more than 14 years at this point with no problem. A lot of problems arise when the maintenance and/or connections are shoddy. But as in all things, if you use this design, you are doing so at your own risk. I've made every effort to minimize risks that you might encounter. If you are uncomfortable with the process of creating the design, take it to a mechanic and ask for help. Of course, be willing to pay for the time and effort. Remember, you've received this design and ALL of the material gratis. Be grateful and pay it forward to the next person.
Anyway, I hope this helps you attain a stable, cost effective Battery Backup System that will last for years and require very minimal attention.
Battery Backup Design (V2)
-
JohnBFisher

- Posts: 3821
- Joined: Wed Oct 14, 2009 6:33 am
Battery Backup Design (V2)
_________________
| Mask: Quattro™ FX Full Face CPAP Mask with Headgear |
| Additional Comments: User of xPAP therapy for over 20 yrs. Resmed & Respironics ASV units with EEP=9cm-14cm H2O; PSmin=4cm H2O; PSmax=15cm H2O; Max=25cm H2O |
Last edited by JohnBFisher on Thu May 09, 2013 7:05 pm, edited 4 times in total.
"I get up. I walk. I fall down. Meanwhile, I keep dancing” from Rabbi Hillel
"I wish to paint in such a manner as if I were photographing dreams." from Zdzisław Beksiński
"I wish to paint in such a manner as if I were photographing dreams." from Zdzisław Beksiński
-
JohnBFisher
- Posts: 3821
- Joined: Wed Oct 14, 2009 6:33 am
Battery Backup Design (V2) - Part 1 - Introduction
My hope is this Battery Backup Design (V2) will help those of you who want to put together a battery backup setup. Others have posted alternatives. However, I've tried to put together a robust, but safe system that only requires changing components as needed - not a full replacement every few years. While the initial costs might be more, the long term costs should be lower.
As I've noted, while I welcome input, please wait until I've posted all the pieces. I will change the first comment (and this one) in this post to note it is complete.
I welcome input, though remember - I am sharing what I've done over the years - not a generic approach. But I am trying to make it generic enough for everyone else to pick up and use. As you can see, this is V2. I recently had the chance to help someone else put together another system. This one makes it even easier and should help reduce some concerns.
Contents
Introduction
Objectives
With this setup if you know there is a possibility power may be interrupted, you can plug into this setup and use the battery. If power goes out, the setup is such that your xPAP unit can continue uninterrupted. When power is restored, the battery tender will gradually recharge the battery to full capacity. Depending on your needs and what you want to spend on the battery, it can even drive the humidifier on more current model xPAP devices.
Since I use an ASV unit that frequently ramps up the pressure, I require a larger battery than someone with a CPAP, APAP or BiPAP (of varying sorts). But I've tried to help show how to determine your power requirements for your setup.
Also, the design is fairly modular to allow you to customize this. If you need a more rapid recharge, you can use a more powerful battery tender. If you need a larger battery, you can purchase and use that. You can keep it simple, or go a bit more complicated and make it sturdier.
Another advantage of a modular design is that you can change/replace only the component that requires replacement. But you should get MANY years of use out of this design. My last unit was created more than three years ago and works without any problem. In another couple years I will need to replace the battery. But then it will be only the battery that requires replacement.
As I've noted his is designed to stay in the bedroom. No need to drag the battery in and out of the house. In fact, the stability of the temperature in your house will help the battery last longer. But it is also designed to allow you to make it so little fingers (or paws) won't be hurt with this setup.
Special Features
To reiterate, part of my design is an attempt to allow you to use a modular approach to the setup. You can choose your battery size. You can choose how quickly you want the battery to be recharged. You choose the shared use option (you can actually power more than just the xPAP device with this). Make it as simple or as sturdy as you need. You can choose the DC to xPAP hookup. For example, you can use a DC to xPAP connection. Or you can use a power inverter (to convert from DC to AC power).
This approach means you can configure this to meet your needs. Additionally with this type of setup, it will help the battery last longer than if it is stored without the "float" charge, which keeps the battery charged and ready to use.
Note about Web sites
I have no affiliation with any of the web sites. I selected and used these products to make this setup for myself. Feel free to tinker and adapt it as you see fit. With this second version, I selected some kits and items that should help make the process simpler.
Note about the application
I researched this as best as possible. I've used deep cycle batteries and an inverter for the past 14 or more years. This particular design is a setup to stay indoors to provide standby power in the event of a power failure. It has worked well (without any interruption or problems) for me for the past three years. I know others on the forum also use it (working from the previous version of the design). Though it should work for your ... and others continue to help improve the design ... please understand if you use this design, you will do so at your own risk. (But it should work for you and the risks are fairly minimal ... if you follow the directions).
Note about the construction
By making this a modular design, you can either do some minor customization, or use a simpler approach to connect the components. I took an approach that does a good job of anchoring all the pieces. The advantage of this is that no parts will accidentally short. Nor will it allow little fingers to accidentally be hurt. It includes steps to avoid corrosion on the battery terminals. It is designed to vent should any gases build up in the battery. It's designed to contain any acid leaks should they unexpectedly occur. It even includes a fuse to prevent any short that might occur.
Note about humidifier use
Humidifiers consume a lot of power. ResMed humidifiers require pure sine wave inverters, which are both more expensive and use much more power. Or it requires the DC to AC converter from Resmed. Thus, this design is primarily intended to be used without a humidifier. The humdifier can be attached, but turned off. It will then function as a "passover" humidifier. Often that's enough to "get the job done" in a power out situation. Still, if you need a heated humidifier and hose, then you can (if you wish) purchase a larger battery to provide that feature.
Shopping List
The parts remain the same. However, I provide a list below that provides the information on the specific components I used in this V2 model.
http://www.amazon.com/UB12550-Scooter-W ... 00CEYPSUM/
The battery I currently use, test every two or three months, and is still working well is:
http://www.batteriesplus.com/product_se ... 34AGM.aspx
Note that battery is a dual purpose battery (both a starting battery and reserve power for accessories). That choice help the cost lower. But if I had to use that battery all the time (once a week or so), it might result in a shorter than expected lifetime of the battery.
Battery Box
http://www.amazon.com/gp/product/B004W5SGBO/
Battery Tender
http://www.amazon.com/gp/product/B000NCOKQK/
Battery Box Adapter & Shared Use Connector
http://www.amazon.com/gp/product/B00206BEOS/
Marine Terminal Conversion
http://www.amazon.com/gp/product/B0060YHP3A/
Marine Terminal Conversion Covers
http://www.amazon.com/gp/product/B000NI3CH2/
DC to xPAP Connection
Respironics
Resmed
For other Resmed models, you may need an inverter:
https://www.cpap.com/productpage/resmed ... erter.html
https://www.cpap.com/productpage/respir ... erter.html
https://www.cpap.com/productpage/DC-to- ... or-s8.html
Intellipap
Others
You can certainly contact our host, CPAP.com, to discuss what your power and cabling requirements might be.
Costs
As of the date of this post (May 8, 2013), the costs for this design are listed below. The particular design includes the cost for hooking a Respironics System One Model 60 BiPAP AutoSV Advanced (an ASV unit). And a deep cycle battery to drive it for two to three days. These costs use the costs (but not shipping costs) from the sites listed above. Purchasing things locally (such as batteries) might increase costs some, but then your local supplier has already absorbed the cost of shipping and has other expenses that are included in your locally purchased items.
Battery .. $130
Battery Box .. $17
Battery Tender .. $55
Battery Box Connector .. $60
Shared Use Connector (included in above)
Marine Terminals .. $7
Marine Terminal Covers .. $8
DC to xPAP Hookup .. $30
Total ... $307
The total setup should last at least 15 to 20 years. If it lasts only 15 years, then during that time it should be necessary to two additional batteries. Thus the total cost over 15 years would be $307 plus $260 .. Or $567. That's an annual cost of about $38. Not bad.
And if you wonder if it's too good to be true, my original design continues to work well, three years later. I check it every two to three months. The battery terminals show NO corrosion during that time. The battery tender continues to work well. And I expect it all to last another 12 years to 18 years (or more).
Continued to Part 2 (Warnings & Disclaimer)
As I've noted, while I welcome input, please wait until I've posted all the pieces. I will change the first comment (and this one) in this post to note it is complete.
I welcome input, though remember - I am sharing what I've done over the years - not a generic approach. But I am trying to make it generic enough for everyone else to pick up and use. As you can see, this is V2. I recently had the chance to help someone else put together another system. This one makes it even easier and should help reduce some concerns.
Contents
- Introduction **(This Section)**
- Warnings and Disclaimer
- Checklist - How to determine YOUR needs & What to shop for
- Battery - To Complete (Add Portable Batteries, Add UPS Info, Add Calculation Info)
- Battery Tender - Add pointers to other options
- Battery Box - Add Safety Issues for Placement
- Shared Use Connector - Possible Options
- Marine Terminal Coversion & Covers - Pictures
- DC to xPAP Hookup - Include Different Machine DC options
- Completed Setup
Introduction
Objectives
With this setup if you know there is a possibility power may be interrupted, you can plug into this setup and use the battery. If power goes out, the setup is such that your xPAP unit can continue uninterrupted. When power is restored, the battery tender will gradually recharge the battery to full capacity. Depending on your needs and what you want to spend on the battery, it can even drive the humidifier on more current model xPAP devices.
Since I use an ASV unit that frequently ramps up the pressure, I require a larger battery than someone with a CPAP, APAP or BiPAP (of varying sorts). But I've tried to help show how to determine your power requirements for your setup.
Also, the design is fairly modular to allow you to customize this. If you need a more rapid recharge, you can use a more powerful battery tender. If you need a larger battery, you can purchase and use that. You can keep it simple, or go a bit more complicated and make it sturdier.
Another advantage of a modular design is that you can change/replace only the component that requires replacement. But you should get MANY years of use out of this design. My last unit was created more than three years ago and works without any problem. In another couple years I will need to replace the battery. But then it will be only the battery that requires replacement.
As I've noted his is designed to stay in the bedroom. No need to drag the battery in and out of the house. In fact, the stability of the temperature in your house will help the battery last longer. But it is also designed to allow you to make it so little fingers (or paws) won't be hurt with this setup.
Special Features
To reiterate, part of my design is an attempt to allow you to use a modular approach to the setup. You can choose your battery size. You can choose how quickly you want the battery to be recharged. You choose the shared use option (you can actually power more than just the xPAP device with this). Make it as simple or as sturdy as you need. You can choose the DC to xPAP hookup. For example, you can use a DC to xPAP connection. Or you can use a power inverter (to convert from DC to AC power).
This approach means you can configure this to meet your needs. Additionally with this type of setup, it will help the battery last longer than if it is stored without the "float" charge, which keeps the battery charged and ready to use.
Note about Web sites
I have no affiliation with any of the web sites. I selected and used these products to make this setup for myself. Feel free to tinker and adapt it as you see fit. With this second version, I selected some kits and items that should help make the process simpler.
Note about the application
I researched this as best as possible. I've used deep cycle batteries and an inverter for the past 14 or more years. This particular design is a setup to stay indoors to provide standby power in the event of a power failure. It has worked well (without any interruption or problems) for me for the past three years. I know others on the forum also use it (working from the previous version of the design). Though it should work for your ... and others continue to help improve the design ... please understand if you use this design, you will do so at your own risk. (But it should work for you and the risks are fairly minimal ... if you follow the directions).
Note about the construction
By making this a modular design, you can either do some minor customization, or use a simpler approach to connect the components. I took an approach that does a good job of anchoring all the pieces. The advantage of this is that no parts will accidentally short. Nor will it allow little fingers to accidentally be hurt. It includes steps to avoid corrosion on the battery terminals. It is designed to vent should any gases build up in the battery. It's designed to contain any acid leaks should they unexpectedly occur. It even includes a fuse to prevent any short that might occur.
Note about humidifier use
Humidifiers consume a lot of power. ResMed humidifiers require pure sine wave inverters, which are both more expensive and use much more power. Or it requires the DC to AC converter from Resmed. Thus, this design is primarily intended to be used without a humidifier. The humdifier can be attached, but turned off. It will then function as a "passover" humidifier. Often that's enough to "get the job done" in a power out situation. Still, if you need a heated humidifier and hose, then you can (if you wish) purchase a larger battery to provide that feature.
Shopping List
The parts remain the same. However, I provide a list below that provides the information on the specific components I used in this V2 model.
- Battery
- Battery Tender
- Battery Box
- Battery Box Adapter
- Shared Use Connector
- Marine Terminal Coversion & Covers
- DC to xPAP Hookup
http://www.amazon.com/UB12550-Scooter-W ... 00CEYPSUM/
The battery I currently use, test every two or three months, and is still working well is:
http://www.batteriesplus.com/product_se ... 34AGM.aspx
Note that battery is a dual purpose battery (both a starting battery and reserve power for accessories). That choice help the cost lower. But if I had to use that battery all the time (once a week or so), it might result in a shorter than expected lifetime of the battery.
Battery Box
http://www.amazon.com/gp/product/B004W5SGBO/
Battery Tender
http://www.amazon.com/gp/product/B000NCOKQK/
Battery Box Adapter & Shared Use Connector
http://www.amazon.com/gp/product/B00206BEOS/
Marine Terminal Conversion
http://www.amazon.com/gp/product/B0060YHP3A/
Marine Terminal Conversion Covers
http://www.amazon.com/gp/product/B000NI3CH2/
DC to xPAP Connection
Respironics
https://www.cpap.com/productpage/dc-pow ... hines.htmlThe following cord can be used to power:
- PR System One 60 Series machine
- PR System One 60 Series machine and 60 Series Heated Humidifier
- PR System One 60 Series machine PR System One 60 Series machine, 60 Series Heated Humidifier and Heated Tube
https://www.cpap.com/productpage/respir ... -cord.htmlThe following cord is compatible with the following units:
- All Respironics M Series Machines
- All PR System One Machines except 60 Series Models
- Respironics REMstar CPAP/APAP Machines (No REMstar BiPAP units)
- Respironics Synchrony Machines
- All Sandman Series Machines
- All IntelliPAP Series Machines
- GoodKnight 425/425 ST BiPAP Machines
Resmed
https://www.cpap.com/productpage/DC-Con ... hines.htmlThis DC Converter works with the following machines:
This Converter allows you to use the H5i Humidifier and the ClimateLine tubing attached to your machine while on 12V or 24V DC power.
- S9 AutoSet™ CPAP Machine
- S9 Elite™ CPAP Machine with EPR™
- S9 Escape™ CPAP Machine with EPR™
- S9 VPAP™ Auto BiLevel Machine
https://www.cpap.com/productpage/resmed ... hines.htmlThe ResMed DC-12 Converter allows you to operate most ResMed S8 devices from a 12V DC power source such as a car, boat, or other vehicle equipped with a suitable battery.
The following cord works with the following devices:
Word of Caution to RESmed S8 and S8 II Machine Users
- S8 AutoSet II
- S8 Vantage EPR Auto
- S8 Escape
- S8 Escape II
- S8 Elite II
- S8 Elite
- S8 VPAP Auto
YOU MUST USE THIS DC-12 Converter when powering S8 machines through a DC battery source. Failure to do so can result in damage to your CPAP.
https://www.cpap.com/productpage/resmed ... -vpap.htmlThe ResMed DC-24 Converter allows you to operate S8 ResMed VPAP™ Auto 25 and VPAP™ ST Machines that run only on a 24V DC power source. This converter increases all 12 Volt batteries into 24 Volt DC power.
This cord is works with the following S8 ResMed devices:
- S8 VPAP ST
- S8 VPAP Auto 25
https://www.cpap.com/productpage/DC-Pow ... Bipap.htmlThe DC Power Adapter and accessories allow you to operate most Respironics BiPAP systems from a 12 volt DC power source. One end attaches to the machine's 12 volt jack and the other plugs into a socket similar to a car's cigarette lighter outlet. The 12v jack that connects to the machine will fit several of our most popular CPAPs.
The following cable is required for DC usage of the following Respironic BiPAP systems:
The Synchrony BiPAP and BiPAP ST does not use this cord.
- BiPAP Plus
- BiPAP Pro
- BiPAP Pro2
- BiPAP Auto
- BiPAP ST New Gray Model
- BiPap Auto SV
For other Resmed models, you may need an inverter:
https://www.cpap.com/productpage/resmed ... erter.html
https://www.cpap.com/productpage/respir ... erter.html
https://www.cpap.com/productpage/DC-to- ... or-s8.html
Intellipap
https://www.cpap.com/productpage/intell ... -cord.htmlThis is a 6 foot long cable that can be used to hook the IntelliPAP Standard or AutoAdjust CPAP machines with a 12 volt jack to 12 volt power. One end attaches to the machines' 12 volt jack and the other plugs into a cigarette lighter socket.
Others
You can certainly contact our host, CPAP.com, to discuss what your power and cabling requirements might be.
Costs
As of the date of this post (May 8, 2013), the costs for this design are listed below. The particular design includes the cost for hooking a Respironics System One Model 60 BiPAP AutoSV Advanced (an ASV unit). And a deep cycle battery to drive it for two to three days. These costs use the costs (but not shipping costs) from the sites listed above. Purchasing things locally (such as batteries) might increase costs some, but then your local supplier has already absorbed the cost of shipping and has other expenses that are included in your locally purchased items.
Battery .. $130
Battery Box .. $17
Battery Tender .. $55
Battery Box Connector .. $60
Shared Use Connector (included in above)
Marine Terminals .. $7
Marine Terminal Covers .. $8
DC to xPAP Hookup .. $30
Total ... $307
The total setup should last at least 15 to 20 years. If it lasts only 15 years, then during that time it should be necessary to two additional batteries. Thus the total cost over 15 years would be $307 plus $260 .. Or $567. That's an annual cost of about $38. Not bad.
And if you wonder if it's too good to be true, my original design continues to work well, three years later. I check it every two to three months. The battery terminals show NO corrosion during that time. The battery tender continues to work well. And I expect it all to last another 12 years to 18 years (or more).
Continued to Part 2 (Warnings & Disclaimer)
_________________
| Mask: Quattro™ FX Full Face CPAP Mask with Headgear |
| Additional Comments: User of xPAP therapy for over 20 yrs. Resmed & Respironics ASV units with EEP=9cm-14cm H2O; PSmin=4cm H2O; PSmax=15cm H2O; Max=25cm H2O |
Last edited by JohnBFisher on Wed May 08, 2013 10:26 am, edited 4 times in total.
"I get up. I walk. I fall down. Meanwhile, I keep dancing” from Rabbi Hillel
"I wish to paint in such a manner as if I were photographing dreams." from Zdzisław Beksiński
"I wish to paint in such a manner as if I were photographing dreams." from Zdzisław Beksiński
-
JohnBFisher
- Posts: 3821
- Joined: Wed Oct 14, 2009 6:33 am
Battery Backup Design (V2) - Part 2 - Warning & Disclaimer
Continued from Part 1 ...
Contents
First, while I put together this design to be as safe as possible, I have NO IDEA what conditions you might have and what choices you might make in constructing your own backup system. So, I am not responsible if your encounter problems. If you have any doubts, take the instructions to your local mechanic and have them help you construct the battery backup system.
Second, as I've noted, I put a lot of thought and experience into this design. It's intended to try to minimize any inherent dangers. But any design can be defeated by intentional or even unintentional interactions with "stuff". So, while the battery is in a battery box and the battery box should have a strap to help keep it closed ... And even if the battery box is opened there are battery terminal covers.... Even with all that, if they are removed and something shorts the terminals, then bad things will happen.
So, remember these batteries can be dangerous. They pack a LOT of energy that can lead to an explosion and/or fire. Of course, so does your car. The key is to minimize risks as much as possible. I've tried to provide you a design that combines my knowledge and experience, suggestions from others on the forum, and lots of common sense. PLEASE READ AND HEED!!

Here are some pages I've found that deal with battery safety and some common myths:
http://batterytender.com/resources/intr ... eries.htm/
http://www.aa1car.com/library/battery_safety.htm
http://jgdarden.com/batteryfaq/carfaq14.htm
So, remember. You use this design at your own risk. If this makes you uncomfortable, hire a mechanic to help you put together the setup.
Continued to Part 3 (Checklist)
Contents
- Introduction
- Warnings and Disclaimer **(This Section)**
- Checklist - How to determine YOUR needs & What to shop for
- Battery - To Complete (Add Portable Batteries, Add UPS Info, Add Calculation Info)
- Battery Tender - Add pointers to other options
- Battery Box - Add Safety Issues for Placement
- Shared Use Connector - Possible Options
- Marine Terminal Coversion & Covers - Pictures
- DC to xPAP Hookup - Include Different Machine DC options
- Completed Setup
First, while I put together this design to be as safe as possible, I have NO IDEA what conditions you might have and what choices you might make in constructing your own backup system. So, I am not responsible if your encounter problems. If you have any doubts, take the instructions to your local mechanic and have them help you construct the battery backup system.
Second, as I've noted, I put a lot of thought and experience into this design. It's intended to try to minimize any inherent dangers. But any design can be defeated by intentional or even unintentional interactions with "stuff". So, while the battery is in a battery box and the battery box should have a strap to help keep it closed ... And even if the battery box is opened there are battery terminal covers.... Even with all that, if they are removed and something shorts the terminals, then bad things will happen.
So, remember these batteries can be dangerous. They pack a LOT of energy that can lead to an explosion and/or fire. Of course, so does your car. The key is to minimize risks as much as possible. I've tried to provide you a design that combines my knowledge and experience, suggestions from others on the forum, and lots of common sense. PLEASE READ AND HEED!!
Here are some pages I've found that deal with battery safety and some common myths:
http://batterytender.com/resources/intr ... eries.htm/
http://www.aa1car.com/library/battery_safety.htm
http://jgdarden.com/batteryfaq/carfaq14.htm
So, remember. You use this design at your own risk. If this makes you uncomfortable, hire a mechanic to help you put together the setup.
Continued to Part 3 (Checklist)
_________________
| Mask: Quattro™ FX Full Face CPAP Mask with Headgear |
| Additional Comments: User of xPAP therapy for over 20 yrs. Resmed & Respironics ASV units with EEP=9cm-14cm H2O; PSmin=4cm H2O; PSmax=15cm H2O; Max=25cm H2O |
Last edited by JohnBFisher on Wed May 08, 2013 5:37 pm, edited 6 times in total.
"I get up. I walk. I fall down. Meanwhile, I keep dancing” from Rabbi Hillel
"I wish to paint in such a manner as if I were photographing dreams." from Zdzisław Beksiński
"I wish to paint in such a manner as if I were photographing dreams." from Zdzisław Beksiński
-
JohnBFisher
- Posts: 3821
- Joined: Wed Oct 14, 2009 6:33 am
Battery Backup Design (V2) - Part 3 - Checklist
Continued from Part 2 ...
Contents
Battery Requirement
However, for the purpose of this part of the checklist you need to determine your power needs. How much power does your xPAP device consume with and without humification? Do you occasionally loose power for days on end? Can you find another place to sleep after a day or two? Do you absolutely need to have a heated humidifier? Could you even do without a humidifier for a few days? Or would "passive" humidification work? That is you put water in the humidifier and allow the air to flow over it, and pick up *some* humidity. Does your xPAP unit support a direct DC to xPAP connection? Or do you require an inverter? An inverter converts the power from 12VDC to 120VAC. Does your xPAP unit support a converter to convert power from 12VDC to the power requirement of your xPAP device?
These are some of the questions you need to answer to determine your battery requirement.
For example, I have a Resmed VPAP Adapt SV Enhanced (an ASV) type xPAP device. With Resmed, finding your battery power requirements is easier. There is a "Battery Guide", which Resmed Technical Services has put together for users of Resmed xPAP devices:
http://www.resmed.com/us/assets/documen ... lo_eng.pdf
When we loose power, it tends to be for less than a day. So, normally, I only need it for a few hours. But since I live in an area where hurricanes can strike, we sometimes loose power for days at a time. However, after the second day things have normally been cleaned up enough to either find another place to sleep or I've been able to start and use our generator, so I can recharge my battery. So, I feel that I only need to use the battery for two nights (or 16 hours).
Using the chart on page 16 of the guide above, I see that I need a deep cycle battery that is 60 Amp Hours in size. Since that second night of use is pretty rare for us, and the cost of the extra Amp Hours was pretty steep, I elected to purchase and use a 55 Amp Hour battery.
I also know that even if I am using a humidifier, the "passive" humidification will suffice. I just turn off my humidifier and allow the air flowing over the water to humidify the air. It's not great. But it works as a temporary solution.
If I wanted to use the humidifier, I would require a Pure Sine Wave, 300 Watt inverter. And the Amp Hours for ONE night would be 60AH. Two nights would be at least 120 to 140 Amp Hours. That's a $270 battery!!! No, thanks! I can live without the heated humidifier.
This gives you an idea of how to use this information to determine your battery size.
Battery Tender
In both instances, the charger and battery will always remain connected and indoors in the bedroom. Thus there are no special requirements for the charger as far as environmental conditions go.
The chargers that meet those needs are from Battery Tender:
http://batterytender.com/
The original design only required the lower amperage Battery Tender Junior:

The second design required the higher amperage Battery Tender Plus:

In fact, I ended up finding one that's designed to handle true GEL batteries that have a higher risk of explosion if charged too rapidly. Though I will recommend against getting one of those batteries, the options might be limited. This will help ascertain risks are minimized.
There are other fine manufacturers of this type of battery charger. In general, be certain they are designed to handle long term connection of the battery to the charger and will not overcharge the battery. This type of connection requires proper electronics within the charger, as outline in the following page:
http://batterytender.com/resources/float-charging.htm/
But I reiterate, there are other companies that provide these chargers. I just happened to select this one based on reputation, recommendation from other users. I've been very pleased with the quality of their product.
Battery Box
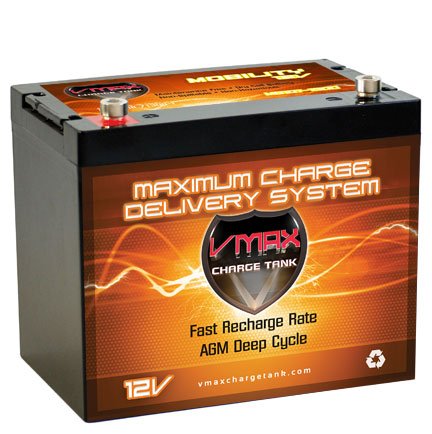
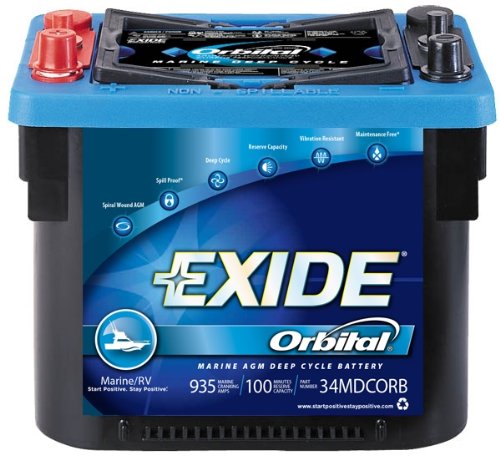
All the way up to a battery that looks like this:
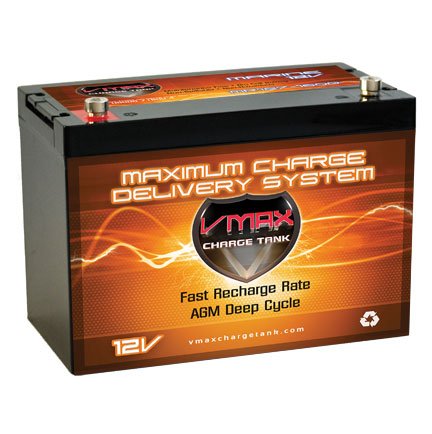
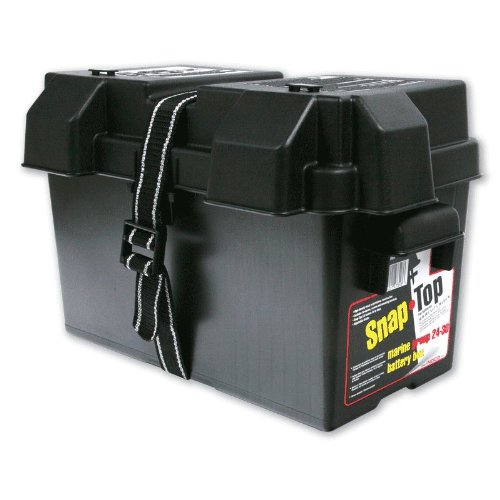
Regardless of the size of the battery, you need a battery box that keeps the battery secure and free of excessive movement. The battery box selected in the second design includes a divider to allow a smaller battery to be "secured" within the battery box.
Of course, if you know the size of the battery, then you can select a model of battery box that better fits your needs. For example, if you purchase a Group 24 sized battery , then a box to fit it would be appropriate (and a little less expensive). For instance for a Group 24 sized battery, a Group 24 sized battery box includes:
That's certainly smaller than this second design:
While it's smaller, it's not as flexible. And flexibility is needed if you don't know how large the battery will be. If you know the size, then select for the correct size.
Battery Box Connector & Share Use
The first design did not answer yes to the longer connection. However, I found that after connecting the battery, the connection provided by the battery connectors in the Battery Tender kit were a little awkward. It would be nice to have be able to connect everything, then drop the battery in the battery box, and still have enough slack in the connection line to the inside of the battery box lid and the battery cover connection. So, the second design chose a kit that includes a longer battery connector. Thus the battery can be fully connected (to the battery connection and the inside of the lid) and THEN lifted into the battery box without having the lid dangle on the side.
The modular design both allows flexibility and safety. Using SAE connections, the battery can be safely unplugged and it minimizes the risk of a short circuit. Further, they are designed to require some amount of force to open and close. This minimizes the risk of children or pets accidentally disconnecting the various connections.
The Dual Use connector on the outside of the lid allows the battery charger to be connected but to quickly and easily connect the DC power to the xPAP device. Because there are often power surges when power returns, I recommend disconnecting the battery charger when the DC power is used to power the xPAP device. But this dual use connector makes it MUCH easier to use when power is out and you are fumbling around in the dark. The dual use (shared use) connector is a Y cable connection that allows you to connect the battery box connector (on the OUTSIDE of the lid) to both the xPAP device and the battery charger. It looks like the following picture:
While you can live without a connector through the lid, it makes it much easier to transport the battery. Just disconnect the dual use connection and cap the connector. The Battery Box Connector looks like:
But, you can certainly just run the battery charger connection to the battery terminals. The Battery Tender models include an SAE connection that can be unplugged. You then would have a lead running from the battery under the battery box lid to the outside world. No neat connection. But it might help drop the cost of the design a few dollars. Still, I felt the connector through the lid is both more elegant and safer.
Don't forget that the connection to the battery ABSOLUTELY requires a fuse. This is NOT an option. If a short circuit occurs, you want the fuse to blow and NOT the battery. This part of the design is non-negotiable. Do it right. Protect yourself and those you love.
Terminal Connectors & Covers

They work well enough with jumper cables. Why not for this?
Well, the difference is one of permanence. You want a connection that is solid and won't accidentally come disconnected and create the possibility of a short circuit. You do NOT want a long term battery backup design to use this approach. The same reason is why the battery terminal connectors are used in cars. You want to use the same approach with a battery backup design.
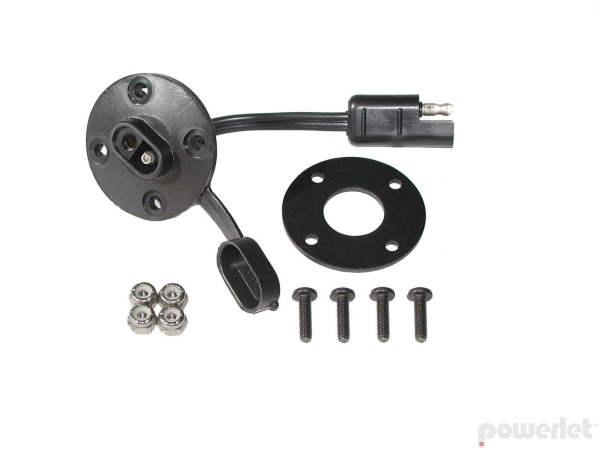
Some batteries, especially those designed for "marine" applications, offer smaller posts for "ring" connectors. The ring connectors look something like this:

Those batteries tend to have two sets of posts. One set is often like classic car battery terminals. The other set is smaller / thinner. The following image provides one configuration that demonstrates this:
If your battery has two sets of connectors, then you may not need the marine terminal connector. You can just connect the ring connectors of the Battery Tender to the ring terminals. But since on this second design I was not certain of the battery that would be used, I elected to also include a marine terminal connector. That way the battery can use a classic car battery type terminal.
DC to xPAP Hookup
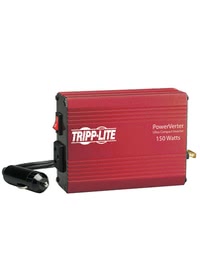
For example, in my original design my xPAP device (a Resmed VPAP AutoSV Enhanced) does not have a converter or direct DC connection. So, I will needed an inverter. The cost of the modified square wave inverter is cheaper than a Pure Sine Wave inverter. So, it's back to the Resmed battery guide:
http://www.resmed.com/us/assets/documen ... lo_eng.pdf
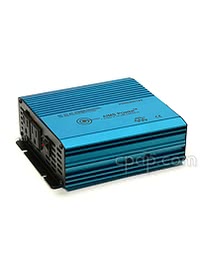
Per page 8 of the Battery Guide, I only require a 150 Watt modified square wave inverter, which costs about $45:
If I wanted the Pure Sine Wave inverter, I would need to purchase a $110 unit:
Ouch! Yup. I'm sticking with using "passive" humidification, if I require the humidifier.
The second design was for a Respironics System One unit that can use a direct DC to xPAP device connection. This greatly simplifies the design and allows just one cable to connect between the battery and the xPAP device.
Hopefully this provides an approach you can use to determine your DC to xPAP device hookup.
Continued to Part 4 (Battery)
Contents
- Introduction
- Warnings and Disclaimer
- Checklist - How to determine YOUR needs & What to shop for **(This Section)**
- Battery - To Complete (Add Portable Batteries, Add UPS Info, Add Calculation Info)
- Battery Tender - Add pointers to other options
- Battery Box - Add Safety Issues for Placement
- Shared Use Connector - Possible Options
- Marine Terminal Coversion & Covers - Pictures
- DC to xPAP Hookup - Include Different Machine DC options
- Completed Setup
Battery Requirement
- What are the power needs for xPAP device?
- Do I need to use the humidifier?
- Would "passive" humidification work?
- Does my humidifier require a "pure sine wave" inverter?
- Is a "converter" available for my unit?
- How many days without charging?
However, for the purpose of this part of the checklist you need to determine your power needs. How much power does your xPAP device consume with and without humification? Do you occasionally loose power for days on end? Can you find another place to sleep after a day or two? Do you absolutely need to have a heated humidifier? Could you even do without a humidifier for a few days? Or would "passive" humidification work? That is you put water in the humidifier and allow the air to flow over it, and pick up *some* humidity. Does your xPAP unit support a direct DC to xPAP connection? Or do you require an inverter? An inverter converts the power from 12VDC to 120VAC. Does your xPAP unit support a converter to convert power from 12VDC to the power requirement of your xPAP device?
These are some of the questions you need to answer to determine your battery requirement.
For example, I have a Resmed VPAP Adapt SV Enhanced (an ASV) type xPAP device. With Resmed, finding your battery power requirements is easier. There is a "Battery Guide", which Resmed Technical Services has put together for users of Resmed xPAP devices:
http://www.resmed.com/us/assets/documen ... lo_eng.pdf
When we loose power, it tends to be for less than a day. So, normally, I only need it for a few hours. But since I live in an area where hurricanes can strike, we sometimes loose power for days at a time. However, after the second day things have normally been cleaned up enough to either find another place to sleep or I've been able to start and use our generator, so I can recharge my battery. So, I feel that I only need to use the battery for two nights (or 16 hours).
Using the chart on page 16 of the guide above, I see that I need a deep cycle battery that is 60 Amp Hours in size. Since that second night of use is pretty rare for us, and the cost of the extra Amp Hours was pretty steep, I elected to purchase and use a 55 Amp Hour battery.
I also know that even if I am using a humidifier, the "passive" humidification will suffice. I just turn off my humidifier and allow the air flowing over the water to humidify the air. It's not great. But it works as a temporary solution.
If I wanted to use the humidifier, I would require a Pure Sine Wave, 300 Watt inverter. And the Amp Hours for ONE night would be 60AH. Two nights would be at least 120 to 140 Amp Hours. That's a $270 battery!!! No, thanks! I can live without the heated humidifier.
This gives you an idea of how to use this information to determine your battery size.
Battery Tender
- How quickly to recharge the battery?
- Will you leave the charger connected?
- Will you store the battery indoors?
In both instances, the charger and battery will always remain connected and indoors in the bedroom. Thus there are no special requirements for the charger as far as environmental conditions go.
The chargers that meet those needs are from Battery Tender:
http://batterytender.com/
The original design only required the lower amperage Battery Tender Junior:
The second design required the higher amperage Battery Tender Plus:
In fact, I ended up finding one that's designed to handle true GEL batteries that have a higher risk of explosion if charged too rapidly. Though I will recommend against getting one of those batteries, the options might be limited. This will help ascertain risks are minimized.
There are other fine manufacturers of this type of battery charger. In general, be certain they are designed to handle long term connection of the battery to the charger and will not overcharge the battery. This type of connection requires proper electronics within the charger, as outline in the following page:
http://batterytender.com/resources/float-charging.htm/
But I reiterate, there are other companies that provide these chargers. I just happened to select this one based on reputation, recommendation from other users. I've been very pleased with the quality of their product.
Battery Box
- What size battery?
- Is it vented?
- Does it have a proper lid and strap?
- A heavy-duty grade battery box for Automotive, Marine, RV and more
- Features locking tabs to securely fasten the lid to the base, reinforced handles to prevent cracking during relocation, and vent caps to limit water entry
- Designed for rugged environments; Impact resistant down to minus 20 degrees Fahrenheit, withstands acid, gas, oil and other contaminants, and immune to UV exposure
- Keeps your battery safe; Limits water entry, effectively collects battery acid, allows adequate ventilation, and protects against accidental contact of battery terminals
- It other words, it should be certified and tested to meet United States Coast Guard (USCG) Code of Federal Regulations 183.420 and American Boat and Yacht Council (ABYC) E-10.7 specifications
All the way up to a battery that looks like this:
Regardless of the size of the battery, you need a battery box that keeps the battery secure and free of excessive movement. The battery box selected in the second design includes a divider to allow a smaller battery to be "secured" within the battery box.
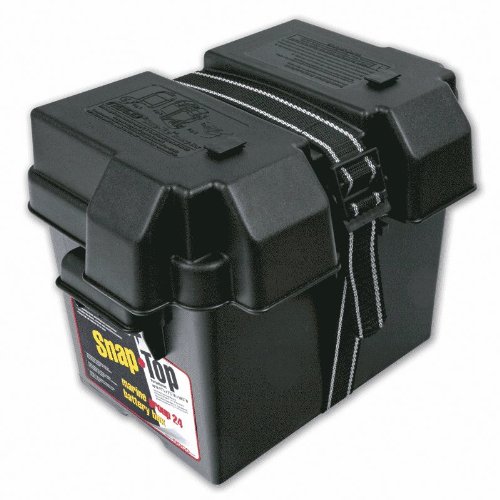
Of course, if you know the size of the battery, then you can select a model of battery box that better fits your needs. For example, if you purchase a Group 24 sized battery , then a box to fit it would be appropriate (and a little less expensive). For instance for a Group 24 sized battery, a Group 24 sized battery box includes:
That's certainly smaller than this second design:
While it's smaller, it's not as flexible. And flexibility is needed if you don't know how large the battery will be. If you know the size, then select for the correct size.
Battery Box Connector & Share Use
- Do you need a longer inside connection to the battery?
- Do you need a modular design?
- Do you need a dual use connection?
- Do you need a connection to go through the battery box lid?
- Do you need a fuse on the battery connector?
The first design did not answer yes to the longer connection. However, I found that after connecting the battery, the connection provided by the battery connectors in the Battery Tender kit were a little awkward. It would be nice to have be able to connect everything, then drop the battery in the battery box, and still have enough slack in the connection line to the inside of the battery box lid and the battery cover connection. So, the second design chose a kit that includes a longer battery connector. Thus the battery can be fully connected (to the battery connection and the inside of the lid) and THEN lifted into the battery box without having the lid dangle on the side.
The modular design both allows flexibility and safety. Using SAE connections, the battery can be safely unplugged and it minimizes the risk of a short circuit. Further, they are designed to require some amount of force to open and close. This minimizes the risk of children or pets accidentally disconnecting the various connections.
The Dual Use connector on the outside of the lid allows the battery charger to be connected but to quickly and easily connect the DC power to the xPAP device. Because there are often power surges when power returns, I recommend disconnecting the battery charger when the DC power is used to power the xPAP device. But this dual use connector makes it MUCH easier to use when power is out and you are fumbling around in the dark. The dual use (shared use) connector is a Y cable connection that allows you to connect the battery box connector (on the OUTSIDE of the lid) to both the xPAP device and the battery charger. It looks like the following picture:
While you can live without a connector through the lid, it makes it much easier to transport the battery. Just disconnect the dual use connection and cap the connector. The Battery Box Connector looks like:
But, you can certainly just run the battery charger connection to the battery terminals. The Battery Tender models include an SAE connection that can be unplugged. You then would have a lead running from the battery under the battery box lid to the outside world. No neat connection. But it might help drop the cost of the design a few dollars. Still, I felt the connector through the lid is both more elegant and safer.
Don't forget that the connection to the battery ABSOLUTELY requires a fuse. This is NOT an option. If a short circuit occurs, you want the fuse to blow and NOT the battery. This part of the design is non-negotiable. Do it right. Protect yourself and those you love.
Terminal Connectors & Covers
- Do you want a permanent battery terminal connection?
- Does your battery include ring posts?
- Or does your battery only have classic car battery terminals?
They work well enough with jumper cables. Why not for this?
Well, the difference is one of permanence. You want a connection that is solid and won't accidentally come disconnected and create the possibility of a short circuit. You do NOT want a long term battery backup design to use this approach. The same reason is why the battery terminal connectors are used in cars. You want to use the same approach with a battery backup design.
Some batteries, especially those designed for "marine" applications, offer smaller posts for "ring" connectors. The ring connectors look something like this:
Those batteries tend to have two sets of posts. One set is often like classic car battery terminals. The other set is smaller / thinner. The following image provides one configuration that demonstrates this:
If your battery has two sets of connectors, then you may not need the marine terminal connector. You can just connect the ring connectors of the Battery Tender to the ring terminals. But since on this second design I was not certain of the battery that would be used, I elected to also include a marine terminal connector. That way the battery can use a classic car battery type terminal.
DC to xPAP Hookup
- Do I need to use the humidifier?
- Would "passive" humidification work?
- Does my humidifier require a "pure sine wave" inverter?
- Is a "converter" available for my unit?
For example, in my original design my xPAP device (a Resmed VPAP AutoSV Enhanced) does not have a converter or direct DC connection. So, I will needed an inverter. The cost of the modified square wave inverter is cheaper than a Pure Sine Wave inverter. So, it's back to the Resmed battery guide:
http://www.resmed.com/us/assets/documen ... lo_eng.pdf
Per page 8 of the Battery Guide, I only require a 150 Watt modified square wave inverter, which costs about $45:
If I wanted the Pure Sine Wave inverter, I would need to purchase a $110 unit:
Ouch! Yup. I'm sticking with using "passive" humidification, if I require the humidifier.
The second design was for a Respironics System One unit that can use a direct DC to xPAP device connection. This greatly simplifies the design and allows just one cable to connect between the battery and the xPAP device.
Hopefully this provides an approach you can use to determine your DC to xPAP device hookup.
Continued to Part 4 (Battery)
_________________
| Mask: Quattro™ FX Full Face CPAP Mask with Headgear |
| Additional Comments: User of xPAP therapy for over 20 yrs. Resmed & Respironics ASV units with EEP=9cm-14cm H2O; PSmin=4cm H2O; PSmax=15cm H2O; Max=25cm H2O |
Last edited by JohnBFisher on Wed May 08, 2013 2:20 pm, edited 5 times in total.
"I get up. I walk. I fall down. Meanwhile, I keep dancing” from Rabbi Hillel
"I wish to paint in such a manner as if I were photographing dreams." from Zdzisław Beksiński
"I wish to paint in such a manner as if I were photographing dreams." from Zdzisław Beksiński
-
JohnBFisher
- Posts: 3821
- Joined: Wed Oct 14, 2009 6:33 am
Battery Backup Design (V2) - Part 4 - Battery
Continued from Part 3 ...
Contents
Deep Cycle Battery
Of course at the core of the unit is the deep cycle battery. There are many options of battery that can be used. I recommend the following links to provide an excellent FAQs for batteries:
http://www.windsun.com/Batteries/Battery_FAQ.htm
http://www.batterystuff.com/tutorial_battery.html
http://batterytender.com/resources/intr ... eries.htm/
Some other websites include:
http://www.backwoodssolar.com/newslette ... enance.pdf
http://marine-electronics.net/techartic ... /b_faq.htm
http://www.aa1car.com/library/battery_safety.htm
http://jgdarden.com/batteryfaq/carfaq14.htm
http://www.wholesalesolar.com/Informati ... nance.html
ResMed also provides a Battery Guide for their xPAP devices. It also includes some basic information about batteries. It is well written and easy to understand.
Storing Batteries
Please be aware, that while you might want to store the battery in your garage, that may well be the worst possible place for it. In general, heat is more destructive of lead acid batteries than anything else. Of course, if your garage is air conditioned (and probably heated for extreme winters), then it would be a fine place to store it. Storing a lead acid battery (especially a sealed battery) in the heat causes the battery to be effective for only two thirds of the normal amount of time. So, if a battery would normally (under ideal conditions) last for 6 years, in the garage (even with ideal charging) it will only last about 4 years. With these batteries in the $120 to $200 dollar range, that's an expensive loss of time.
Additionally, even if you store a battery inside, it must be either left on a charger that can be constantly connected, or must be charged at least every three weeks. If the battery is not charged that frequently, it will also eventually loose its ability to accept and hold a charge.
Why use a Deep Cycle battery? To quote from the WindSun website (above):
Deep cycle batteries typically are "wet" construction. Some have caps over the battery to allow maintenance of the fluid levels. I do not recommend those. Some are sealed, but have regulated valves to allow built of hydrogen. Some are completely sealed. Others, while still "wet" use a "jelly like" compound instead of completely fluid material. This includes Absorbent Glass Mat (AGM) batteries. And some batteries are GEL batteries. I specifically do not recommend GEL batteries, since they run a higher risk of an explosion than other type of batteries. AGM batteries tend to be a better choice for this application than the traditional "wet" or GEL deep cycle batteries.
From my research I found that a standard deep cycle battery provided the best price performance. As I noted, I've used one for about the past 10 to 15 years without problem, so I am sticking to that for this design. Some of these batteries are designed for hybrid use. That is, they both can be used as a "starter" battery and a deep cycle battery. However, since they are not designed specifically for deep cycle operations, they should only occasionally be used for deep cycle use. However, they do tend to be a little less expensive than traditional deep cycle batteries.
During the past 15 years I used deep cycle batteries (all three were for hybrid use). The design works well and lasts a long time.
Note: It is best to purchase a sealed, maintenace free deep cycle battery.
What about UPS units? Well, they can be an option. Some xPAP units require more power than most UPS units provide. Larger UPS units (though more expensive) can be used to power more current xPAP units.
On the downside, not all UPS units have replaceable batteries. Remember, this design (even allowing for additional costs) should run about $40 per year. If you must replace them every few years, the cost becomes quite prohibitive. Worse, they are often not designed to last a long time (only 45 to 90 minutes). Thus, you might not attain a full night of sleep when using an UPS system.
What about portable batteries? These certainly can also be used. However, the cost of those batteries are prohibitive for the power requirements of my ASV unit. Thus, I selected a deep cycle battery to keep my unit going for a couple nights.
What about car batteries? Standard car batteries should NOT be used. They typically are designed to provide a quick boost of energy to start an engine (cold cranking amps), instead of being designed for deep cycle operations. A deep cycle will often ruin such batteries after one or two times they are used.
How much power do I need? ResMed provides a handy Battery Guide to help understand how to hook up and use battery backup for your ResMed unit.
ResMed Battery Guide
For instance, I use a ResMed VPAP Adapt SV Enhanced unit. To use this unit without a humidifier, I need to use a modified sine wave Inverter. That inverter must provide at least 150W sustained output. If I use a humidifer with my ASV unit, I need to use a pure sine wave inverter with at least 300W sustained output and upto 500W peak output.
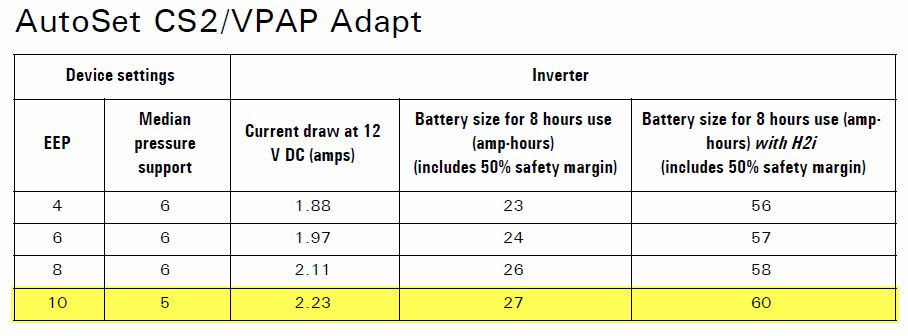
Then based on the pressure setting of my unit, I can determine the size of the battery that I need. On page 16 there is a table titled "AutoSet CS2/VPAP Adapt powered with inverter". My unit uses an ending exhalation pressure (EEP) of 7. To be conservative, I will choose 8 from the table. So, to last 8 hours WITHOUT a humidifier, my unit needs upto 27 amp-hours. To last 8 hours WITH a humidifier, my unit needs upto 60 amp-hours:
How long will power be out? In my area the power rarely is out more than 2 days. In fact, most of the time power is out only for a few hours. However, 2 days provides enough leeway to handle most emergencies.
So, with 2 nights of service but without a humidifier, I will need over 52 amp-hours (AH) from a deep cycle battery. Thus, I purchased a deep cycle battery rated at 55 amp-hours.
What if I had a ResMed S9 AutoSet with DC Conveter?
In that case, I probably would want to use a DC Converter. If my average treatement pressure was 10, and I wanted to use the humidifier at setting three, then per the ResMed Battery Guide on page 19, it indicates I would need only 25 amp-hours to run the unit for 8 hours. That's 8 hours WITH the humidifier!!
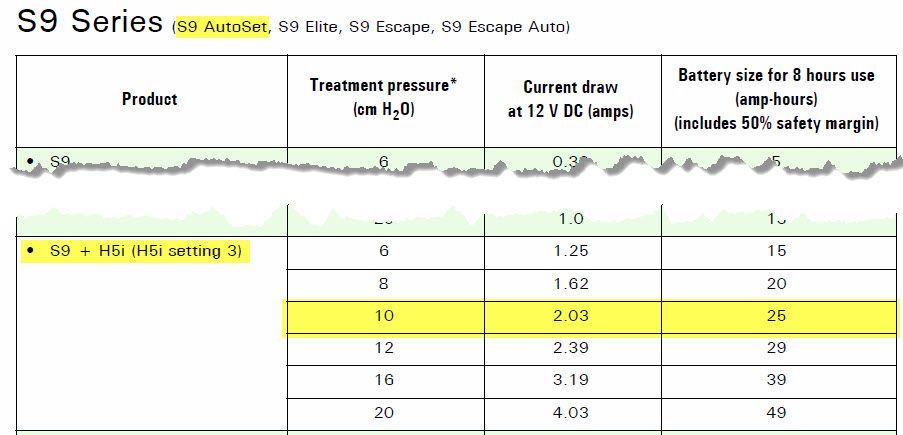
So, to last two nights, I would need a deep cycle battery rated for 30 amp-hours.
What about other units?
Other units by other manufacturers require a little more calculation. One way to determine the size of the battery required is to use the battery calculator with the CPAP battery pack sold by the host of this site:
https://www.cpap.com/cpap-machine/CPAP. ... -Pack.html
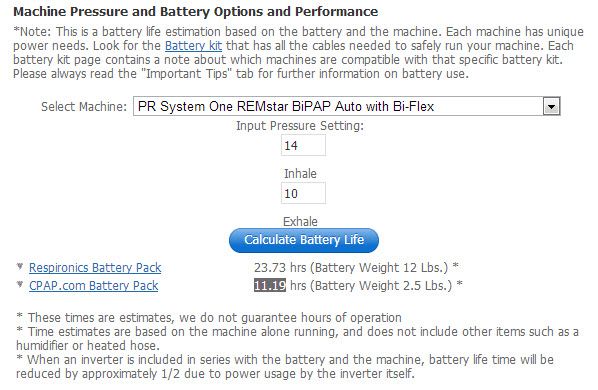
For example, if I had a PR System One REMstar BiPAP Auto with Bi-Flex, and the inhale/exhale pressure is 14/10. That battery pack is rated at 6.6 AH output. That is it can output .33 amps for 20 hours. So, 0.33 Amps times 20 Hours is 6.6 AH. With at xPAP unit, the battery will last 11.9 hours:
Since it lasts 11.19 hours using some simple math, we can determine the actual amperage draw:
If you want to use the humidifier (on a medium setting) it typically doubles the Amp Hour requirement.
If you use an inverter, assume an additional 25% power loss. So, if you calculate the xPAP device pulls 0.59 amps, add 25 percent to that. To calculate it, the xPAP device would draw an additional 0.15 amps (0.59 * 0.25). That means you can expect the amperage to be 0.74 amps. In this case, it would yield about a 24AH battery. As you would expect it's about 25% more than the 19AH noted above.
Where to purchase a deep cycle battery?
I found my deep cycle battery at Batteries Plus. You can also find them at many automotive stores as well as Sears and other stores with automotive departments, such as AutoZone, Pep Boys, etc. Be careful that you purchase a battery that is a deep cycle battery. Remember that in this case, cheaper is probably going to be just that - cheaper. It is worth paying more for a battery that will last longer and not die in the middle of a power outage.
Continued to Part 5 (Battery Tender)
Contents
- Introduction
- Warnings and Disclaimer
- Checklist - How to determine YOUR needs & What to shop for
- Battery - To Complete (Add Portable Batteries, Add UPS Info, Add Calculation Info) **(This Section)**
- Battery Tender - Add pointers to other options
- Battery Box - Add Safety Issues for Placement
- Shared Use Connector - Possible Options
- Marine Terminal Coversion & Covers - Pictures
- DC to xPAP Hookup - Include Different Machine DC options
- Completed Setup
Deep Cycle Battery
Of course at the core of the unit is the deep cycle battery. There are many options of battery that can be used. I recommend the following links to provide an excellent FAQs for batteries:
http://www.windsun.com/Batteries/Battery_FAQ.htm
http://www.batterystuff.com/tutorial_battery.html
http://batterytender.com/resources/intr ... eries.htm/
Some other websites include:
http://www.backwoodssolar.com/newslette ... enance.pdf
http://marine-electronics.net/techartic ... /b_faq.htm
http://www.aa1car.com/library/battery_safety.htm
http://jgdarden.com/batteryfaq/carfaq14.htm
http://www.wholesalesolar.com/Informati ... nance.html
ResMed also provides a Battery Guide for their xPAP devices. It also includes some basic information about batteries. It is well written and easy to understand.
Storing Batteries
Please be aware, that while you might want to store the battery in your garage, that may well be the worst possible place for it. In general, heat is more destructive of lead acid batteries than anything else. Of course, if your garage is air conditioned (and probably heated for extreme winters), then it would be a fine place to store it. Storing a lead acid battery (especially a sealed battery) in the heat causes the battery to be effective for only two thirds of the normal amount of time. So, if a battery would normally (under ideal conditions) last for 6 years, in the garage (even with ideal charging) it will only last about 4 years. With these batteries in the $120 to $200 dollar range, that's an expensive loss of time.
Additionally, even if you store a battery inside, it must be either left on a charger that can be constantly connected, or must be charged at least every three weeks. If the battery is not charged that frequently, it will also eventually loose its ability to accept and hold a charge.
Why use a Deep Cycle battery? To quote from the WindSun website (above):
So, the deep cycle battery can last 4 to 8 years and be reused over and over and over.... Deep cycle batteries are designed to be discharged down as much as 80% time after time, and have much thicker plates. The major difference between a true deep cycle battery and others is that the plates are SOLID Lead plates - not sponge. This gives less surface area, thus less "instant" power like starting batteries need. Although these an be cycled down to 20% charge, the best lifespan vs cost method is to keep the average cycle at about 50% discharge. ...
Deep cycle batteries typically are "wet" construction. Some have caps over the battery to allow maintenance of the fluid levels. I do not recommend those. Some are sealed, but have regulated valves to allow built of hydrogen. Some are completely sealed. Others, while still "wet" use a "jelly like" compound instead of completely fluid material. This includes Absorbent Glass Mat (AGM) batteries. And some batteries are GEL batteries. I specifically do not recommend GEL batteries, since they run a higher risk of an explosion than other type of batteries. AGM batteries tend to be a better choice for this application than the traditional "wet" or GEL deep cycle batteries.
From my research I found that a standard deep cycle battery provided the best price performance. As I noted, I've used one for about the past 10 to 15 years without problem, so I am sticking to that for this design. Some of these batteries are designed for hybrid use. That is, they both can be used as a "starter" battery and a deep cycle battery. However, since they are not designed specifically for deep cycle operations, they should only occasionally be used for deep cycle use. However, they do tend to be a little less expensive than traditional deep cycle batteries.
During the past 15 years I used deep cycle batteries (all three were for hybrid use). The design works well and lasts a long time.
Note: It is best to purchase a sealed, maintenace free deep cycle battery.
What about UPS units? Well, they can be an option. Some xPAP units require more power than most UPS units provide. Larger UPS units (though more expensive) can be used to power more current xPAP units.
On the downside, not all UPS units have replaceable batteries. Remember, this design (even allowing for additional costs) should run about $40 per year. If you must replace them every few years, the cost becomes quite prohibitive. Worse, they are often not designed to last a long time (only 45 to 90 minutes). Thus, you might not attain a full night of sleep when using an UPS system.
What about portable batteries? These certainly can also be used. However, the cost of those batteries are prohibitive for the power requirements of my ASV unit. Thus, I selected a deep cycle battery to keep my unit going for a couple nights.
What about car batteries? Standard car batteries should NOT be used. They typically are designed to provide a quick boost of energy to start an engine (cold cranking amps), instead of being designed for deep cycle operations. A deep cycle will often ruin such batteries after one or two times they are used.
How much power do I need? ResMed provides a handy Battery Guide to help understand how to hook up and use battery backup for your ResMed unit.
ResMed Battery Guide
For instance, I use a ResMed VPAP Adapt SV Enhanced unit. To use this unit without a humidifier, I need to use a modified sine wave Inverter. That inverter must provide at least 150W sustained output. If I use a humidifer with my ASV unit, I need to use a pure sine wave inverter with at least 300W sustained output and upto 500W peak output.
Then based on the pressure setting of my unit, I can determine the size of the battery that I need. On page 16 there is a table titled "AutoSet CS2/VPAP Adapt powered with inverter". My unit uses an ending exhalation pressure (EEP) of 7. To be conservative, I will choose 8 from the table. So, to last 8 hours WITHOUT a humidifier, my unit needs upto 27 amp-hours. To last 8 hours WITH a humidifier, my unit needs upto 60 amp-hours:
How long will power be out? In my area the power rarely is out more than 2 days. In fact, most of the time power is out only for a few hours. However, 2 days provides enough leeway to handle most emergencies.
So, with 2 nights of service but without a humidifier, I will need over 52 amp-hours (AH) from a deep cycle battery. Thus, I purchased a deep cycle battery rated at 55 amp-hours.
What if I had a ResMed S9 AutoSet with DC Conveter?
In that case, I probably would want to use a DC Converter. If my average treatement pressure was 10, and I wanted to use the humidifier at setting three, then per the ResMed Battery Guide on page 19, it indicates I would need only 25 amp-hours to run the unit for 8 hours. That's 8 hours WITH the humidifier!!
So, to last two nights, I would need a deep cycle battery rated for 30 amp-hours.
What about other units?
Other units by other manufacturers require a little more calculation. One way to determine the size of the battery required is to use the battery calculator with the CPAP battery pack sold by the host of this site:
https://www.cpap.com/cpap-machine/CPAP. ... -Pack.html
For example, if I had a PR System One REMstar BiPAP Auto with Bi-Flex, and the inhale/exhale pressure is 14/10. That battery pack is rated at 6.6 AH output. That is it can output .33 amps for 20 hours. So, 0.33 Amps times 20 Hours is 6.6 AH. With at xPAP unit, the battery will last 11.9 hours:
Since it lasts 11.19 hours using some simple math, we can determine the actual amperage draw:
Thus, the amperage for that xPAP device at those pressures (without the humidifier) is 0.59 amps. We want to determine the AH of the battery for it to last for two nights (16 hours) AND leave 50% power reserve, since it's not good to fully discharge a lead acid battery. With the numbers in hand, we do the following math to get the standard Amp Hour battery size:"X" is (20 hours / 11.19 hours) = 1.79 * 0.33 amps (for the 6.6 AH battery) = 0.59 amps
But since we are going for only 16 hours, we know that 16 is 80 percent of 20. So, we need only 80 percent of 23.6 AH. Thus the battery size needed is about 19 Amp Hours (actually 18.88 AH). Thus, a 20 AH battery (not sure you can find a 19AH battery) should last two days and still have enough charge to deplete the battery only to the 50% mark."X" is (double 0.59 amps) * 20 hours
.. or ..
"X" is 1.18 amps x 20 hours is 23.6 AH
If you want to use the humidifier (on a medium setting) it typically doubles the Amp Hour requirement.
If you use an inverter, assume an additional 25% power loss. So, if you calculate the xPAP device pulls 0.59 amps, add 25 percent to that. To calculate it, the xPAP device would draw an additional 0.15 amps (0.59 * 0.25). That means you can expect the amperage to be 0.74 amps. In this case, it would yield about a 24AH battery. As you would expect it's about 25% more than the 19AH noted above.
Where to purchase a deep cycle battery?
I found my deep cycle battery at Batteries Plus. You can also find them at many automotive stores as well as Sears and other stores with automotive departments, such as AutoZone, Pep Boys, etc. Be careful that you purchase a battery that is a deep cycle battery. Remember that in this case, cheaper is probably going to be just that - cheaper. It is worth paying more for a battery that will last longer and not die in the middle of a power outage.
Continued to Part 5 (Battery Tender)
_________________
| Mask: Quattro™ FX Full Face CPAP Mask with Headgear |
| Additional Comments: User of xPAP therapy for over 20 yrs. Resmed & Respironics ASV units with EEP=9cm-14cm H2O; PSmin=4cm H2O; PSmax=15cm H2O; Max=25cm H2O |
Last edited by JohnBFisher on Wed May 08, 2013 5:31 pm, edited 5 times in total.
"I get up. I walk. I fall down. Meanwhile, I keep dancing” from Rabbi Hillel
"I wish to paint in such a manner as if I were photographing dreams." from Zdzisław Beksiński
"I wish to paint in such a manner as if I were photographing dreams." from Zdzisław Beksiński
-
JohnBFisher
- Posts: 3821
- Joined: Wed Oct 14, 2009 6:33 am
Battery Backup Design (V2) - Part 5 - Battery Tender
Continued from Part 4 ...
Contents
With standard lead acid batteries and especially deep cycle batteries that are only periodically used, it is important to keep them charged to maintain their chemistry and charge. If left uncharged for a prolonged period of time it irrevocably damanges the battery.
To maintain this charge, you can periodically maintain the charge. For example, once a month charge the battery. However, if time elapses and the battery is not charged, damage can be done.
It is possible to maintain a trickle charger. However, unless it is designed to stop charging the battery, if left on too long a trickle charger can over charge a battery and thus permanently damage a battery. Worse yet, an overcharged battery is all to liable to explode (diagram from Popular Mechanics):

Instead, the easiest and best way to maintain the charge on a battery is to use a Float Charger. This maintains the charge on the battery, but stops charging once it senses the battery is fully charged. For more information on trickle and float chargers, see:
http://en.wikipedia.org/wiki/Trickle_charging
Though others are available, I chose the Battery Tender Jr. charger in my first design:
The second design required a little more rapid charging, so I chose the Battery Tender Plus:
By the way, you might have the requirement for this setup to be more water resistant. For example, the part number 022-0157-1, is a Battery Tender product that is also waterproof:

Why might you need a waterproof (or at least resistant to water) battery charger? Well, camping and/or boating are two simple and obvious reasons. But no doubt there are plenty of other reasons.
And if you should need an international version, Battery Tender also makes an international and portable version, which is part number 022-0139P-DL-WH:

While I don't envision lugging a battery as you travel internationally, this does allow someone who will stay in a country with 240VAC power to take the battery charger (and even all the components except the battery) with them. In fact someone who lives abroad might need the battery backup system even more than we need it. Once abroad, they can then obtain the battery for the backup system. And once again, you won't loose sleep .. even if the power system is less than reliable.
These Battery Tender chargers are available at the Battery Tender and Amazon websites:
http://www.batterytender.com/
http://www.amazon.com/
In my first design, since I only rarely see power outages, the Battery Tender Jr delivers an adequate charge rate to maintain my battery. However, in the second design it assumes that power interruptions are more frequent. Thus, that V2 design uses the more powerful Battery Tender Plus unit.
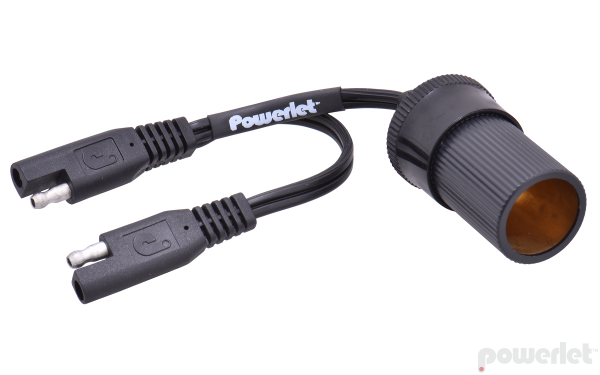
Additionally, one of the advantages of the Battery Tender models is that they use the SAE automotive connectors. So, you can easily add an extension cord to the unit, such as those found at Powerlet.com:
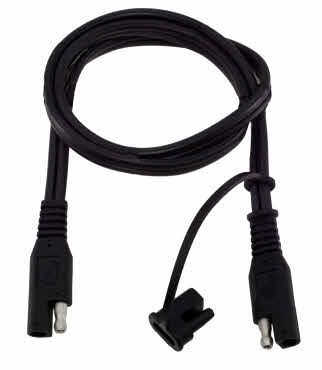
Though the Battery Tender units come with the Ring connectors for the battery, I recommend purchasing a longer Ring connector cable. This is included in the Powerlet package, part number PTB-004, which I now recommend. This allows the lid and the battery to be separated by a larger distance. That makes it a little bit easier to assemble the battery system.
As you can see, there are numerous options available with this design. This flexibility to be tailored to YOUR needs is why I
Continued to Part 6 (Battery Box)
Contents
- Introduction
- Warnings and Disclaimer
- Checklist - How to determine YOUR needs & What to shop for
- Battery - To Complete (Add Portable Batteries, Add UPS Info, Add Calculation Info)
- Battery Tender - Add pointers to other options **(This Section)**
- Battery Box - Add Safety Issues for Placement
- Shared Use Connector - Possible Options
- Marine Terminal Coversion & Covers - Pictures
- DC to xPAP Hookup - Include Different Machine DC options
- Completed Setup
With standard lead acid batteries and especially deep cycle batteries that are only periodically used, it is important to keep them charged to maintain their chemistry and charge. If left uncharged for a prolonged period of time it irrevocably damanges the battery.
To maintain this charge, you can periodically maintain the charge. For example, once a month charge the battery. However, if time elapses and the battery is not charged, damage can be done.
It is possible to maintain a trickle charger. However, unless it is designed to stop charging the battery, if left on too long a trickle charger can over charge a battery and thus permanently damage a battery. Worse yet, an overcharged battery is all to liable to explode (diagram from Popular Mechanics):
Instead, the easiest and best way to maintain the charge on a battery is to use a Float Charger. This maintains the charge on the battery, but stops charging once it senses the battery is fully charged. For more information on trickle and float chargers, see:
http://en.wikipedia.org/wiki/Trickle_charging
Though others are available, I chose the Battery Tender Jr. charger in my first design:
The second design required a little more rapid charging, so I chose the Battery Tender Plus:
By the way, you might have the requirement for this setup to be more water resistant. For example, the part number 022-0157-1, is a Battery Tender product that is also waterproof:
Why might you need a waterproof (or at least resistant to water) battery charger? Well, camping and/or boating are two simple and obvious reasons. But no doubt there are plenty of other reasons.
And if you should need an international version, Battery Tender also makes an international and portable version, which is part number 022-0139P-DL-WH:
While I don't envision lugging a battery as you travel internationally, this does allow someone who will stay in a country with 240VAC power to take the battery charger (and even all the components except the battery) with them. In fact someone who lives abroad might need the battery backup system even more than we need it. Once abroad, they can then obtain the battery for the backup system. And once again, you won't loose sleep .. even if the power system is less than reliable.
These Battery Tender chargers are available at the Battery Tender and Amazon websites:
http://www.batterytender.com/
http://www.amazon.com/
In my first design, since I only rarely see power outages, the Battery Tender Jr delivers an adequate charge rate to maintain my battery. However, in the second design it assumes that power interruptions are more frequent. Thus, that V2 design uses the more powerful Battery Tender Plus unit.
Additionally, one of the advantages of the Battery Tender models is that they use the SAE automotive connectors. So, you can easily add an extension cord to the unit, such as those found at Powerlet.com:
Though the Battery Tender units come with the Ring connectors for the battery, I recommend purchasing a longer Ring connector cable. This is included in the Powerlet package, part number PTB-004, which I now recommend. This allows the lid and the battery to be separated by a larger distance. That makes it a little bit easier to assemble the battery system.
As you can see, there are numerous options available with this design. This flexibility to be tailored to YOUR needs is why I
Continued to Part 6 (Battery Box)
_________________
| Mask: Quattro™ FX Full Face CPAP Mask with Headgear |
| Additional Comments: User of xPAP therapy for over 20 yrs. Resmed & Respironics ASV units with EEP=9cm-14cm H2O; PSmin=4cm H2O; PSmax=15cm H2O; Max=25cm H2O |
Last edited by JohnBFisher on Thu May 09, 2013 10:46 am, edited 4 times in total.
"I get up. I walk. I fall down. Meanwhile, I keep dancing” from Rabbi Hillel
"I wish to paint in such a manner as if I were photographing dreams." from Zdzisław Beksiński
"I wish to paint in such a manner as if I were photographing dreams." from Zdzisław Beksiński
-
JohnBFisher
- Posts: 3821
- Joined: Wed Oct 14, 2009 6:33 am
Battery Backup Design (V2) - Part 6 - Battery Box
Continued from Part 5 ...
Contents
Original Design
There are several key disadvantages to batteries in the bedroom.
First, one of the disadvantages of lead acid batteries is that they do contain acid! Even sealed batteries can leak. That's certainly not somethng that I want uncontained within my bedroom.
Second, it is possible pets and/or little fingers might want to explore the battery. These batteries contain a good deal of power and might hurt those naive, inquisitive fingers and noses. So, sealed and protected makes the most sense for a battery in the bedroom.
Finally, though it probably won't occur, left uncovered and unsealed, it is possible clamps may be knocked off of the battery. Again, this can damage the battery and possibly cause other problems.
For for all three reasons an ounce of prevention is worth a pound of cure! And to do this, I chose a plastic battery box, such as the following image:

It was available at the Batteries Plus store, where I purchased the battery and the Battery Tender Jr.
I also specifically chose a flat top to allow me to modify the top to make it that much more modular than with the rounded top.
Updated V2 Design
In the case of the second design, I was uncertain what size battery might be used, so I picked one that is designed for a single group 24-31 battery. In other words, it can handle a battery that ranges from group 24 to group 31 in size. Thus, from a battery like this:
All the way up to a battery that looks like this:
Regardless of the size of the battery, you need a battery box that keeps the battery secure and free of excessive movement. The battery box selected in the second design includes a divider to allow a smaller battery to be "secured" within the battery box.
Of course, if you know the size of the battery, then you can select a model of battery box that better fits your needs. For example, if you purchase a Group 24 sized battery , then a box to fit it would be appropriate (and a little less expensive). For instance for a Group 24 sized battery, a Group 24 sized battery box includes:
That's certainly smaller than this second design:
While it's smaller, it's not as flexible. And flexibility is needed if you don't know how large the battery will be. If you know the size, then select for the correct size.
Additionally, you want a battery box that includes a strap so the box can be strapped closed. This increases the security of the system by making it another step more difficult for pets and small fingers to open the battery box. Also, if you want, the battery box can be secured to plywood or flooring (if you want). This will further increase the security of the battery system.
Continued to Part 7 (Shared Use Connector)
Contents
- Introduction
- Warnings and Disclaimer
- Checklist - How to determine YOUR needs & What to shop for
- Battery - To Complete (Add Portable Batteries, Add UPS Info, Add Calculation Info)
- Battery Tender - Add pointers to other options
- Battery Box - Add Safety Issues for Placement **(This Section)**
- Shared Use Connector - Possible Options
- Marine Terminal Coversion & Covers - Pictures
- DC to xPAP Hookup - Include Different Machine DC options
- Completed Setup
Original Design
There are several key disadvantages to batteries in the bedroom.
First, one of the disadvantages of lead acid batteries is that they do contain acid! Even sealed batteries can leak. That's certainly not somethng that I want uncontained within my bedroom.
Second, it is possible pets and/or little fingers might want to explore the battery. These batteries contain a good deal of power and might hurt those naive, inquisitive fingers and noses. So, sealed and protected makes the most sense for a battery in the bedroom.
Finally, though it probably won't occur, left uncovered and unsealed, it is possible clamps may be knocked off of the battery. Again, this can damage the battery and possibly cause other problems.
For for all three reasons an ounce of prevention is worth a pound of cure! And to do this, I chose a plastic battery box, such as the following image:
It was available at the Batteries Plus store, where I purchased the battery and the Battery Tender Jr.
I also specifically chose a flat top to allow me to modify the top to make it that much more modular than with the rounded top.
Updated V2 Design
In the case of the second design, I was uncertain what size battery might be used, so I picked one that is designed for a single group 24-31 battery. In other words, it can handle a battery that ranges from group 24 to group 31 in size. Thus, from a battery like this:
All the way up to a battery that looks like this:
Regardless of the size of the battery, you need a battery box that keeps the battery secure and free of excessive movement. The battery box selected in the second design includes a divider to allow a smaller battery to be "secured" within the battery box.
Of course, if you know the size of the battery, then you can select a model of battery box that better fits your needs. For example, if you purchase a Group 24 sized battery , then a box to fit it would be appropriate (and a little less expensive). For instance for a Group 24 sized battery, a Group 24 sized battery box includes:
That's certainly smaller than this second design:
While it's smaller, it's not as flexible. And flexibility is needed if you don't know how large the battery will be. If you know the size, then select for the correct size.
Additionally, you want a battery box that includes a strap so the box can be strapped closed. This increases the security of the system by making it another step more difficult for pets and small fingers to open the battery box. Also, if you want, the battery box can be secured to plywood or flooring (if you want). This will further increase the security of the battery system.
Continued to Part 7 (Shared Use Connector)
_________________
| Mask: Quattro™ FX Full Face CPAP Mask with Headgear |
| Additional Comments: User of xPAP therapy for over 20 yrs. Resmed & Respironics ASV units with EEP=9cm-14cm H2O; PSmin=4cm H2O; PSmax=15cm H2O; Max=25cm H2O |
Last edited by JohnBFisher on Thu May 09, 2013 1:17 am, edited 4 times in total.
"I get up. I walk. I fall down. Meanwhile, I keep dancing” from Rabbi Hillel
"I wish to paint in such a manner as if I were photographing dreams." from Zdzisław Beksiński
"I wish to paint in such a manner as if I were photographing dreams." from Zdzisław Beksiński
-
JohnBFisher
- Posts: 3821
- Joined: Wed Oct 14, 2009 6:33 am
Battery Backup Design (V2) - Part 7 - Shared Use Connector
Continued from Part 6 ...
Contents
Original Design
The secret to this design is the shared use connector. That is, at the same time you charge the battery, the battery can also be connected to an inverter. To do this, you have one of two options. I decided to modify the Battery Box and provide a connector that was securely anchored to the battery. I did not want a loose wire to result in a clamp being pulled loose from the battery. However, it is also reasonable to just use a Y connector.
These SAE connectors are available at Powerlet.com. The model I chose was the "Luggage Electrix Connector and Cigarette Socket". The model number is PTB-003. Though this is more expensive, as the image shows, it is firmly connected to the battery box.
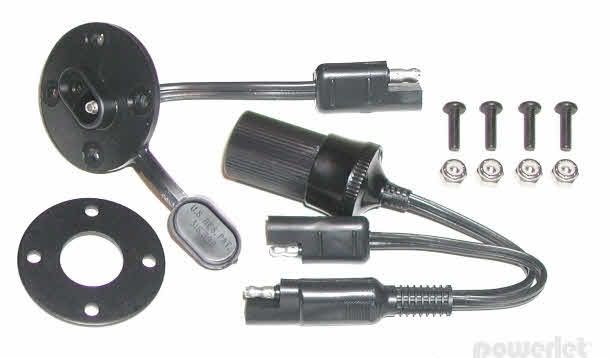
However, the Y connector only is also available:
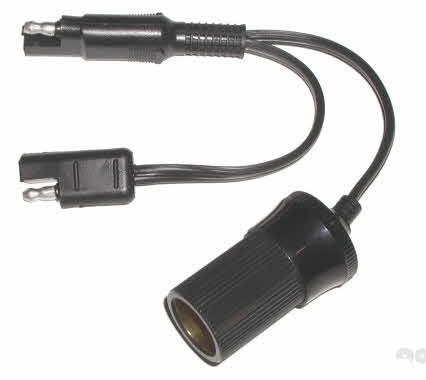
As you can see from the completed battery box, the connector between the battery minder and Y cable is very sturdy and unobtrusive. Wires hanging all over the place is not a good choice for me (due to incoordination). Many others might prefer this, especially if children or animals might tug on the wiring.
I used a drill and a bit to drill the holes for the bolts. I also used a drill with a bit to drill holes to drill the center opening in the battery box. This seemed to be the easiest approach to create the openings in the side of the Battery Box.
First is the modified box with the connector installed.
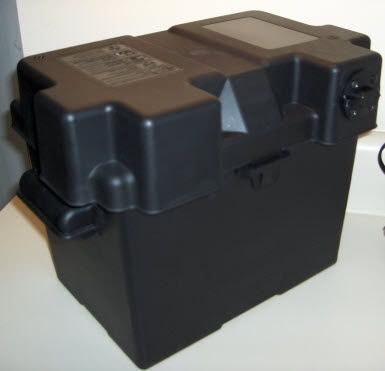
Next is a close up picture of the connector. It can be closed for easy and safe transportation, such as to take the battery car camping (if power if not readily available at the camp site).
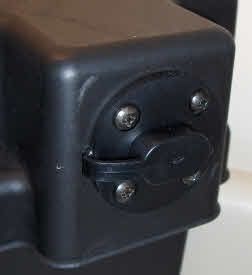
Finally, the connector can be opened and the Y Cable (the shared use connection cable) can be inserted into the connector.

On the inside, the connector is firmly bolted to the battery box cover. The highlighted area shows that it presents the same connector as the end of the cable that leads from the battery tender. Thus, it can connect to either the battery clamp or the battery ring terminal harness. Either of those can then connect to the battery.
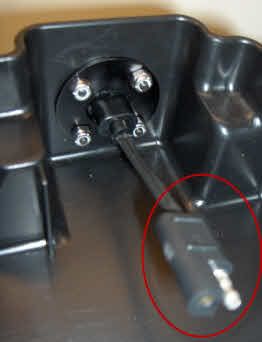
Updated V2 Design
"Live and learn!" .. It's not just a motto, it's what should happen for all of us. We should learn from our own hard won experience. And as we see on this forum, we can and should learn from the hard won experiences of others.
The same thing happened with this design. I still hold fast that the connector for the battery box is an important part of what makes this design both elegant and safe. It's interesting that the best designs tend to also be very elegant. And the sleeker, more professional they appear, the safer they tend to be.
But what I found from using the battery box is that ring terminal connection wire from the ring terminals to the battery box connector on the inside of the battery box is just a little bit too short. While it works, it would work better if there was enough slack to have it connected to the battery and battery box lid and not have it restrict movement. So, while the Battery Tend includes a battery connection for ring terminals, I chose to go with a slightly different version of the "Powerlet Basic Luggage Electrix Tankbag & Saddlebag Power Kit". This one, part number PTB-004 instead of PTB-003, includes a longer connection between the battery and the battery box lid connector.

As you can see, it includes the battery box and the shared use connector. But with the longer connection between the battery and the connector on the inside of the battery box lid, you will have a little better freedom of movement as you assemble this design.
The following picture shows a close up of the connector that goes through the battery box lid. It can be closed for easy and safe transportation, such as to take the battery car camping (if power if not readily available at the camp site).
Once the battery box lid is put on the battery box, the lid is closed, the strap is applied, you can then open the connector an insert the Y Cable (the shared use connection cable). This connector allows either the charger or the xPAP device to be connected.
On the inside of the battery box lid, the connector is firmly bolted to the battery box cover. The highlighted area shows that it presents the same connector as the end of the cable that leads from the battery tender (with the same polarity ... and that's REALLY important). Thus, it can connect to either the battery clamp or the battery ring terminal harness. Either of those can then connect to the battery.
IMPORTANT NOTE: Though you can connect both the battery charger and the xPAP device AT THE SAME TIME, using the shared use cable (the Y cable), I do NOT (repeat, I DO NOT) recommend leaving the battery charger connected to power after you switch to battery power. Here's why:
Continued to Part 7 (Marine Terminal Coversion & Covers)
Contents
- Introduction
- Warnings and Disclaimer
- Checklist - How to determine YOUR needs & What to shop for
- Battery - To Complete (Add Portable Batteries, Add UPS Info, Add Calculation Info)
- Battery Tender - Add pointers to other options
- Battery Box - Add Safety Issues for Placement
- Shared Use Connector - Possible Options **(This Section)**
- Marine Terminal Coversion & Covers - Pictures
- DC to xPAP Hookup - Include Different Machine DC options
- Completed Setup
Original Design
The secret to this design is the shared use connector. That is, at the same time you charge the battery, the battery can also be connected to an inverter. To do this, you have one of two options. I decided to modify the Battery Box and provide a connector that was securely anchored to the battery. I did not want a loose wire to result in a clamp being pulled loose from the battery. However, it is also reasonable to just use a Y connector.
These SAE connectors are available at Powerlet.com. The model I chose was the "Luggage Electrix Connector and Cigarette Socket". The model number is PTB-003. Though this is more expensive, as the image shows, it is firmly connected to the battery box.
However, the Y connector only is also available:
As you can see from the completed battery box, the connector between the battery minder and Y cable is very sturdy and unobtrusive. Wires hanging all over the place is not a good choice for me (due to incoordination). Many others might prefer this, especially if children or animals might tug on the wiring.
I used a drill and a bit to drill the holes for the bolts. I also used a drill with a bit to drill holes to drill the center opening in the battery box. This seemed to be the easiest approach to create the openings in the side of the Battery Box.
First is the modified box with the connector installed.
Next is a close up picture of the connector. It can be closed for easy and safe transportation, such as to take the battery car camping (if power if not readily available at the camp site).
Finally, the connector can be opened and the Y Cable (the shared use connection cable) can be inserted into the connector.
On the inside, the connector is firmly bolted to the battery box cover. The highlighted area shows that it presents the same connector as the end of the cable that leads from the battery tender. Thus, it can connect to either the battery clamp or the battery ring terminal harness. Either of those can then connect to the battery.
Updated V2 Design
"Live and learn!" .. It's not just a motto, it's what should happen for all of us. We should learn from our own hard won experience. And as we see on this forum, we can and should learn from the hard won experiences of others.
The same thing happened with this design. I still hold fast that the connector for the battery box is an important part of what makes this design both elegant and safe. It's interesting that the best designs tend to also be very elegant. And the sleeker, more professional they appear, the safer they tend to be.
But what I found from using the battery box is that ring terminal connection wire from the ring terminals to the battery box connector on the inside of the battery box is just a little bit too short. While it works, it would work better if there was enough slack to have it connected to the battery and battery box lid and not have it restrict movement. So, while the Battery Tend includes a battery connection for ring terminals, I chose to go with a slightly different version of the "Powerlet Basic Luggage Electrix Tankbag & Saddlebag Power Kit". This one, part number PTB-004 instead of PTB-003, includes a longer connection between the battery and the battery box lid connector.
As you can see, it includes the battery box and the shared use connector. But with the longer connection between the battery and the connector on the inside of the battery box lid, you will have a little better freedom of movement as you assemble this design.
The following picture shows a close up of the connector that goes through the battery box lid. It can be closed for easy and safe transportation, such as to take the battery car camping (if power if not readily available at the camp site).
Once the battery box lid is put on the battery box, the lid is closed, the strap is applied, you can then open the connector an insert the Y Cable (the shared use connection cable). This connector allows either the charger or the xPAP device to be connected.
On the inside of the battery box lid, the connector is firmly bolted to the battery box cover. The highlighted area shows that it presents the same connector as the end of the cable that leads from the battery tender (with the same polarity ... and that's REALLY important). Thus, it can connect to either the battery clamp or the battery ring terminal harness. Either of those can then connect to the battery.
IMPORTANT NOTE: Though you can connect both the battery charger and the xPAP device AT THE SAME TIME, using the shared use cable (the Y cable), I do NOT (repeat, I DO NOT) recommend leaving the battery charger connected to power after you switch to battery power. Here's why:
- When power fails, depending on numerous conditions, you might have a surge of power through the normal power lines in your house.
- Occasionally this can cause irreparable harm to electronic components.
- While the battery charger should cut out most of that over/under voltage, with an expensive xPAP device, it is wiser to simply disconnect the battery charger from the AC power supply.
Continued to Part 7 (Marine Terminal Coversion & Covers)
_________________
| Mask: Quattro™ FX Full Face CPAP Mask with Headgear |
| Additional Comments: User of xPAP therapy for over 20 yrs. Resmed & Respironics ASV units with EEP=9cm-14cm H2O; PSmin=4cm H2O; PSmax=15cm H2O; Max=25cm H2O |
Last edited by JohnBFisher on Thu May 09, 2013 10:26 am, edited 3 times in total.
"I get up. I walk. I fall down. Meanwhile, I keep dancing” from Rabbi Hillel
"I wish to paint in such a manner as if I were photographing dreams." from Zdzisław Beksiński
"I wish to paint in such a manner as if I were photographing dreams." from Zdzisław Beksiński
-
JohnBFisher
- Posts: 3821
- Joined: Wed Oct 14, 2009 6:33 am
Battery Backup Design (V2) - Part 8 - Terminals & Covers
Continued from Part 7 ...
Contents
Original Design
Finally, to keep the battery connections as secure as possible, it is important to shift form the battery clamps to a battery post to terminal conversion. This conversion unit connects in a similar manner to most automobile battery connectors. However, instead of a cable coming form the battery post, it provides a terminal, onto which the Ring Terminal Harness of the Battery Tender can be attached. The Ring Terminal Harness looks like this:
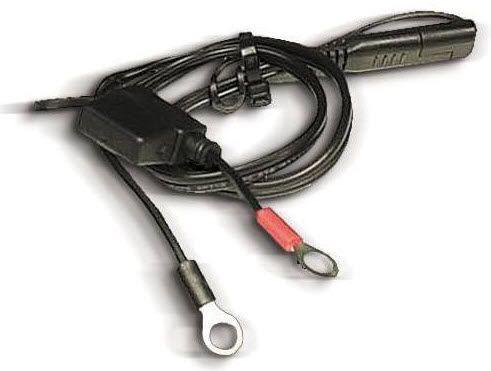
The inside diameter of the ring terminals is 3/8". To connect that to the battery post, we need a 3/8" terminal. To provide the terminal, I chose the "Battery post marine conversions by Quick Cable". It is available at SolarSeller.com The battery post conversion looks like:
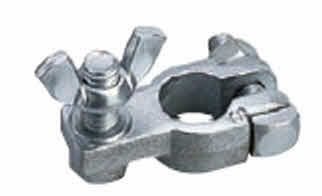
You need two of the positive conversion adpaters, which has a 3/8" threaded steel terminal and wing nut. The part number from this company is # 5516 P.
Then to "cap it off" a set of covers for these marine terminals will help ascertain nothing interferes with the battery connections. The covers are available at SolarSeller.com. The type I chose was the "Marine Terminal Cover - Swivel Type". I purchased a pair (one positive - red, and one negative - black).
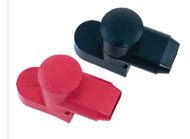
While we are talking about preparing the battery for a long term without any interaction, it's best to also prevent corrosion of the cable clamps. Though the sealed, maintenace free battery will help, the following suggestion from BatteryStuff.com will help avoid issues:

Another URL for sources include:
http://www.vteworld.com/content/electro ... 516_17.php
Updated V2 Design
Here's an area where this design simplifies the process. Sometimes the experience of putting this altogether made it easier for me to track down a few items that combine what's needed and help improve the safety of the design.
The "Schumacher BAF-MT2 Coated Marine Terminal End" from Amazon, provides both a better set of battery terminal connectors and the felt rings to help stop corrosion of the battery terminals. As you can see:

By color coding these, it is much easier to be certain you are connecting the proper connector to the correct terminal. Red to red to red to red .... And I am "Positive" about that! ..
Since part of this design is to require as little attention as possible, we also want to minimize corrosion of the battery terminals. When connected for a long time, battery terminal connectors often develop corrosion, which results from escaping gasses. Though "sealed", and maintenance free batteries help, the following suggestion from BatteryStuff.com helps completely avoid this problem:
Additionally, I found some covers that are a simple one piece design. The item "Ancor 260350 Marine Grade Electrical Battery Terminal Boots (Wing Nut Style, 1 each size 2 and 4, Black/Red, 2-Pack)" is also available from Amazon. As you can see, they still cover the marine terminal connection and the battery terminal connection:
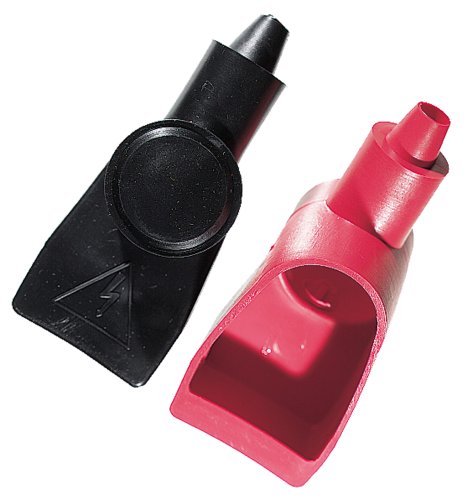
So, the updated design is both a little simpler (fewer items and fewer sources) and it is a little safer (everything is color coded).
Continued to Part 9 (DC to xPAP Hookup)
Contents
- Introduction
- Warnings and Disclaimer
- Checklist - How to determine YOUR needs & What to shop for
- Battery - To Complete (Add Portable Batteries, Add UPS Info, Add Calculation Info)
- Battery Tender - Add pointers to other options
- Battery Box - Add Safety Issues for Placement
- Shared Use Connector - Possible Options
- Marine Terminal Coversion & Covers - Pictures **(This Section)**
- DC to xPAP Hookup - Include Different Machine DC options
- Completed Setup
Original Design
Finally, to keep the battery connections as secure as possible, it is important to shift form the battery clamps to a battery post to terminal conversion. This conversion unit connects in a similar manner to most automobile battery connectors. However, instead of a cable coming form the battery post, it provides a terminal, onto which the Ring Terminal Harness of the Battery Tender can be attached. The Ring Terminal Harness looks like this:
The inside diameter of the ring terminals is 3/8". To connect that to the battery post, we need a 3/8" terminal. To provide the terminal, I chose the "Battery post marine conversions by Quick Cable". It is available at SolarSeller.com The battery post conversion looks like:
You need two of the positive conversion adpaters, which has a 3/8" threaded steel terminal and wing nut. The part number from this company is # 5516 P.
Then to "cap it off" a set of covers for these marine terminals will help ascertain nothing interferes with the battery connections. The covers are available at SolarSeller.com. The type I chose was the "Marine Terminal Cover - Swivel Type". I purchased a pair (one positive - red, and one negative - black).
While we are talking about preparing the battery for a long term without any interaction, it's best to also prevent corrosion of the cable clamps. Though the sealed, maintenace free battery will help, the following suggestion from BatteryStuff.com will help avoid issues:
The following image provides an example of the top post washers I will use:To prevent corrosion of cables on top post batteries use a small bead of silicon sealer at the base of the post and place a felt battery washer over it. Coat the washer with high temperature grease or petroleum jelly (Vaseline), then place cable on the post and tighten. Coat the exposed cable end with the grease.
Another URL for sources include:
http://www.vteworld.com/content/electro ... 516_17.php
Updated V2 Design
Here's an area where this design simplifies the process. Sometimes the experience of putting this altogether made it easier for me to track down a few items that combine what's needed and help improve the safety of the design.
The "Schumacher BAF-MT2 Coated Marine Terminal End" from Amazon, provides both a better set of battery terminal connectors and the felt rings to help stop corrosion of the battery terminals. As you can see:
By color coding these, it is much easier to be certain you are connecting the proper connector to the correct terminal. Red to red to red to red .... And I am "Positive" about that! ..
Since part of this design is to require as little attention as possible, we also want to minimize corrosion of the battery terminals. When connected for a long time, battery terminal connectors often develop corrosion, which results from escaping gasses. Though "sealed", and maintenance free batteries help, the following suggestion from BatteryStuff.com helps completely avoid this problem:
As you will see in the "Completed Setup" section, this does work. It makes the battery backup system pretty much maintenance free. I did little other than test the battery every two or three months (by sleeping with it all night) during the past three years. And it required NO other maintenance. (Okay, the battery box lid was dusted every now and then !! )To prevent corrosion of cables on top post batteries use a small bead of silicon sealer at the base of the post and place a felt battery washer over it. Coat the washer with high temperature grease or petroleum jelly (Vaseline), then place cable on the post and tighten. Coat the exposed cable end with the grease.
Additionally, I found some covers that are a simple one piece design. The item "Ancor 260350 Marine Grade Electrical Battery Terminal Boots (Wing Nut Style, 1 each size 2 and 4, Black/Red, 2-Pack)" is also available from Amazon. As you can see, they still cover the marine terminal connection and the battery terminal connection:
So, the updated design is both a little simpler (fewer items and fewer sources) and it is a little safer (everything is color coded).
Continued to Part 9 (DC to xPAP Hookup)
_________________
| Mask: Quattro™ FX Full Face CPAP Mask with Headgear |
| Additional Comments: User of xPAP therapy for over 20 yrs. Resmed & Respironics ASV units with EEP=9cm-14cm H2O; PSmin=4cm H2O; PSmax=15cm H2O; Max=25cm H2O |
Last edited by JohnBFisher on Thu May 09, 2013 11:07 am, edited 4 times in total.
"I get up. I walk. I fall down. Meanwhile, I keep dancing” from Rabbi Hillel
"I wish to paint in such a manner as if I were photographing dreams." from Zdzisław Beksiński
"I wish to paint in such a manner as if I were photographing dreams." from Zdzisław Beksiński
-
JohnBFisher
- Posts: 3821
- Joined: Wed Oct 14, 2009 6:33 am
Battery Backup Design (V2) - Part 9 - DC to xPAP Hookup
Continued from Part 9 ...
Contents
To simplify this, I will discuss and present four different methods to connect a xPAP device to this DC power supply. This section does not discuss the power requirements or specifics for different units. Review the Checklist section, the manufacturer's specifications, and even CPAP.com, which has much useful information about power requirements.
Direct DC Connection
Respironics
Some xPAP units accept 12V DC input. Those use a "Direct DC Connection". For example, the current PR System One series accept power via a DC connection. Under normal conditions it is connected to 120/240VAC via a transformer (capable of accepting either 120VAC or 240VAC power). However, the output of the transformer is a 12VDC connector. Thus, you can connect these units to a battery system with a simple cable that allows you to plug into a car cigarette lighter receptacle (now known as a power port on a car). The other end then plugs into the power connector (the same as used by the transformer) on the back of the xPAP device.
So, with my newer (but not a Model 60 version) PR System One BiPAP Auto SV Advanced unit, I just needed the correct power cord:
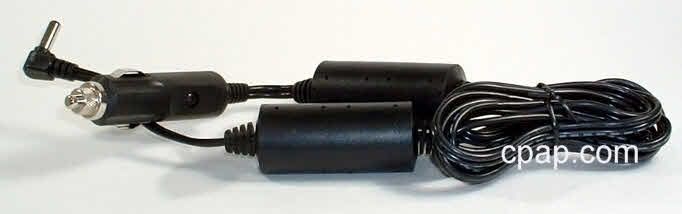
This Respironics "12 Volt DC Power Cord" is available from CPAP.com.
In fact, this cord supports a number of different units. CPAP.com notes:

It appears they include an extra Ferrite bead to help eliminate RFI. See the following article for an explanation of these "beads":
http://en.wikipedia.org/wiki/Ferrite_bead
Intellipap
Intellipap uses a similar connection:
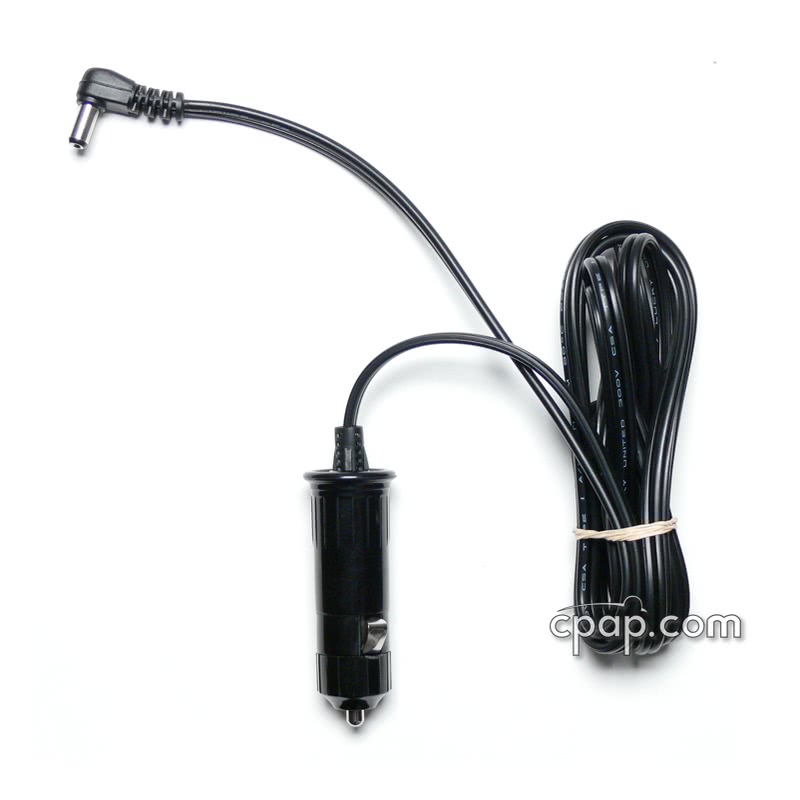
Per CPAP.com:
GoodKnight 420 Series
A slightly different cable is available for the GoodKnight 420 Series:

Available at CPAP.com, this usit is only for the 420 series. The 425 series should use the Respironics cable (above).
DC Converters
So, what's a DC Converter? Technically, it's that converts from one DC power source to another DC power source. Typically the converter changes the voltage from one level to another. It can also be used to regulate the voltage. As an example, if the power of a 12VDC power source (a battery) drops to 11VDC, it will accept that input (within a certain range) and convert it to another DC voltage. For more technical information see:
http://en.wikipedia.org/wiki/DC-to-DC_converter
http://www.maximintegrated.com/app-note ... vp/id/2031
Resmed
The Resmed S9 series units actually accept 24VDC power input. Normally the transformer takes 120/240VAC power and converts it to 24VDC power to the xPAP device. Since the S9 series units use 24VDC as the power input, Resmed built and sells a "DC Converter 24V/90W For S9™ Machines". This is available at CPAP.com:

It's important to note that it accepts either 12VDC or 24VDC power! For example, you could combine two 12VDC batteries (by connecting them in series) to create a 24VDC battery bank. See the following tutorial article for more information:
http://www.batterystuff.com/kb/articles ... orial.html
For Resmed's S8™ Machines they made a different DC converter, known as the "DC-12 Converter For S8™ Machines". It is also available at CPAP.com. As you can see, it is essentially the same (similar function tends to result in similar design):

For Resmed's S8 VPAP™ Auto 25 and VPAP™ ST Machines there is a different DC converter. It is also available at CPAP.com. Likewise, it has a similar form as the other converters:

Respironics
Respironics also dabbled with DC converters. The "RP-DC Power Adapter Kit for Respironics Bipap Machines" is designed for older Respironics BiPAP machines. As CPAP.com notes:
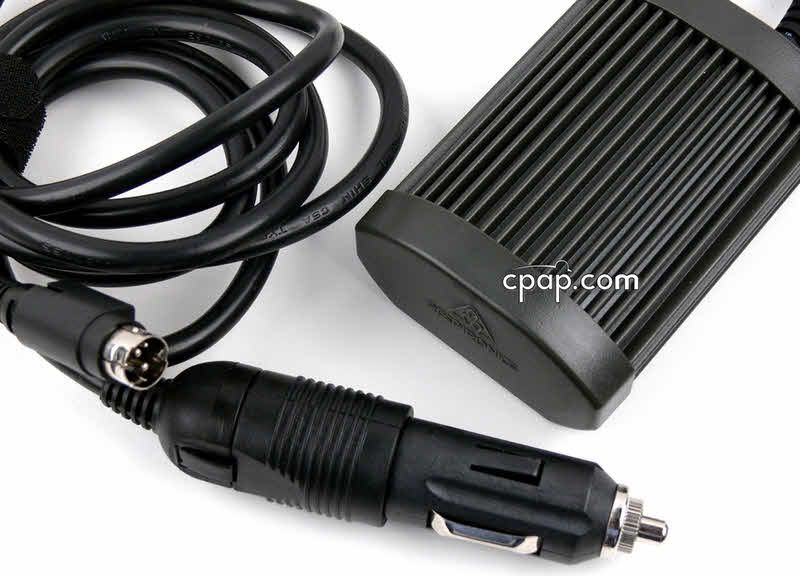
Modified Sine Wave Inverters
An inverter converts from DC to AC voltages. There are two common, basic different types. The first is a Modified Sine Wave inverter. This unit converts from 12VDC to 120VAC. However, it uses a fairly simple circuit that produces a "Modified Sine Wave". Essentially during the alteration, it steps from one level two another. This step from one level to another creates a ""Modified Sine Wave". For example, the following image shows this stepping process:

Typically, this goes from 12V DC to 120V AC. As an example, at the Tripp Lite web site, there is an inverter that provides 150W sustained output (using a modified sine wave). It also has a cigarette ligher/power port adapter at one end but an AC plug adapter at the other end:
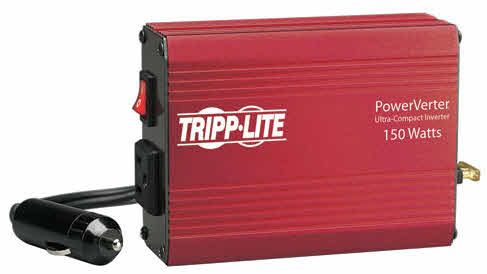
Of course, inverters are available that produce 240VAC as the power output. For example, the following unit is an example available at Amazon:
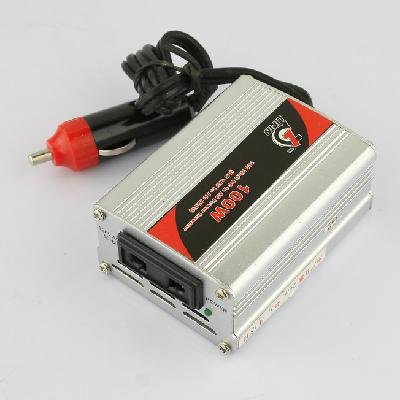
Such a device allows any xPAP unit to be plugged into a cigarette lighter/power port. But the down side of such a unit is that it does use about 25 percent more power than a straight DC connection or DC to DC conversion. Since this can require a significant increase in Amp Hours of the battery, it may both cost more for the battery and require a heavier battery. So, if a Direct DC Connection or DC Converter is available, I would recommend the use of those options.
Pure Sine Wave Inverters
Most modern electrical devices can handle modified sine wave input. With xPAP devices the power supply is designed to accept such stepping in the voltage and properly convert it to DC voltage that the various components xPAP device can use. However, many of the older xPAP devices did not have these more sophisticated power supplies, Those require the output of a Pure Sine Wave Inverter:
Also from CPAP.com, the following picture shows an example of a pure sine wave inverter (300W sustained output).
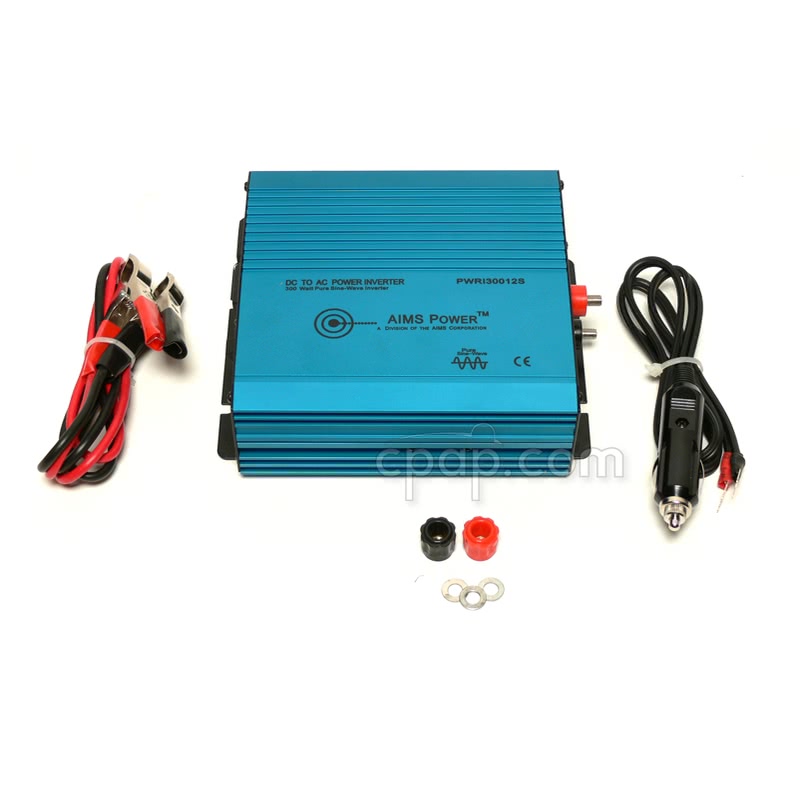
Unfortunately, this particular option includes "spade connectors" to connect the cables to the inverter. That seems to be pretty common with these inverters. However, it raises the possibility of a connector that comes loose and causes a short. My preference would be for a hard wired connection for the DC power input into the inverter.
Fortunately, fewer xPAP devices require these inverters. Sometimes, if you are willing to live without a heated humidifier you can use a modified sine wave inverter. That is both more efficient and it uses much less input power, thus dropping (by almost one half) the size of the battery required to drive your xPAP device.
Continued to Part 10 (Completed Setup)
Contents
- Introduction
- Warnings and Disclaimer
- Checklist - How to determine YOUR needs & What to shop for
- Battery - To Complete (Add Portable Batteries, Add UPS Info, Add Calculation Info)
- Battery Tender - Add pointers to other options
- Battery Box - Add Safety Issues for Placement
- Shared Use Connector - Possible Options
- Marine Terminal Coversion & Covers - Pictures
- DC to xPAP Hookup - Include Different Machine DC options **(This Section)**
- Completed Setup
To simplify this, I will discuss and present four different methods to connect a xPAP device to this DC power supply. This section does not discuss the power requirements or specifics for different units. Review the Checklist section, the manufacturer's specifications, and even CPAP.com, which has much useful information about power requirements.
Direct DC Connection
Respironics
Some xPAP units accept 12V DC input. Those use a "Direct DC Connection". For example, the current PR System One series accept power via a DC connection. Under normal conditions it is connected to 120/240VAC via a transformer (capable of accepting either 120VAC or 240VAC power). However, the output of the transformer is a 12VDC connector. Thus, you can connect these units to a battery system with a simple cable that allows you to plug into a car cigarette lighter receptacle (now known as a power port on a car). The other end then plugs into the power connector (the same as used by the transformer) on the back of the xPAP device.
So, with my newer (but not a Model 60 version) PR System One BiPAP Auto SV Advanced unit, I just needed the correct power cord:
This Respironics "12 Volt DC Power Cord" is available from CPAP.com.
In fact, this cord supports a number of different units. CPAP.com notes:
The newer Respironics System One Model 60 units require a different cord:This cord is compatible with the following units:
- All Respironics M Series Machines
- All PR System One Machines except 60 Series Models
- Respironics REMstar CPAP/APAP Machines (No REMstar BiPAP units)
- Respironics Synchrony Machines
- All Sandman Series Machines
- All IntelliPAP Series Machines
- GoodKnight 425/425 ST BiPAP Machines
It appears they include an extra Ferrite bead to help eliminate RFI. See the following article for an explanation of these "beads":
http://en.wikipedia.org/wiki/Ferrite_bead
Intellipap
Intellipap uses a similar connection:
Per CPAP.com:
In fact, from CPAP.com, the older (non Model 60) Respironics cord also supports the Intellipap xPAP units.This is a 6 foot long cable that can be used to hook the IntelliPAP Standard or AutoAdjust CPAP machines with a 12 volt jack to 12 volt power.
GoodKnight 420 Series
A slightly different cable is available for the GoodKnight 420 Series:
Available at CPAP.com, this usit is only for the 420 series. The 425 series should use the Respironics cable (above).
DC Converters
So, what's a DC Converter? Technically, it's that converts from one DC power source to another DC power source. Typically the converter changes the voltage from one level to another. It can also be used to regulate the voltage. As an example, if the power of a 12VDC power source (a battery) drops to 11VDC, it will accept that input (within a certain range) and convert it to another DC voltage. For more technical information see:
http://en.wikipedia.org/wiki/DC-to-DC_converter
http://www.maximintegrated.com/app-note ... vp/id/2031
Resmed
The Resmed S9 series units actually accept 24VDC power input. Normally the transformer takes 120/240VAC power and converts it to 24VDC power to the xPAP device. Since the S9 series units use 24VDC as the power input, Resmed built and sells a "DC Converter 24V/90W For S9™ Machines". This is available at CPAP.com:
It's important to note that it accepts either 12VDC or 24VDC power! For example, you could combine two 12VDC batteries (by connecting them in series) to create a 24VDC battery bank. See the following tutorial article for more information:
http://www.batterystuff.com/kb/articles ... orial.html
For Resmed's S8™ Machines they made a different DC converter, known as the "DC-12 Converter For S8™ Machines". It is also available at CPAP.com. As you can see, it is essentially the same (similar function tends to result in similar design):
For Resmed's S8 VPAP™ Auto 25 and VPAP™ ST Machines there is a different DC converter. It is also available at CPAP.com. Likewise, it has a similar form as the other converters:
Respironics
Respironics also dabbled with DC converters. The "RP-DC Power Adapter Kit for Respironics Bipap Machines" is designed for older Respironics BiPAP machines. As CPAP.com notes:
Though slightly different in shape, the form is essentially the same as the Resmed DC converters:This item is required for DC usage of the following Respironic BiPAP systems:
- BiPAP Plus
- BiPAP Pro
- BiPAP Pro2
- BiPAP Auto
- BiPAP ST New Gray Model
- BiPap Auto SV
Modified Sine Wave Inverters
An inverter converts from DC to AC voltages. There are two common, basic different types. The first is a Modified Sine Wave inverter. This unit converts from 12VDC to 120VAC. However, it uses a fairly simple circuit that produces a "Modified Sine Wave". Essentially during the alteration, it steps from one level two another. This step from one level to another creates a ""Modified Sine Wave". For example, the following image shows this stepping process:
Typically, this goes from 12V DC to 120V AC. As an example, at the Tripp Lite web site, there is an inverter that provides 150W sustained output (using a modified sine wave). It also has a cigarette ligher/power port adapter at one end but an AC plug adapter at the other end:
Of course, inverters are available that produce 240VAC as the power output. For example, the following unit is an example available at Amazon:
Such a device allows any xPAP unit to be plugged into a cigarette lighter/power port. But the down side of such a unit is that it does use about 25 percent more power than a straight DC connection or DC to DC conversion. Since this can require a significant increase in Amp Hours of the battery, it may both cost more for the battery and require a heavier battery. So, if a Direct DC Connection or DC Converter is available, I would recommend the use of those options.
Pure Sine Wave Inverters
Most modern electrical devices can handle modified sine wave input. With xPAP devices the power supply is designed to accept such stepping in the voltage and properly convert it to DC voltage that the various components xPAP device can use. However, many of the older xPAP devices did not have these more sophisticated power supplies, Those require the output of a Pure Sine Wave Inverter:
Also from CPAP.com, the following picture shows an example of a pure sine wave inverter (300W sustained output).
Unfortunately, this particular option includes "spade connectors" to connect the cables to the inverter. That seems to be pretty common with these inverters. However, it raises the possibility of a connector that comes loose and causes a short. My preference would be for a hard wired connection for the DC power input into the inverter.
Fortunately, fewer xPAP devices require these inverters. Sometimes, if you are willing to live without a heated humidifier you can use a modified sine wave inverter. That is both more efficient and it uses much less input power, thus dropping (by almost one half) the size of the battery required to drive your xPAP device.
Continued to Part 10 (Completed Setup)
_________________
| Mask: Quattro™ FX Full Face CPAP Mask with Headgear |
| Additional Comments: User of xPAP therapy for over 20 yrs. Resmed & Respironics ASV units with EEP=9cm-14cm H2O; PSmin=4cm H2O; PSmax=15cm H2O; Max=25cm H2O |
Last edited by JohnBFisher on Thu May 09, 2013 1:48 pm, edited 6 times in total.
"I get up. I walk. I fall down. Meanwhile, I keep dancing” from Rabbi Hillel
"I wish to paint in such a manner as if I were photographing dreams." from Zdzisław Beksiński
"I wish to paint in such a manner as if I were photographing dreams." from Zdzisław Beksiński
-
JohnBFisher
- Posts: 3821
- Joined: Wed Oct 14, 2009 6:33 am
Battery Backup Design (V2) - Part 10 - Completed Setup
Continued from Part 9 ...
Contents
Overview
So, you stuck with me this far? .. I'm amazed! .. .. There is a lot of information to absorb. But my intent with this entire post is to provide YOU with the information that you or a mechanic need to determine what needs to be put together to help YOU meet your Battery Backup needs.
At this point, I assume you have all the parts ordered and in front of you. With that, we will go through step-by-step the process involved in putting together this Battery Backup Design. We will cover:
Preparing the Battery Box Lid
To prepare the battery box lid, you need to drill several holes through the lid to receive the battery box lid connector and the screws that hold it in place. To do this, you will use a 1" hole saw and a 1/8" drill bit. If you need to purchase the hole saw, be aware that some models include the hole saw arbor and some do not. Ask at your friendly hardware store. In this case, I tend to recommend AGAINST the big box stores, where finding help is a challenge. This is typically a better choice for your neighborhood hardware store. And remember to buy the hole saw from them .. they really do add value in this process.
Here's an example of a 1" hole saw without the arbor.

Sometimes the arbor is welded into the hole saw. Other times it is included, but not welded (often held in place by a set screw). Here's an example of a 1" hole saw with the arbor connected to the hole saw:

The 1/8 inch drill bit does not have to be anything fancy. Here's an example:
With those tools, you will need flip the lid over to find the best spot on the battery box lid to install the connector. In this case on the protruding part of the lid that's designed to allow large battery cables to run under the lid. I then flipped the lid over, found a center point, and drilled the 1" hole with the hole saw. Then using the metal back plate of the battery lid connector (see the next section), I marked and drilled the 1/8 inch holes for the bolts to secure the battery lid connector. The result is a single large hole with four smaller holes surrounding it.

Installing the Battery Box Lid Connector
The next step is to install the battery box lid connector. This uses the connector kit from the "Powerlet Basic Luggage Electrix Tankbag & Saddlebag Power Kit". The entire kit is Powerlet part number PTB-004:
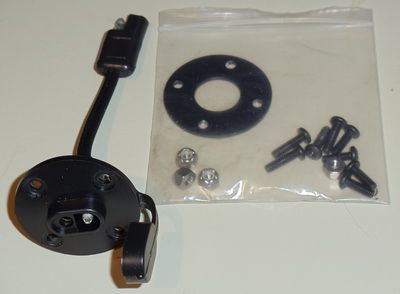
The kit includes a metal backplate that goes on the inside of the battery lid. It is firmly held in place using four bolts and nuts. The connector slips into the larger 1 inch hole with the capped connector toward the outside of the lid. Then the bolts are installed and held in place with the nuts on the inside of the lid, behind the metal plate. The connector kit includes a total of eight bolts. Use the four shorter bolts for the cleanest installation (without bolts jutting out into the inside of the battery box). While it won't hurt anything to use the longer bolts, it makes it cleaner. Plus with the shorter bolts you have less chance of accidentally running into the bolts with you hand.
Here's the outside of the lid with the connector partially installed:
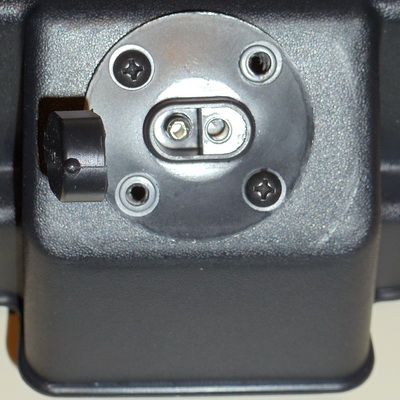
Here's the inside of the lid with the connector partially installed:
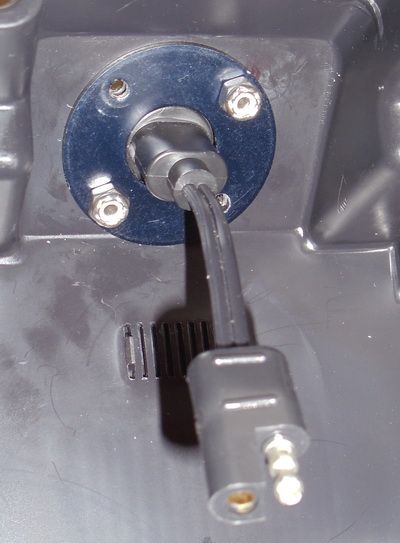
Note that I used a "criss cross" pattern to install and tighten the bolts. This helps avoid unintentional warping of the plastic battery box lid and the connector. Though not essential, a closed box wrench that is 11/32 inches in size makes the installation easier.
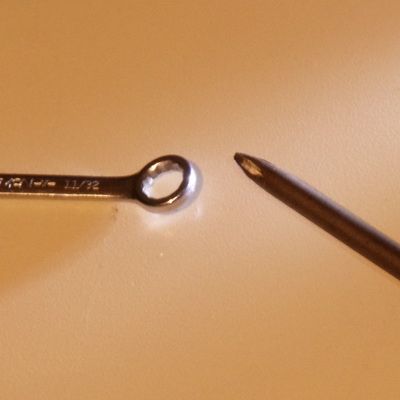
You will also need a Phillips head screw driver. Though you can use a pair of needle nose pliers or an open box wrench to hold the nuts on the inside of the lid, it tends to be easiest to use a closed box wrench. The wrench is a good fit at 11/32 inches in size.
As you tighten the bolts, you might see a slight puckering of the connector on the outside of the lid. Just don't tighten it to the point that it severely warps the plastic of the connector or the lid:

Though this is warped a little, it is held firmly in place and does not interfere with the connector in any manner. It will last a long time.
Note that on first battery backup design the top had a straight edge where the connector was installed and not a sloped area:
As you can see the connector can be closed for easy and safe transportation, such as to take the battery car camping (if power if not readily available at the camp site):
In either event, you want to install this toward the TOP of the battery box lid, not down toward the bottom of the lid where it might interfere with the closing of the lid.
Preparing the Marine Terminal Connectors
Now it's time to prepare the marine terminal connectors, take the LONGER battery connector from the Powerlet kit. You want the longer connector to the left side of the picture with the ring terminal connectors:
Here is a closer view of the cable:
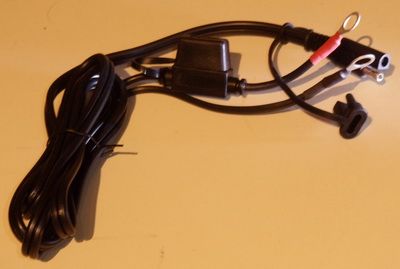
And here is a closer view of the connectors on this cable:
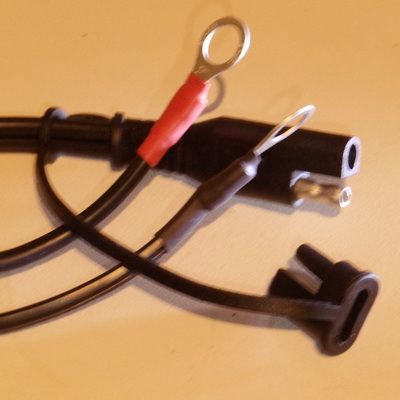
You will note one end of the cable connects to the inside of the battery lid connector (now installed). The other connects to the marine terminal connectors. That's the next thing to do in this step of the process. To prepare, you will need the Marine Terminal Covers and the Marine Terminal Connectors:
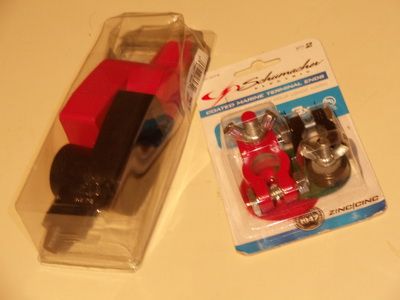
Insert the ring terminal connectors through the appropriately colored Marine Terminal Covers:
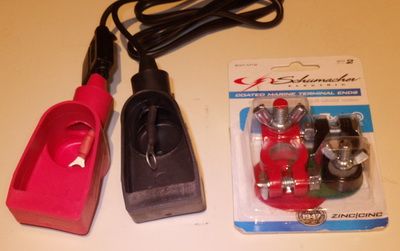
Red to red. This will help guarantee the polarity of the setup remains correct. Note that the fuse on the connector cable limits how far up the Marine Terminal Cover can be pushed up onto the cable. Just flex it out of the way, when you start to connect the ring onto the ring terminal of the Marine Terminal Connector. The following picture demonstrates this:
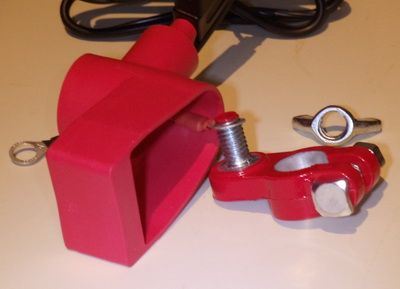
The red ring connector is a tight fit on the red terminal on the Marine Terminal Connector. Simply twirl the Marine Terminal Connector around as if it was a bold threading onto a nut. Once the ring terminal is in place, you can then thread the "wing nut" onto the Marine Terminal Connector:
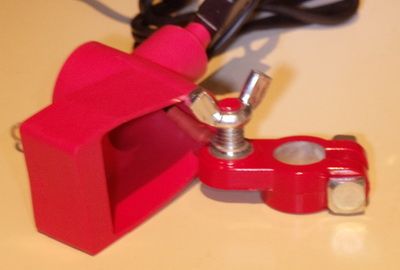
Then you can flip the Marine Terminal Connector over and store it within the Marine Terminal Cover. Repeat this on the other Marine Terminal Connector:
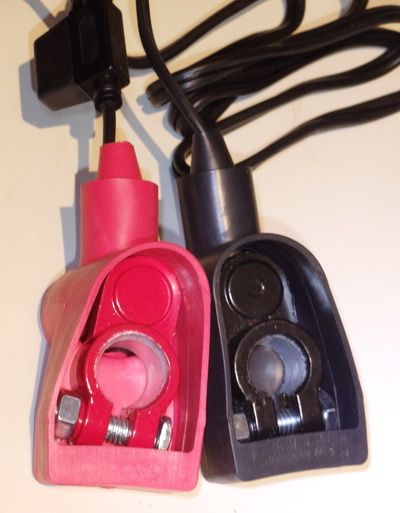
At this point do NOT connect the battery to the Battery Lid Connector!!
Installing the Battery Terminal Connectors
Now it's time to connect all the pieces together. The Marine Terminal Connector needs to be connected to the Battery Terminals. For this you will need a 1/2 inch wrench (I prefer a closed box wrench, but an open end wrench or an adjustable wrench works as well). You will also need a packet of battery grease:

Though I've shown one, it is just one of many that would meet your needs. The key objective is to get a battery grease that can withstand heat and is "dielectric". That is, it does not conduct electricity all that well.
Why not use vaseline? Well, it CAN be used, but does liquify when it gets warm. You want a grease that will stay in place even when it gets warm. These are typically well under $10 (and generally less than $5) for each packet.
You might wonder if you will have to deal with corrosion on the battery terminals. That's the objective of the felt washers and the battery grease. As you can see in the following picture, my original setup has not corroded since I first put on the Marine Terminal Connectors more than three years ago:

To prepare the Battery Terminals, first remove the plastic cover over the battery terminal. Then coat the felt washers with the battery grease. Also coat the battery terminal with the battery grease. (Save a little bit of the grease to cover the Marine Terminal Connectors once they are on the battery). Put the felt washers over the battery terminals. Remember, Red of Red (positive or "+"). The other washer is green and goes over the negative ("-") terminal. However, do this ONE AT A TIME as you install the Marine Terminal Connectors. Do not remove the plastic cover on both terminals at the same time. You want to do one at a time to help avoid the possibility of a short circuit.
To install the Marine Terminal Connectors onto the Battery Terminals, you will want to move the Marine Terminal Cover out of the way and install the Marine Terminal Connectors over the Battery Terminals. The wing nut will will be up and away from the battery. Use the 1/2 inch wrench to tighten the hex nut on the battery. Do not try to tighten the bolt with a square head. It is designed to fit snug up against the Marine Terminal Connector, so you don't need a wrench to hold the bolt in place as you tighten the nut. As you can see in the picture immediately above, the connection should be good and solid.
Once one connector is installed over the terminal, place the Marine Terminal Cover fully over the terminal. Then and only then remove the next plastic cover on the battery and install the next Marine Terminal Connector.
As noted, you need to be VERY careful when installing the connectors. You have some options. Do it one at a time to only one terminal at a time is exposed. Or you can use an insulated wrench:

Or you can use a pair of insulating gloves. Clearly, the easiest solution is to remove the covers for the terminals one at a time.
Now we can complete the rest of the installation of the battery to the battery box lid. You will notice that inside the box (in the highlighted area) the same connector as the end of the marine terminal connection cable is present. Thus, though from different companies, by using the same SAE automotive connector, we can add the battery box access and/or the shared use cable to the battery tender product.
Here's the connector on the inside of the battery box. Note the same SAE connector as the Battery Tendor cable.
This connects to the portion of cable from the battery tender product that connects to the battery. Note how the SAE connectors fit together.
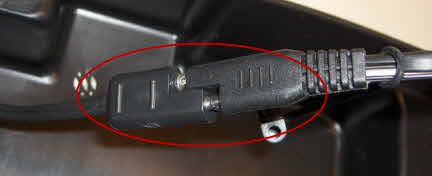
Though the cables fit together snugly, they are not (nor are they intended to be) water tight. Instead, they fit together well enough to not come apart easily. Thus they will stay secure even if the battery box is bumped about a bit.
IMPORTANT NOTE: The SAE connectors are NOT water tight. Thus, this design is not intended for operation where the SAE connectors may be drenched in water.

Once complete, as you can see of this picture of my first version of the design, the battery terminals are all well protected, and the cable can be readily placed out of the way. This is a VERY solid connection. It should not move. It should not have real problems with corrosion. It should not have problems with accidental shorts. I've done what I can to minimize problems.
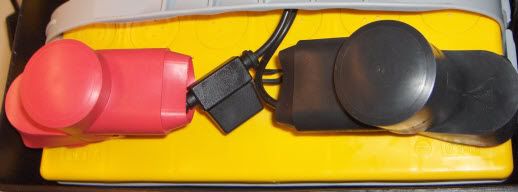
By the way, you will note how I have placed the battery terminal connections. By having them along the length of the box, it helps avoid any strain on the battery cable. It also keeps the entire package nice and need.
As you can see in the photo, that was from the first version of this design. The second version includes a larger battery box. To test out the second version, I installed the separator to help hold the battery in place (so it does not slide around). You can see it below:
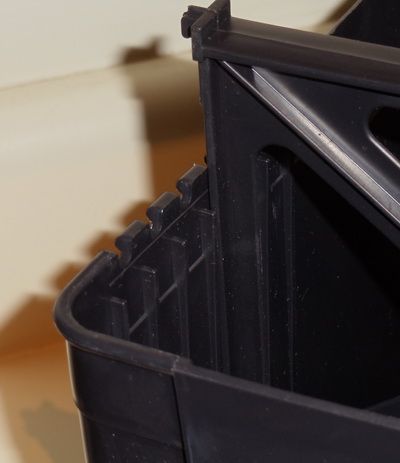
Unfortunately with the first design the cable connecting the battery to the inside of the battery lid connector is a little too short:
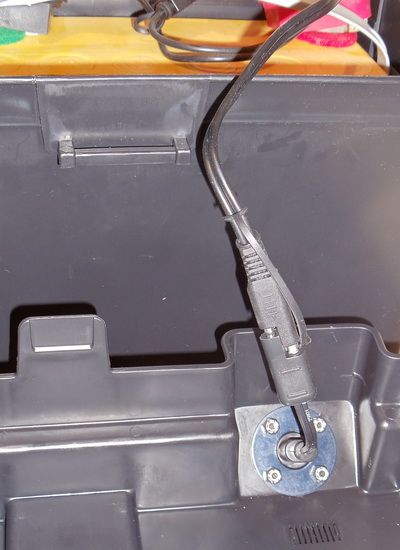
This the second version of this design uses a longer cable. This allows you to connect all the components for the inside of the battery box and NOT have problems with having a cable that's a little too short. It can work, but not everyone has a clear counter to assemble the unit.
Finally, to tidy up the configuration, close the lid. The battery box does include "catches" to help keep the box shut. However, since this will be in an area where little fingers might hunt, an extra method to slow them may help. And to that end, add the strap for the battery box. This helps make it harder for the lid to be removed without adult supervision.

Installing the Battery Charger
Now that the battery box is completed, it's time to prepare the battery box for the Battery Charger. To do that, locate the "Shared Use" or the Y Cable:
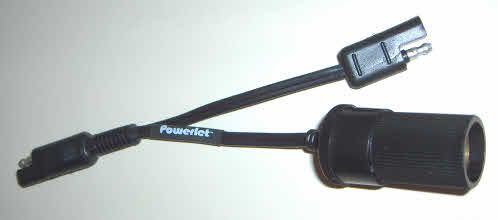
This SAE automotive connector to the left of the Y cable (on the picture below) then plugs into the power outlet on the battery box. The cigarette lighter / power port is where the inverter will connect.

And here they are connected together. The cigarette lighter / power port is ready for the inverter. And the SAE connector on the cable can be connected to the Battery Charger.
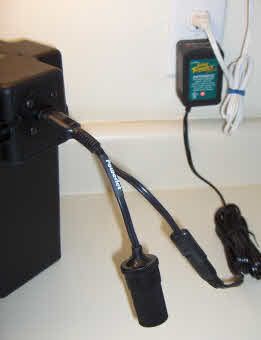
And here is the second version of the design. Unlike the Battery Tender Jr, which only has a DC Power out cable, the larger Battery Tender Plus has two cables. One is a cable to DC power out and the other is the AC power in cable. Please note, the SAE connectors were not fully engaged to show how they connect. Be certain they are fully connected and no metal pins are showing.
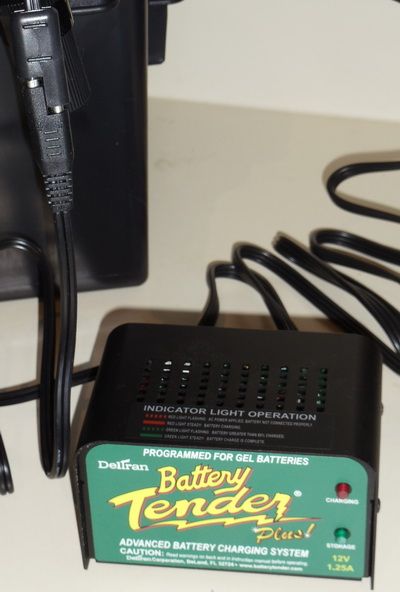
With the first version of this design, I noted the battery charger and DC to xPAP connection can remain connected. While that remains true with V2 of this design, I recommend that the battery charger be removed from AC power before using the DC output from the battery. This will help remove the chance that unusual power conditions in the AC power will impact he xPAP device. Sometimes upon coming back with power there is a power surge. In fact, it often surges and the falls. This over/under voltage can irreparably damage sensitive electronics. And while the Battery Charger should isolate the system from such over/under voltage on the AC power in line, I am a belt and suspenders sort of person. So, just unplug it from the AC power receptacle to be on the safe side.
Installing the DC to xPAP Power Connector
So, what's involved in using the DC power source? It's a simple process:
So, what does this look like in operation? Well my first design used an inverter. The inverter includes both a connector that inserts into an automotive cigarette lighter (also known as a Car Power Port) and the AC receptacle for a standard AC plug. Obviously, the outlet will differ by country and the prevailing voltage.
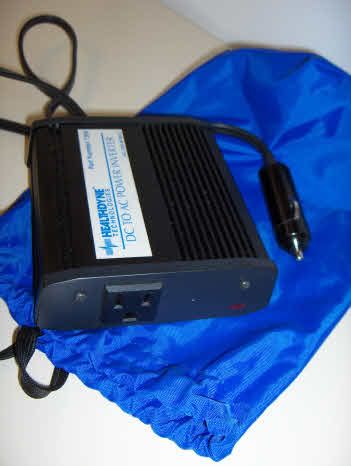
And then we connect it all together. While my first design allows for it to all remain connected, I've since decided this might pose too much of a problem when power surges occur when power is being restored. We've had some "dillies" since I first created this design. So, I now recommend disconnecting the battery charger from the AC power receptacle. Let the DC power supply do it's job as you sleep. In the morning (or when power is restored) you can disconnect the DC power to your xPAP device and reconnect the battery charger to your AC power supply.
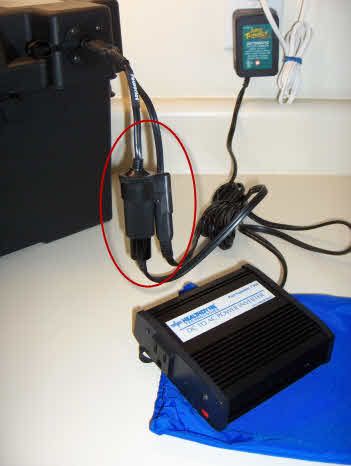
So, here we are at the end of this. Are you still here?? Really?? Wow! I'm impressed!
While this is a VERY extensive post, I hope it will make it easier for others to implement this V2 of my Battery Backup System for you xPAP devices.
Contents
- Introduction
- Warnings and Disclaimer
- Checklist - How to determine YOUR needs & What to shop for
- Battery - To Complete (Add Portable Batteries, Add UPS Info, Add Calculation Info)
- Battery Tender - Add pointers to other options
- Battery Box - Add Safety Issues for Placement
- Shared Use Connector - Possible Options
- Marine Terminal Coversion & Covers - Pictures
- DC to xPAP Hookup - Include Different Machine DC options
- Completed Setup **(This Section)**
Overview
So, you stuck with me this far? .. I'm amazed! .. .. There is a lot of information to absorb. But my intent with this entire post is to provide YOU with the information that you or a mechanic need to determine what needs to be put together to help YOU meet your Battery Backup needs.
At this point, I assume you have all the parts ordered and in front of you. With that, we will go through step-by-step the process involved in putting together this Battery Backup Design. We will cover:
- Preparing the Battery Box Lid
- Installing the Battery Box Lid Connector
- Preparing the Marine Terminal Connectors
- Installing the Battery Terminal Connectors
- Installing the Battery Charger
- Installing the DC to xPAP Power Connector
Preparing the Battery Box Lid
To prepare the battery box lid, you need to drill several holes through the lid to receive the battery box lid connector and the screws that hold it in place. To do this, you will use a 1" hole saw and a 1/8" drill bit. If you need to purchase the hole saw, be aware that some models include the hole saw arbor and some do not. Ask at your friendly hardware store. In this case, I tend to recommend AGAINST the big box stores, where finding help is a challenge. This is typically a better choice for your neighborhood hardware store. And remember to buy the hole saw from them .. they really do add value in this process.
Here's an example of a 1" hole saw without the arbor.
Sometimes the arbor is welded into the hole saw. Other times it is included, but not welded (often held in place by a set screw). Here's an example of a 1" hole saw with the arbor connected to the hole saw:
The 1/8 inch drill bit does not have to be anything fancy. Here's an example:
With those tools, you will need flip the lid over to find the best spot on the battery box lid to install the connector. In this case on the protruding part of the lid that's designed to allow large battery cables to run under the lid. I then flipped the lid over, found a center point, and drilled the 1" hole with the hole saw. Then using the metal back plate of the battery lid connector (see the next section), I marked and drilled the 1/8 inch holes for the bolts to secure the battery lid connector. The result is a single large hole with four smaller holes surrounding it.
Installing the Battery Box Lid Connector
The next step is to install the battery box lid connector. This uses the connector kit from the "Powerlet Basic Luggage Electrix Tankbag & Saddlebag Power Kit". The entire kit is Powerlet part number PTB-004:
The kit includes a metal backplate that goes on the inside of the battery lid. It is firmly held in place using four bolts and nuts. The connector slips into the larger 1 inch hole with the capped connector toward the outside of the lid. Then the bolts are installed and held in place with the nuts on the inside of the lid, behind the metal plate. The connector kit includes a total of eight bolts. Use the four shorter bolts for the cleanest installation (without bolts jutting out into the inside of the battery box). While it won't hurt anything to use the longer bolts, it makes it cleaner. Plus with the shorter bolts you have less chance of accidentally running into the bolts with you hand.
Here's the outside of the lid with the connector partially installed:
Here's the inside of the lid with the connector partially installed:
Note that I used a "criss cross" pattern to install and tighten the bolts. This helps avoid unintentional warping of the plastic battery box lid and the connector. Though not essential, a closed box wrench that is 11/32 inches in size makes the installation easier.
You will also need a Phillips head screw driver. Though you can use a pair of needle nose pliers or an open box wrench to hold the nuts on the inside of the lid, it tends to be easiest to use a closed box wrench. The wrench is a good fit at 11/32 inches in size.
As you tighten the bolts, you might see a slight puckering of the connector on the outside of the lid. Just don't tighten it to the point that it severely warps the plastic of the connector or the lid:
Though this is warped a little, it is held firmly in place and does not interfere with the connector in any manner. It will last a long time.
Note that on first battery backup design the top had a straight edge where the connector was installed and not a sloped area:
As you can see the connector can be closed for easy and safe transportation, such as to take the battery car camping (if power if not readily available at the camp site):
In either event, you want to install this toward the TOP of the battery box lid, not down toward the bottom of the lid where it might interfere with the closing of the lid.
Preparing the Marine Terminal Connectors
Now it's time to prepare the marine terminal connectors, take the LONGER battery connector from the Powerlet kit. You want the longer connector to the left side of the picture with the ring terminal connectors:
Here is a closer view of the cable:
And here is a closer view of the connectors on this cable:
You will note one end of the cable connects to the inside of the battery lid connector (now installed). The other connects to the marine terminal connectors. That's the next thing to do in this step of the process. To prepare, you will need the Marine Terminal Covers and the Marine Terminal Connectors:
Insert the ring terminal connectors through the appropriately colored Marine Terminal Covers:
Red to red. This will help guarantee the polarity of the setup remains correct. Note that the fuse on the connector cable limits how far up the Marine Terminal Cover can be pushed up onto the cable. Just flex it out of the way, when you start to connect the ring onto the ring terminal of the Marine Terminal Connector. The following picture demonstrates this:
The red ring connector is a tight fit on the red terminal on the Marine Terminal Connector. Simply twirl the Marine Terminal Connector around as if it was a bold threading onto a nut. Once the ring terminal is in place, you can then thread the "wing nut" onto the Marine Terminal Connector:
Then you can flip the Marine Terminal Connector over and store it within the Marine Terminal Cover. Repeat this on the other Marine Terminal Connector:
At this point do NOT connect the battery to the Battery Lid Connector!!
Installing the Battery Terminal Connectors
Now it's time to connect all the pieces together. The Marine Terminal Connector needs to be connected to the Battery Terminals. For this you will need a 1/2 inch wrench (I prefer a closed box wrench, but an open end wrench or an adjustable wrench works as well). You will also need a packet of battery grease:
Though I've shown one, it is just one of many that would meet your needs. The key objective is to get a battery grease that can withstand heat and is "dielectric". That is, it does not conduct electricity all that well.
Why not use vaseline? Well, it CAN be used, but does liquify when it gets warm. You want a grease that will stay in place even when it gets warm. These are typically well under $10 (and generally less than $5) for each packet.
You might wonder if you will have to deal with corrosion on the battery terminals. That's the objective of the felt washers and the battery grease. As you can see in the following picture, my original setup has not corroded since I first put on the Marine Terminal Connectors more than three years ago:
To prepare the Battery Terminals, first remove the plastic cover over the battery terminal. Then coat the felt washers with the battery grease. Also coat the battery terminal with the battery grease. (Save a little bit of the grease to cover the Marine Terminal Connectors once they are on the battery). Put the felt washers over the battery terminals. Remember, Red of Red (positive or "+"). The other washer is green and goes over the negative ("-") terminal. However, do this ONE AT A TIME as you install the Marine Terminal Connectors. Do not remove the plastic cover on both terminals at the same time. You want to do one at a time to help avoid the possibility of a short circuit.
To install the Marine Terminal Connectors onto the Battery Terminals, you will want to move the Marine Terminal Cover out of the way and install the Marine Terminal Connectors over the Battery Terminals. The wing nut will will be up and away from the battery. Use the 1/2 inch wrench to tighten the hex nut on the battery. Do not try to tighten the bolt with a square head. It is designed to fit snug up against the Marine Terminal Connector, so you don't need a wrench to hold the bolt in place as you tighten the nut. As you can see in the picture immediately above, the connection should be good and solid.
Once one connector is installed over the terminal, place the Marine Terminal Cover fully over the terminal. Then and only then remove the next plastic cover on the battery and install the next Marine Terminal Connector.
As noted, you need to be VERY careful when installing the connectors. You have some options. Do it one at a time to only one terminal at a time is exposed. Or you can use an insulated wrench:
Or you can use a pair of insulating gloves. Clearly, the easiest solution is to remove the covers for the terminals one at a time.
Now we can complete the rest of the installation of the battery to the battery box lid. You will notice that inside the box (in the highlighted area) the same connector as the end of the marine terminal connection cable is present. Thus, though from different companies, by using the same SAE automotive connector, we can add the battery box access and/or the shared use cable to the battery tender product.
Here's the connector on the inside of the battery box. Note the same SAE connector as the Battery Tendor cable.
This connects to the portion of cable from the battery tender product that connects to the battery. Note how the SAE connectors fit together.
Though the cables fit together snugly, they are not (nor are they intended to be) water tight. Instead, they fit together well enough to not come apart easily. Thus they will stay secure even if the battery box is bumped about a bit.
IMPORTANT NOTE: The SAE connectors are NOT water tight. Thus, this design is not intended for operation where the SAE connectors may be drenched in water.
Once complete, as you can see of this picture of my first version of the design, the battery terminals are all well protected, and the cable can be readily placed out of the way. This is a VERY solid connection. It should not move. It should not have real problems with corrosion. It should not have problems with accidental shorts. I've done what I can to minimize problems.
By the way, you will note how I have placed the battery terminal connections. By having them along the length of the box, it helps avoid any strain on the battery cable. It also keeps the entire package nice and need.
As you can see in the photo, that was from the first version of this design. The second version includes a larger battery box. To test out the second version, I installed the separator to help hold the battery in place (so it does not slide around). You can see it below:
Unfortunately with the first design the cable connecting the battery to the inside of the battery lid connector is a little too short:
This the second version of this design uses a longer cable. This allows you to connect all the components for the inside of the battery box and NOT have problems with having a cable that's a little too short. It can work, but not everyone has a clear counter to assemble the unit.
Finally, to tidy up the configuration, close the lid. The battery box does include "catches" to help keep the box shut. However, since this will be in an area where little fingers might hunt, an extra method to slow them may help. And to that end, add the strap for the battery box. This helps make it harder for the lid to be removed without adult supervision.
Installing the Battery Charger
Now that the battery box is completed, it's time to prepare the battery box for the Battery Charger. To do that, locate the "Shared Use" or the Y Cable:
This SAE automotive connector to the left of the Y cable (on the picture below) then plugs into the power outlet on the battery box. The cigarette lighter / power port is where the inverter will connect.
And here they are connected together. The cigarette lighter / power port is ready for the inverter. And the SAE connector on the cable can be connected to the Battery Charger.
And here is the second version of the design. Unlike the Battery Tender Jr, which only has a DC Power out cable, the larger Battery Tender Plus has two cables. One is a cable to DC power out and the other is the AC power in cable. Please note, the SAE connectors were not fully engaged to show how they connect. Be certain they are fully connected and no metal pins are showing.
With the first version of this design, I noted the battery charger and DC to xPAP connection can remain connected. While that remains true with V2 of this design, I recommend that the battery charger be removed from AC power before using the DC output from the battery. This will help remove the chance that unusual power conditions in the AC power will impact he xPAP device. Sometimes upon coming back with power there is a power surge. In fact, it often surges and the falls. This over/under voltage can irreparably damage sensitive electronics. And while the Battery Charger should isolate the system from such over/under voltage on the AC power in line, I am a belt and suspenders sort of person. So, just unplug it from the AC power receptacle to be on the safe side.
Installing the DC to xPAP Power Connector
So, what's involved in using the DC power source? It's a simple process:
- Unplug the battery charger from the AC power input receptacle.
- Plug the DC power connector for your xPAP device into the SAE Y Cable Cigarette Socket
- If you configuration includes DC Direct Connection or DC Converter, unplug the xPAP device from the normal power supply and plug the other end into the xPAP device
- If your configuration includes an inverter, then unplug the xPAP device from the normal AC power receptacle and plug the AC cable into the inverter.
Go back to sleep.
So, what does this look like in operation? Well my first design used an inverter. The inverter includes both a connector that inserts into an automotive cigarette lighter (also known as a Car Power Port) and the AC receptacle for a standard AC plug. Obviously, the outlet will differ by country and the prevailing voltage.
And then we connect it all together. While my first design allows for it to all remain connected, I've since decided this might pose too much of a problem when power surges occur when power is being restored. We've had some "dillies" since I first created this design. So, I now recommend disconnecting the battery charger from the AC power receptacle. Let the DC power supply do it's job as you sleep. In the morning (or when power is restored) you can disconnect the DC power to your xPAP device and reconnect the battery charger to your AC power supply.
So, here we are at the end of this. Are you still here?? Really?? Wow! I'm impressed!
While this is a VERY extensive post, I hope it will make it easier for others to implement this V2 of my Battery Backup System for you xPAP devices.
_________________
| Mask: Quattro™ FX Full Face CPAP Mask with Headgear |
| Additional Comments: User of xPAP therapy for over 20 yrs. Resmed & Respironics ASV units with EEP=9cm-14cm H2O; PSmin=4cm H2O; PSmax=15cm H2O; Max=25cm H2O |
Last edited by JohnBFisher on Fri May 10, 2013 12:23 pm, edited 1 time in total.
"I get up. I walk. I fall down. Meanwhile, I keep dancing” from Rabbi Hillel
"I wish to paint in such a manner as if I were photographing dreams." from Zdzisław Beksiński
"I wish to paint in such a manner as if I were photographing dreams." from Zdzisław Beksiński
-
JohnBFisher
- Posts: 3821
- Joined: Wed Oct 14, 2009 6:33 am
Re: Battery Backup Design (V2) - Release the Hounds!!
Well, here's V2 of my Battery Backup Design. I will be making some edits to this document over the course of the next few days. I will also create a PDF version of the post. Once that's complete, I will post a link to it in the first reply to this post.
Here's hoping this post as helpful for others as the original post seemed to be.
Here's hoping this post as helpful for others as the original post seemed to be.
_________________
| Mask: Quattro™ FX Full Face CPAP Mask with Headgear |
| Additional Comments: User of xPAP therapy for over 20 yrs. Resmed & Respironics ASV units with EEP=9cm-14cm H2O; PSmin=4cm H2O; PSmax=15cm H2O; Max=25cm H2O |
"I get up. I walk. I fall down. Meanwhile, I keep dancing” from Rabbi Hillel
"I wish to paint in such a manner as if I were photographing dreams." from Zdzisław Beksiński
"I wish to paint in such a manner as if I were photographing dreams." from Zdzisław Beksiński
-
Sir NoddinOff

- Posts: 4190
- Joined: Mon May 14, 2012 5:30 pm
- Location: California
Re: Battery Backup Design (V2)
Nice compendium on the battery backup design - not to mention, diligent research and testing. I plan to try it all out in the near future and will give you feedback. With some extra design implementation, I still think deep charge marine batteries are a good cheap solution for car camping.
However, fair warning, you are in trouble with my wife who hates camping. She thought I was done with it when I started CPAP . BTW, I still love to camp all over California and the Southwest... more importantly so do both my kids (adult kids). She can stay at home and go to the spa. EDIT: why don't you just sell the whole outfit. Maybe you could make a few bucks off the deal and help a lot of folks out
However, fair warning, you are in trouble with my wife who hates camping. She thought I was done with it when I started CPAP . BTW, I still love to camp all over California and the Southwest... more importantly so do both my kids (adult kids). She can stay at home and go to the spa. EDIT: why don't you just sell the whole outfit. Maybe you could make a few bucks off the deal and help a lot of folks out
_________________
| Mask: AirFit™ F10 Full Face Mask with Headgear |
| Additional Comments: Sleepyhead software v.0.9.8.1 Open GL and Encore Pro v2.2. |
Last edited by Sir NoddinOff on Sat May 11, 2013 4:30 pm, edited 1 time in total.
I like my ResMed AirFit F10 FFM - reasonably low leaks for my ASV therapy. I'm currently using a PR S1 AutoSV 960P Advanced. I also keep a ResMed S9 Adapt as backup. I use a heated Hibernite hose. Still rockin' with Win 7 by using GWX to stop Win 10.
-
JohnBFisher
- Posts: 3821
- Joined: Wed Oct 14, 2009 6:33 am
Re: Battery Backup Design (V2)
Any other suggestions? Or did I just overwhelm everyone with this post?
_________________
| Mask: Quattro™ FX Full Face CPAP Mask with Headgear |
| Additional Comments: User of xPAP therapy for over 20 yrs. Resmed & Respironics ASV units with EEP=9cm-14cm H2O; PSmin=4cm H2O; PSmax=15cm H2O; Max=25cm H2O |
"I get up. I walk. I fall down. Meanwhile, I keep dancing” from Rabbi Hillel
"I wish to paint in such a manner as if I were photographing dreams." from Zdzisław Beksiński
"I wish to paint in such a manner as if I were photographing dreams." from Zdzisław Beksiński
Re: Battery Backup Design (V2)
Well done! Stands to be a reference that will be used for years to come!JohnBFisher wrote:Any other suggestions? Or did I just overwhelm everyone with this post?
A few suggestions for additions:
1) The document could use an overview of the final, completed and set up product, with pictures. This would best be at the very beginning of the document. This will help draw together all the sections with the details.
2) Appendices: a) parts list of all the various pieces is needed. Something that could be printed and taken to the store, or used as a check list. b) A collated list of references and sources would be useful.
3) Not sure if it's there, but some notes about care and maintenance of a deep cycle battery (in an appendix) would be helpful.
I'm workin' on it.