MY HOSE MANAGEMENT AND POWER SOURCE SYSTEMS

General Discussion on any topic relating to CPAP and/or Sleep Apnea.
User avatar
resistance
Posts: 65
Joined: Sat May 22, 2010 3:24 pm
Location: Ankara, TR

MY HOSE MANAGEMENT AND POWER SOURCE SYSTEMS

Post by resistance » Sun Jul 18, 2010 5:50 pm

Ok, this could be a long long post to read, but I'll try to keep it as short as I can with pictures.

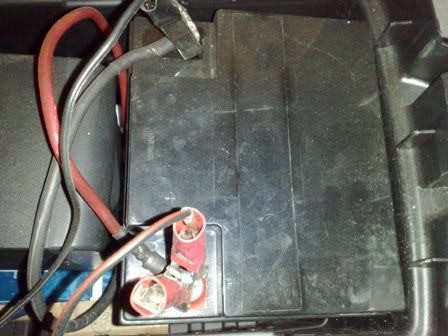
Since the beginning, managing the hose has always been a problem for me. For the last couple of weeks, I often started waking up with the hose around my neck, strangling me like a snake:) My other problem was about power outages which were causing me to wake up sweating and trying to breath hardly through the mask's vent hole (and eventually ripping the mask off).

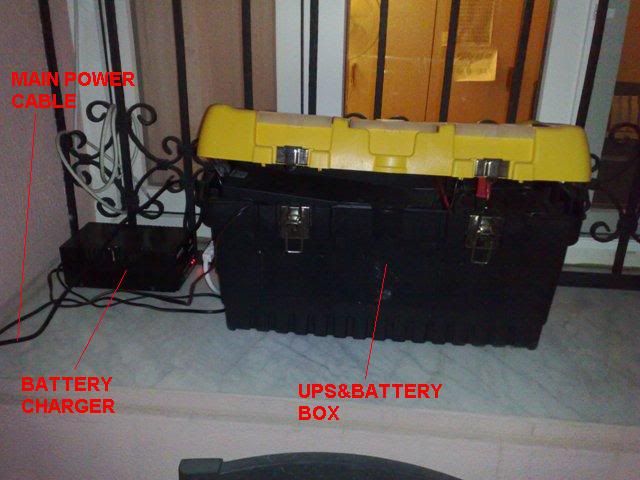
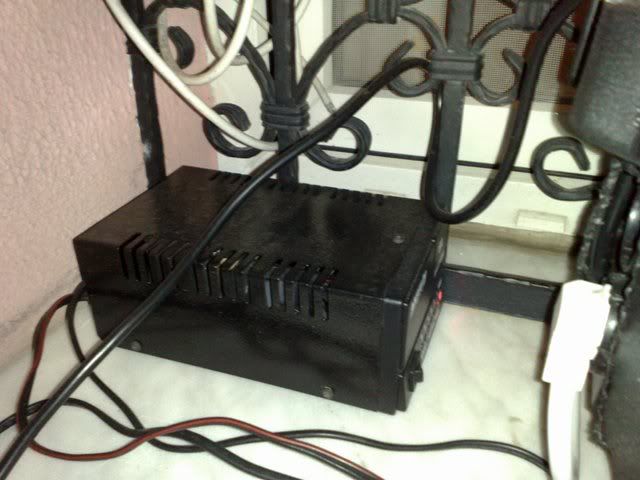
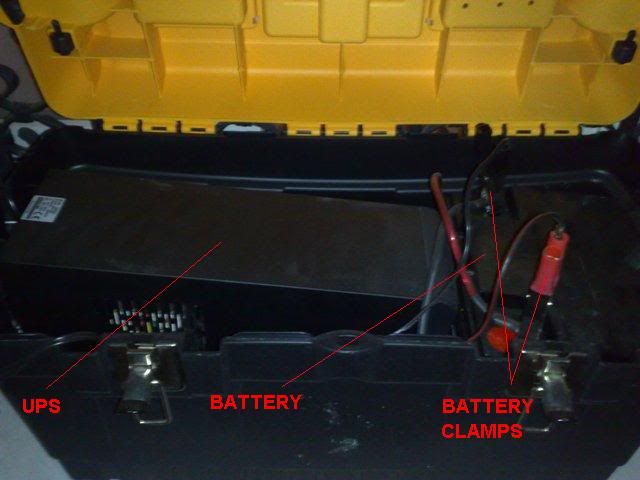
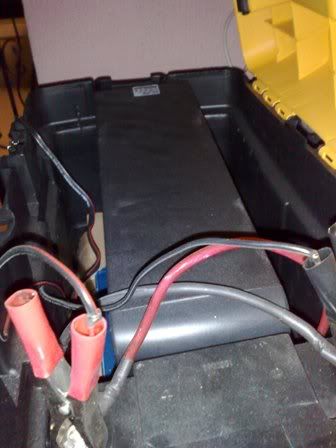
So I firstly designed things in my mind, did some research, and made two very simple, robust, affordable, "DIY" type systems; one for hose management and the other for providing continuous power for my CPAP machine. My rule was "KISS"(Keep it simple and stupid)

WARNING: THE FOLLOWING DOCUMENT IS ONLY FOR SHARING MY OWN PERSONAL EXPERIENCE. PLEASE BE AWARE THAT I DO NOT ENDORSE ANY OF THESE SYSTEMS AND THEREFORE NOT RESPONSIBLE FOR ANY POSSIBLE DAMAGE THAT YOU MAY ENCOUNTER.

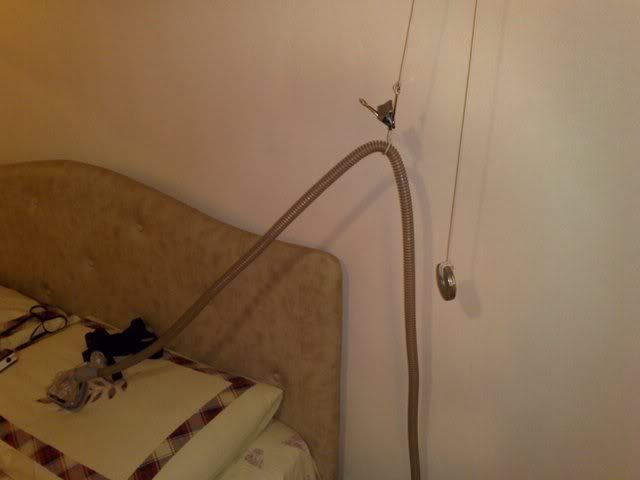
SINGLE PULLEY HOSE MANAGEMENT SYSTEM:

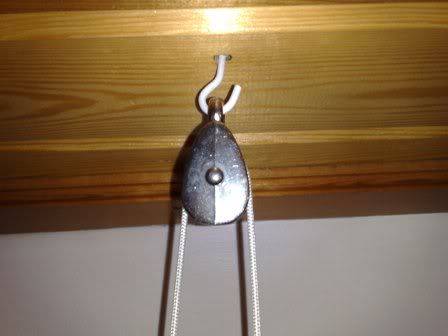
Things needed: A hook, a small pulley wheel, some rope(about 1 mm thick for gaining optimal tension), a paper clip, some metal nuts for weight.

Well, as I've said it's simple and stupid as possible:
Image

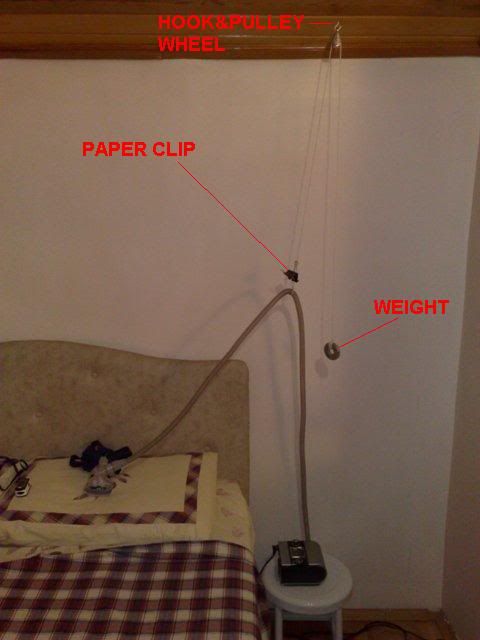
The hook is placed securely on the ceiling. The pulley wheel is hung onto it. The rope goes through the wheel as in any simple pulley system:
Image

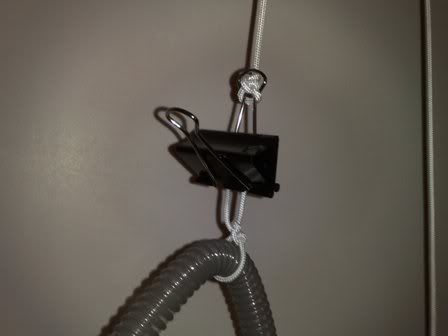
On one end of the rope, there is a strong paper clip. A small piece of rope is tied around the hose and secured. The paper clip holds the piece of rope, thus making the hose easily detachable whenever you want:
Image

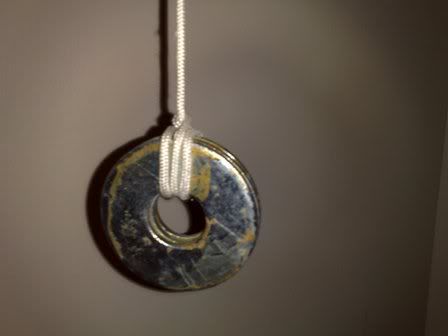
On the other end of the rope, some metal nuts are tied securely to balance the weight of your mask and hose (you can find the right amount of weight by trial and error, it’s no big deal):
Image

So it should look like this when done:
Image

Image

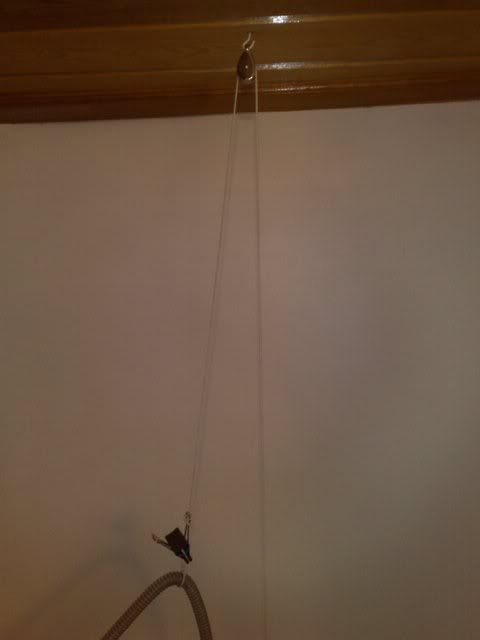
Now after some fine tuning, the link to your hose will be pulled with your mask and the weight will go up. When you return to your first position, the link will be retracted and the weight will go down. This way your hose will always be kept in the same position above your head, following your movement properly. You could always use some decorative things to cover the weight, the clip, etc. to make it look nicer, at least I’ll do so;)

_________________
Mask: Swift™ FX Nasal Pillow CPAP Mask with Headgear
Humidifier: S9™ Series H5i™ Heated Humidifier with Climate Control
Additional Comments: Contec CMS-50E Pulse Oximeter --- Pressure: 5-12 cm2
Last edited by resistance on Mon Jul 19, 2010 4:22 pm, edited 3 times in total.

User avatar
resistance
Posts: 65
Joined: Sat May 22, 2010 3:24 pm
Location: Ankara, TR

MY HOSE MANAGEMENT AND POWER SOURCE SYSTEMS

Post by resistance » Sun Jul 18, 2010 5:51 pm

UNINTERRUPTIBLE POWER SOURCE SYSTEM (For use with Resmed S9 WITHOUT Humidifier):

Things needed: A small, simple, cheap but good quality line interactive UPS device (1000 VA modified sine is ok), One Deep Cycle Sealed Non Spillable Battery, one automatic battery float charger and its charging cables with battery clamps, two 8 cm electric fans (like the fans in our computers), two pieces of 6 gauge isolated wire with insulated battery rings, a large plastic toolbox.

This also is a simple system, but since high voltage and a big battery is involved, it would be better to get some help from a technician for someone who does not have any experience in this area. I did so.

There are 3 main steps to get the system ready:
1- Extract the original internal battery of the UPS. 2- Add a large external rechargeable battery. 3- Connect the float charger and the UPS to the battery.

This is what the system looks like. On the left there is my float charger (6 A/H), plugged into the main power, and its output cables, feeding the battery in the plastic toolbox:
Image
Image

Now let’s see what’s inside the box. The black item on the left is the UPS device. Next to it, stands my 40 A/H sealed deep cycle battery. The output cables of the float charger comes into the box and are connected to the battery with those large clamps:
Image

This is how it's done:
First, the UPS casing is opened. The small, insufficient original battery in the UPS and its cables are extracted. To avoid overheating by the bigger battery, these original cables are replaced by the two pieces of 6 gauge isolated wire (with battery rings) and hard soldered. Polarization is important: Red replaces red, black replaces black!
Image
The UPS casing is drilled and these wires go through them out, sticking out the UPS. Then, the clamps are attached to the battery.
Image

Finally, the clamps of the float charger are attached to the battery (watch polarization!!). So there are two wires+rings +clamps on each battery pole: One from the UPS, the other from the float charger:
Image

Those big, ugly and insecure clamps in the picture belong to the float charger. I’ll replace them with the insulated rings ASAP, like the ones I used for the UPS:
Image
Finally, both the charger and the UPS is plugged into the mains and switched on. I insterted the two 8 cm electric fans into the UPS and the charger to help prevent overheating again. I also kept the whole system outside against any potential risk of fire, explosion, and gas leak (Better be safe than sorry). Bringing the power into my room using an extension:
Image

Well, that’s it! I used a 12V 40 A/H sealed lead acid rechargable battery just to have a heavy duty system and abundant power. So it can keep my PC/ desktop lamp or TV running for hours. I prefered a seperate automatic battery charger (6 A/H) instead of the UPS charging board. So the battery is fully charged in less than 7 hours and always kept at full level.

I could have just used an inverter, but I prefered a UPS. Because UPS devices have different additional functions. It keeps your machine safe against voltage surge, thunder, etc. It has a safety system that shuts the system down in case of overheating. It can be monitored via the PC and has extra power usage settings, etc.

The system is placed firmly in a plastic toolbox (with ventilation holes drilled on it). I just close the lid and I have a portable power source in a case.

I have been using the system for a month now. I even pushed it to the limits (500+ watts) for hours and everything worked fine. Heating normally occurs after a few hours under full load, but it’s ok. This is a low cost, heavy duty power source and working on it was fun:)

_________________
Mask: Swift™ FX Nasal Pillow CPAP Mask with Headgear
Humidifier: S9™ Series H5i™ Heated Humidifier with Climate Control
Additional Comments: Contec CMS-50E Pulse Oximeter --- Pressure: 5-12 cm2

User avatar
elena88
Posts: 1650
Joined: Sun Feb 28, 2010 2:25 pm
Location: california

Re: MY HOSE MANAGEMENT AND POWER SOURCE SYSTEMS

Post by elena88 » Sun Jul 18, 2010 9:40 pm

geez louise, you are quite the inventer!

thanks for sharing all of this, absolutely amazing!

good for you, that you have your own power source, and I love your little pully system for the hose..

I use a french ribbon attached to my four post bed, works great. If I didnt have the four poster, I would
certainly want what you have! HOpe you have some really good nights ahead with your new hose management system,
and peace of mine know ing you have a back up power source..

elena

_________________
Mask: Swift™ FX Nasal Pillow CPAP Mask with Headgear
Humidifier: S9™ Series H5i™ Heated Humidifier with Climate Control
Additional Comments: sleep study: slept 66 min in stage 2 AHI 43.3 had 86 spontaneous arousals I changed pressure from 11 to 4cm now no apap tummy sleeping solved apnea

DreamOn
Posts: 1920
Joined: Fri Oct 23, 2009 10:13 am

Re: MY HOSE MANAGEMENT AND POWER SOURCE SYSTEMS

Post by DreamOn » Mon Jul 19, 2010 1:15 am

Thanks for the great ideas, resistance! The photos were extremely helpful. I appreciate the time you took to share all that information!

User avatar
DreamStalker
Posts: 7509
Joined: Mon Aug 07, 2006 9:58 am
Location: Nowhere & Everywhere At Once

Re: MY HOSE MANAGEMENT AND POWER SOURCE SYSTEMS

Post by DreamStalker » Mon Jul 19, 2010 7:19 am

Nice job. I have everything needed but the spare toolbox. I'll have to keep an eye out for one on Craig's list.
President-pretender, J. Biden, said "the DNC has built the largest voter fraud organization in US history". Too bad they didn’t build the smartest voter fraud organization and got caught.

User avatar
resistance
Posts: 65
Joined: Sat May 22, 2010 3:24 pm
Location: Ankara, TR

Re: MY HOSE MANAGEMENT AND POWER SOURCE SYSTEMS

Post by resistance » Mon Jul 19, 2010 4:54 pm

Thank you for your comments:) I hope this might be of some help, especially for people who are looking for a way to provide back up power. There are not many affordable power solutions out there.

_________________
Mask: Swift™ FX Nasal Pillow CPAP Mask with Headgear
Humidifier: S9™ Series H5i™ Heated Humidifier with Climate Control
Additional Comments: Contec CMS-50E Pulse Oximeter --- Pressure: 5-12 cm2

User avatar
DreamStalker
Posts: 7509
Joined: Mon Aug 07, 2006 9:58 am
Location: Nowhere & Everywhere At Once

Re: MY HOSE MANAGEMENT AND POWER SOURCE SYSTEMS

Post by DreamStalker » Mon Jul 19, 2010 6:51 pm

One other question for clarification.

How are the fans powered?

and do they stay on at all times?
President-pretender, J. Biden, said "the DNC has built the largest voter fraud organization in US history". Too bad they didn’t build the smartest voter fraud organization and got caught.

User avatar
resistance
Posts: 65
Joined: Sat May 22, 2010 3:24 pm
Location: Ankara, TR

Re: MY HOSE MANAGEMENT AND POWER SOURCE SYSTEMS

Post by resistance » Tue Jul 20, 2010 3:21 pm

The fan wires need to be soldered to the poles on the charger boards, both in the UPS and the float charger, since there's no place for them to be plugged into. I too didn't know where to get the power from, so I got help from a technician. I did so, because the pole points are not shown on the board, so there's a considerable risk of melting the poles down and killing the circuit while soldering.

Please also note that all you need is a very simple and cheap fan, no need for something expensive. Actually you may not even need fans at all, if you will only use the UPS for the CPAP machine; but I personally checked the UPS heat under heavy load and saw that the system was really hot. Better be safe than sorry..

And yes, at the moment they stay on at all times. I'm planning to add heat sensors (cheap stuff) to the fan wires to only switch them on over a certain degree of heat.

_________________
Mask: Swift™ FX Nasal Pillow CPAP Mask with Headgear
Humidifier: S9™ Series H5i™ Heated Humidifier with Climate Control
Additional Comments: Contec CMS-50E Pulse Oximeter --- Pressure: 5-12 cm2