


Well, after trying about as many masks as you find at a Halloween party, I finally decided on the Swift, even as a side sleeper. My main complaint (and one I've seen here on the board) is the problem the hose presents, particularly to a side sleeper. Many of us have awakened to find that our "Elvis sideburns" have been joined by an indentation of the hose. Some route the hose downwards to avoid this issue, which creates its own set of problems...I personally like having the hose up and over my headboard so that it doesn't pull on the mask as I roll around.
I found a solution that works great for me. I'll try to explain it as best I can.
The Swift comes with a small Velcro strap that you can use, according to the directions, to secure the hose to one of the ascending straps on the headgear. I've found an alternate location for this strap.
1) Adjust the headgear until the fit is comfortable. This is important, as locating the strap where I'm recommending makes adjusting the top strap more difficult later.
2) Take the headgear off and locate the plastic adjustment buckle on the strap that goes over the TOP of your head.
3) Take the Velcro strap and, from the underside of the buckle, route both ends of the strap through the slits in the buckle so that both ends of the Velcro strap are sticking out of the top side of the buckle.
4) Connect your Swift's hose to your main tubing. Place the tubing on top of the buckle and secure with the Velcro strap. Make sure you route the tubing the correct direction...the Swift's tubing should be forward of the buckle.
You can decide for yourself what part of the tubing assembly is secured directly under the velcro strap. I find that it works best if you use the rubber connector of the larger tubing. Securing the tubing itself (either the Swift's or the main tubing) causes the tubing to slide through the connector.
5) Strap on and go!
You'll find that this arrangement keeps the Swift's tubing both forward and off to the side of your face, so that if you lay on your side it's completely out of the way. This arrangement also doesn't interfere with changing which side the Swift's tubing is connected to, which is great for people like me who frequently switch sides during the night. Lastly, securing the tubing to the top of your head in this way allows you to route the main tubing over your headboard or attached to the wall above, so it doesn't pull on your mask, and keeps you from rolling over onto it as happens when the Swift's tubing is routed downwards.
Tridens
Solution for Swift side sleepers
Solution for Swift side sleepers
Tridens
-
Janelle
I think this is pretty much the same way that R & R has his done and the way the woman in the photo of the Swift is wearing hers. I use a mini hose wrap on my Swift so it doesn't move anywhere once it is velcroed in.
I think the Swoosh marks are made by lying on your side and the pressure of the pillow pushing it against your cheek. The right kind of pillow can make a big difference too. If you lay with your cheek on the pillows edge the Swoosh marks are reduced and you can't feel an "improperly placed" hose either. Many people recommend using a TemperPedic pillow as it absorbs the mask and headgear better so there is little to no pressure. Imitations may vary depending on their density being close or nowhere near that of TemperPedic. The beadfilled pillow also offer some relief. I have one I found at Walmart that is star shaped that can work kind of like a PapPillow.
I think the Swoosh marks are made by lying on your side and the pressure of the pillow pushing it against your cheek. The right kind of pillow can make a big difference too. If you lay with your cheek on the pillows edge the Swoosh marks are reduced and you can't feel an "improperly placed" hose either. Many people recommend using a TemperPedic pillow as it absorbs the mask and headgear better so there is little to no pressure. Imitations may vary depending on their density being close or nowhere near that of TemperPedic. The beadfilled pillow also offer some relief. I have one I found at Walmart that is star shaped that can work kind of like a PapPillow.

I think this is a SLIGHT variation on the hose placement than anyone has suggested before, and as minimalist as the Swift is, a tiny difference can make a BIG difference.
I can't wait to try out this lash down point to see if its any better than hanging over the edge of a pap-pillow. And yes I know thats a sad statement that something like this gets me excited. Life used to be a lot more thrilling that that, it seems.
I can't wait to try out this lash down point to see if its any better than hanging over the edge of a pap-pillow. And yes I know thats a sad statement that something like this gets me excited. Life used to be a lot more thrilling that that, it seems.
Remember:
What you read above is only one data point based on one person's opinion.
I am not a doctor, nor do I even play one on TV.
Your mileage may vary.
Follow ANY advice or opinions at your own risk.
Not everything you read is true.
What you read above is only one data point based on one person's opinion.
I am not a doctor, nor do I even play one on TV.
Your mileage may vary.
Follow ANY advice or opinions at your own risk.
Not everything you read is true.
-
Sleepless on LI
- Posts: 3997
- Joined: Mon May 30, 2005 6:46 pm
- Location: Long Island, New York
Tridens,
Deleted my reply to you because at first, I didn't get what you were saying. Then I went downstairs and looked at my mask and did what you suggested. I have to say, this is new and I am going to give it a shot tonight. It seems to really curve the hose out of the line of your cheek, and putting the velcro piece over the rubber part of the hose, although it's a really tight fit, seems like it will keep it from moving. Yet another new reason to keep me up tonight, something else to try...I just long for the day I find the right configuration, and the perfect pillow position, and the perfect mask, etc., and can just sleep every night in harmony. I'm in dreamland right now if I just said that, aren't I?
Thanks for the suggestion. I'm on board to try it tonight.
L o R i

Janelle,
If you're referring to the picture that is on the cpap.com sales page for the Swift, what I'm talking about is a big improvement, as strange as that may sound. Routing it in the way I'm suggesting basically loops the tube in front of you and off to one side in such a way that it's impossible to end up lying on the hose. This is because the velcro strap is oriented in such a way as to force the hose to out and away from your head (picture the direction the temple piece of a pair of glasses points...this is the direction the hose starts off at the top of your head).
As far as R & R's way of doing it, I'm not sure, as I haven't seen his.
Thanks for the pillow advice. I might head to Wal-mart. I'm really holding out for Tempurpedic, but I want to buy it at a Brookstone, as they're the only ones I've found that will actually take a return on it (just in case it doesn't work for me or I have the wrong size).
Lori,
I'd be happy to provide some pictures. But (and this is funny coming from a former network administrator and programmer: I'd need some help in knowing how to post the picture. It's just not something I've ever done. I can e-mail the picture(s) to someone, or someone can explain to me how to do it. I see the "Img" button when typing a post, but I'm not sure how to get my pictures stored/uploaded to a particular URL to enter. If someone can direct me to a cheap (or even better, free) hosting site for images, I'm sure I can figure it out. I don't think my ISP provides this service.
I'm securing it to only one buckle the one on the top of your head, not the one toward the back of your neck. The buckle has two slits in it (the same slits in which the headgear is routed that gives you the ability to tighten or loosen the straps). From the underside of the buckle, I just pushed an end of the velcro strap into the slit (right along side of the headgear strap). It's a little snug, which is why you want to properly adjust your headgear first, but it will fit). Then do the same thing with the other end of the velcro strap and the other slit in the same buckle. When you're done, you should have both ends of the velcro strap protruding out the top side of the buckle. Place the hose between these to ends and connect the ends to secure the hose. You'll end up with plenty of hose that naturally forms the C, which is the beauty of this...it does it itself. While you can adjust the C a little by twisting the Swift hose where it enters the cylinder, I found little need to. It's basically "Plug n Play." The rotating connector on the end of the Swift's hose protrudes nicely from the velcro enclosure, making it easy to switch connection points on the cylinder without having to twist or play with the hose (especially if you secure the Velcro directly over the rubber end of the main tubing as I recommend).
Let me know if this helps or not. I can have pictures available pretty quickly if someone can help me with the posting part.
Tridens
If you're referring to the picture that is on the cpap.com sales page for the Swift, what I'm talking about is a big improvement, as strange as that may sound. Routing it in the way I'm suggesting basically loops the tube in front of you and off to one side in such a way that it's impossible to end up lying on the hose. This is because the velcro strap is oriented in such a way as to force the hose to out and away from your head (picture the direction the temple piece of a pair of glasses points...this is the direction the hose starts off at the top of your head).
As far as R & R's way of doing it, I'm not sure, as I haven't seen his.
Thanks for the pillow advice. I might head to Wal-mart. I'm really holding out for Tempurpedic, but I want to buy it at a Brookstone, as they're the only ones I've found that will actually take a return on it (just in case it doesn't work for me or I have the wrong size).
Lori,
I'd be happy to provide some pictures. But (and this is funny coming from a former network administrator and programmer: I'd need some help in knowing how to post the picture. It's just not something I've ever done. I can e-mail the picture(s) to someone, or someone can explain to me how to do it. I see the "Img" button when typing a post, but I'm not sure how to get my pictures stored/uploaded to a particular URL to enter. If someone can direct me to a cheap (or even better, free) hosting site for images, I'm sure I can figure it out. I don't think my ISP provides this service.
Until we get the picture thing figured out, I'll try to re-explain...I know it's hard to visualize this kind of thing, but I'll try again...I had put the velcro next to the top buckle on the headgear, but not under or between the two. Are you just securing it between the two top buckles on the top part of the headgear? If so, how are you routing the tubing so that you don't lay on it? Doesn't seem like there would be enough tubing left to put it in a C to make it not touch your cheek.
I'm securing it to only one buckle the one on the top of your head, not the one toward the back of your neck. The buckle has two slits in it (the same slits in which the headgear is routed that gives you the ability to tighten or loosen the straps). From the underside of the buckle, I just pushed an end of the velcro strap into the slit (right along side of the headgear strap). It's a little snug, which is why you want to properly adjust your headgear first, but it will fit). Then do the same thing with the other end of the velcro strap and the other slit in the same buckle. When you're done, you should have both ends of the velcro strap protruding out the top side of the buckle. Place the hose between these to ends and connect the ends to secure the hose. You'll end up with plenty of hose that naturally forms the C, which is the beauty of this...it does it itself. While you can adjust the C a little by twisting the Swift hose where it enters the cylinder, I found little need to. It's basically "Plug n Play." The rotating connector on the end of the Swift's hose protrudes nicely from the velcro enclosure, making it easy to switch connection points on the cylinder without having to twist or play with the hose (especially if you secure the Velcro directly over the rubber end of the main tubing as I recommend).
Let me know if this helps or not. I can have pictures available pretty quickly if someone can help me with the posting part.
Tridens
Tridens
-
Sleepless on LI
- Posts: 3997
- Joined: Mon May 30, 2005 6:46 pm
- Location: Long Island, New York
Tridens,
Our posts must have crossed. I totally understand it now. And I think you're really onto something here. Going to try it tonight.
If you want to post a photo, you have to first upload it to a site like http://www.photobucket.com, which is what I use because it's so easy, or any other site that will give it a URL address. Then copy down the URL and paste it in the text of your post, or highlight the photo and right click, click on properties and then copy the photo's address. After you paste that in the text box of your post, then highlight it and press Img and you will get the photo in the text, not a link to the URl.
I feel so good to be able to give you advice. I hope nobody beats me to it. Finally I can help YOU with something, not that it's a biggie or anything, but... .
L o R i
-
Newsgrouper
- Posts: 244
- Joined: Sun Mar 27, 2005 11:39 pm
- Location: Southern Nevada
Tridens:
I'm sure someone here can help you post some pictures. I really want to set up my Swift as you describe but am having difficulty doing this. A picture would help.
I'm sure someone here can help you post some pictures. I really want to set up my Swift as you describe but am having difficulty doing this. A picture would help.
_________________
| Mask: Mirage Quattro™ Full Face CPAP Mask with Headgear |
| Humidifier: S9™ Series H5i™ Heated Humidifier with Climate Control |
-
Sleepless on LI
- Posts: 3997
- Joined: Mon May 30, 2005 6:46 pm
- Location: Long Island, New York
Newsgrouper,
Let me try. On the top buckle of the headgear, take the velcro holder that you would use for the tube to place it in the up position that holds it to the strap. With that one top buckle in mind, from the underside of the buckle, pulling the straps running through both sides to each side at a time away from the center so as to free up some room, slip one end of the little holder (without the velcro piece on it now) from the underside of the buckle, up through it and do the same on the other side of the buckle with the other piece of the little tube holder. Actually what you are doing is, if you're looking at the underside of that top buckle, you're holding the little tube holder piece in a U so that the two ends of it slip into each side of the inner parts of the top buckle, alongside the straps that are already in it for the adjusted top piece/strap for the headgear. Once you've done that, you have the ends of the little tube holder sticking through each center part of the top buckle.
Then take the hose, preferably the rubber piece from the machine hose as opposed to the tube hose from the Swift, and place it so that the piece you just ran through the buckles holds it in place by putting the actual velcro piece across it. If you now attach your swift tube to that piece that you just locked into place with the tube holder that is facing directly forward, like in line with the direction your nose points in, that will force the Swift's tube to project away from your face. If you curve the connector at the barrel where the tube goes into it away from you, you cannot possibly lay on it if you lay on your side.
I will try to go take a photo of mine if my husband's camera is around. Then you'll see what I tried to explain just now. It's a great idea.
L o R i
-
Sleepless on LI
- Posts: 3997
- Joined: Mon May 30, 2005 6:46 pm
- Location: Long Island, New York

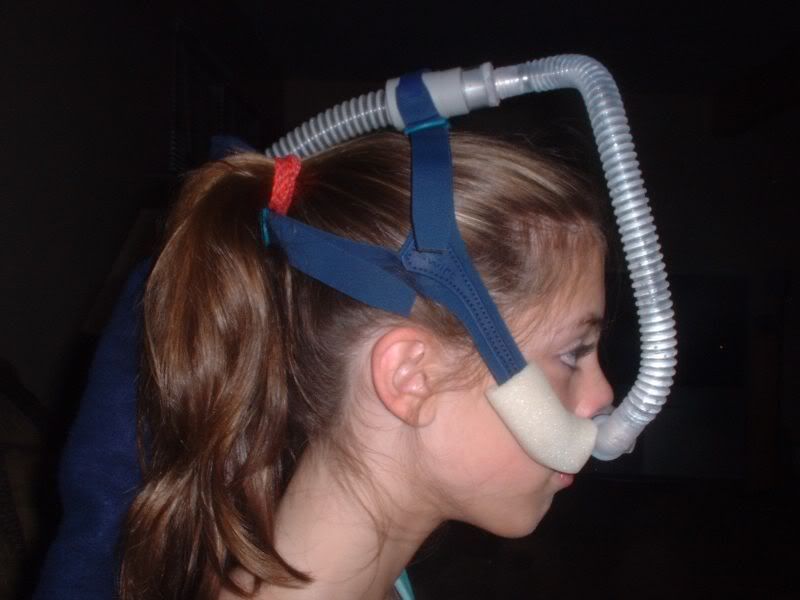
Photo of top strap with hose in place, looking from above.

Underneath shot of positioner/velco piece coming up from under the buckle on the top of top strap.

Looking head on at the hose as it comes from the new connector on top of head (excuse the crazy glue "fix")
Hope these helped. If you need other shots, let me know.
L o R i
Lori,
You've got it! Thanks for the pictures, and thanks for the photo help! I'll have to try it sometime.
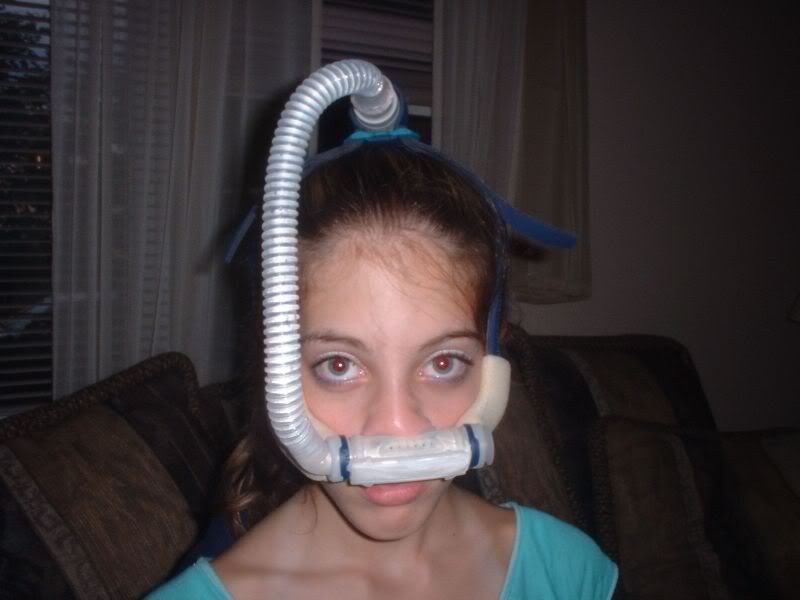
Re: more pictures, it might help to take one or two (front and profile) of someone wearing it with it rigged this way. Anyone in your household who wants to be a famous model?
You've got it! Thanks for the pictures, and thanks for the photo help! I'll have to try it sometime.
Re: more pictures, it might help to take one or two (front and profile) of someone wearing it with it rigged this way. Anyone in your household who wants to be a famous model?
Last edited by Tridens on Mon Aug 22, 2005 4:41 pm, edited 1 time in total.
Tridens
-
Sleepless on LI
- Posts: 3997
- Joined: Mon May 30, 2005 6:46 pm
- Location: Long Island, New York
Tridens..............SWIFT adjustment works perfectly!!!!
Tridens:
YOUR idea works PERFECTLY!!!! The swift has been the best interface i have ever found to date. Have never had any problems with it as Lori and a few others have had with the marks etc, i just never slept on the right side because it blew on my wife etc. so i placed it there on the right. But now with your GREAT idea i can lay almost on my right side - no tube in the way and the air vents mostly downward, not bothering my wife, i think - I will test that tonight!!! The only (miner) problem i had was the hose hanging over the back of my head - every time i moved or lifted my head up the two connectors got caught on my pillow etc, BUT NO MORE!
Well it looks like YOU came up with a simple BUT great idea to make the SWIFT even better!! i just adjusted my mask the way you said to, and IT WORKS GREAT!!! So much BETTER!!! Thanks for the great POST!! I know it will work GREAT tonight!!!
Greatly appreciated!!
my best to you,
steve,
ufo13
_________________
| Mask: AirFit™ P10 Nasal Pillow CPAP Mask with Headgear |
| Additional Comments: Also use ResMed N30 and ResMed P30i |
-
Sleepless on LI
- Posts: 3997
- Joined: Mon May 30, 2005 6:46 pm
- Location: Long Island, New York


Lori,
Not only does this hold the hose out of the way, I've finally tried the toe cushions.
viewtopic.php?t=4086&highlight=toe+cushions
Now and NO swoosh marks in the morning. Thank you for your great suggestions and research to help so many!!!!!!!!!!!!!!
Not only does this hold the hose out of the way, I've finally tried the toe cushions.
When I ran to CVS last night to address what everyone is suggesting might be mouth leaks with my leakage report number being higher than it should be, I bought these foam "toe bandages," I believe they're called. They are tubular, three in a pack. I think the two smallest ones may be slightly different in size, but just an iota. They are tubular with no opening and are made of thin foam that you are supposed to cut to size to put on your toe as a bandage so it doesn't get hurt by any of the toes on either side.
Well, I took the straps off the "barrel" last night and slipped one of these babies over the bottom of the straps and slid it up to where it almost reaches to top of the side strap. This morning, I awoke with NOTHING but right above where the bandage stopped. It was barely noticeable. But the "C" mark/swoosh lines were not there at all!!!! I was amazed it worked.
viewtopic.php?t=4086&highlight=toe+cushions
Now and NO swoosh marks in the morning. Thank you for your great suggestions and research to help so many!!!!!!!!!!!!!!