You will need:
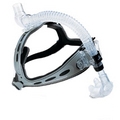
The ComfortLife 2 mask assembly without the headgear. I removed the mask from the headgear by undoing the Velcro crown swivel connector and unsnapping the angular adjustment base.
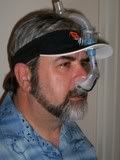
A “one-size-fits-all” baseball cap with an elastic band or a Velcro adjustment strap, (so nothing impacts your head while lying on your back. BTW my wife thinks a Donald Duck hat is the most appropriate.) If you think a hat will be too warm you can use a cloth visor (with a stiff brim and an elastic or Velcro headband) as well.
A Velcro strap (hooks on one side, loops on the other) 6” long and 5/8” wide.
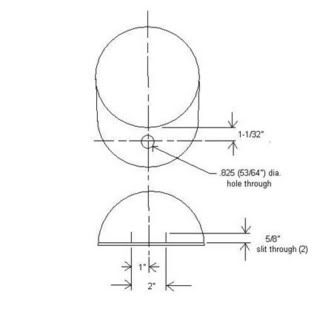
First do the sacrilegious and flatten the cap’s brim (yes it makes it look nerdy, but we are not nerds, we are hoseheads!). Make a .825” (53/64”) diameter hole in the brim, centered in the middle and 11/16” from the front of the cap (where the brim meets the cap) to the hole’s rear edge, or 1-1/32” to the center of the hole. I would suggest using a ¾” drill bit, and then take a slightly larger cylindrical object and force it through the hole (hey big guy, easy, this is a family forum!) to gradually widen the hole. You want it wide enough to force the vertical tube adjustment cylinder through the hole, but only with great difficulty. Now make two short 5/8” vertical slits in the front of the cap, one inch on either side of center, starting at the back edge of the bill and upward. You should be over the hat’s inner band, but do not cut through it.
Take the mask assembly without a mask attached and from above the cap push the downtube and the vertical tube adjustment cylinder through the hole in the brim. Again, this should be difficult so the vertical tube adjustment cylinder will prevent the tube from coming back up through the hole. Seat the top of the brim against the bottom of the angular adjustment base. Now lean the mask forward and lay the Velcro strap across the back of the angular adjustment base and thread each end forward through the vertical slots on either side of the base. End up with equal lengths of the strap ends protruding forward. Now lean the mask back against the cap and thread the ends of the strap back around the outside of the angular adjustment base and through the vertical slots you previously made in the hat. Pull them inside of the cap (as tight as you can, making the angular adjustment base flush against the hat, as this will allow for the most angular adjustment) and hook them together under the hats inside band.
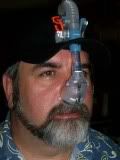
I would leave the flex tube and crown swivel connector free from the hat, as this will minimize the effects the hose can have on the mask assembly when you are moving around. All of the adjustments still work, with the vertical tube adjustment below the bill, and the angular adjustment above it (although that one will now require two hands, one to stabilize the base). Put on the hat and tighten the rear hat strap as much as is comfortable. Attach the chosen interface (nasal pillows, direct seal or simple mask) and adjust as usual. For side sleepers you can sharply bend the outside edges of the brim downward so they are inside of the line of your cheekbones (and thus restoring the “cool” factor). The end result is that the stabilization provided by the original forehead platform, and the resulting pressure, is now distributed throughout the hat. In essence it is a headband with a stabilizing platform for the downtube assembly.
I find it to be comfortable, flexible and stable enough to maintain the seal. Let me know how it works for you or if you have any questions.
Denny
_________________
CPAPopedia Keywords Contained In This Post (Click For Definition): hose, oracle, seal